My plowblade construction for FEL

   / My plowblade construction for FEL #1  

Larry_Van_Horn

Gold Member
Joined
Jul 15, 2003
Messages
271
Location
Honeoye Falls, NY
Tractor
Case 580D Backhoe, NH TC40D SS, JD 450BC dozer, Ford F700 dump
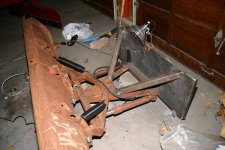
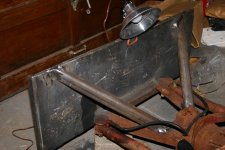
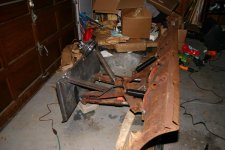
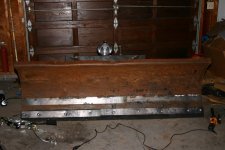
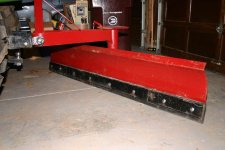
I thought I would post some pictures of my front blade configuration. This is not quite done but shows my efforts over the holiday.

Heavily used and rusted 7' pickup truck blade, A frame and cylinders - $100
Quick-tach mounting plate - $95
2 springs - $18
2 plow skid shoes $32
Total cost so far $245

I haven't got the skid shoes on yet so my rubber horse stall mat (only 1/2" w/ 2" protruding is bending a bit under the weight. Might not be heavy enough).
Larry
 

Attachments

  • 344191-picture0412s.JPG
    344191-picture0412s.JPG
    88.2 KB · Views: 664
   / My plowblade construction for FEL
  • Thread Starter
#2  
ANother
 

Attachments

  • 344194-picture0409s.JPG
    344194-picture0409s.JPG
    93.6 KB · Views: 410
   / My plowblade construction for FEL
  • Thread Starter
#3  
Another 2
 

Attachments

  • 344196-picture0408s.JPG
    344196-picture0408s.JPG
    93 KB · Views: 405
   / My plowblade construction for FEL
  • Thread Starter
#4  
View of front, some covering of rusted sections by my dad (first time welding) good opportunity to do something non structural!
 

Attachments

  • 344198-picture0407s.JPG
    344198-picture0407s.JPG
    86.5 KB · Views: 439
   / My plowblade construction for FEL #5  
That ought to work. Nice pile of combustables next to your welding area there. /forums/images/graemlins/tongue.gif
 
   / My plowblade construction for FEL
  • Thread Starter
#6  
Here is a picture of my rear 7' slider blade (cost $180) that I have stripped with horse mat. I intend to slide this out to the side and angle for my wing just like the big town plows have to push the snow back.
Lar /forums/images/graemlins/wink.gif
 

Attachments

  • 344200-picture0414s.JPG
    344200-picture0414s.JPG
    92.9 KB · Views: 438
   / My plowblade construction for FEL
  • Thread Starter
#7  
Yeah, figured someone would pick up on that /forums/images/graemlins/blush.gif, weld outside and then bring it in at night. Just moved in 3 weeks ago and too many of those piles to navigate at the moment.
Lar
 
   / My plowblade construction for FEL #8  
Good Job Larry.

Enjoy your Quality time with your POP. I am sure he is.

Tom
 
   / My plowblade construction for FEL #9  
Larry.... that is a great looking job that you are doing and you have every right to be proud of it. After reading about your going to the back 40 to get a picture of the chips in another post, I know that you have a good sense of humor, so I feel it safe to make one small correction to your design. In the first picture you show the plow springs set off at an angle. I would suggest that they be mounted in a vertical plane to the plow frame. This will give you a more even trip mechanism and is the way that most plow set ups are done. I have only seen one brand that used an off set spring set up and that was because the manufacturer used weaker springs. After one season the plows would usually flop over with the slightest amount of pressure. We would change the mountings and install new springs and the customers were always happy with the modification and had no more problems. When we did the modifications we would use closed loop eye bolts and nuts so the customers could adjust the tension of the trip mechanism to their particular conditions of plowing. Your plow, your design, my observation. Hope that you take this suggestion in the good spirit that it is intended. Good luck with the rest of the project and don't forget to show us the pictures of the finished job.
 
   / My plowblade construction for FEL
  • Thread Starter
#10  
Junkman,
Appreciate any and all suggestions /forums/images/graemlins/smile.gif, I don't have those springs mounted yet, they are just lying there. My intention was to use the existing mounting points with eye bolts as you suggested. They are off at an angle however. I was thinking that this would be particularly bad when you angle the blade. I was thinking about changing the location of the mount points but hadn't gotten to that point yet. Long story short, I am interested in your suggestion, but don't quite understand. Do I understand you to say that I should get the springs mounted as vertically as possible behind the blade and minimize the amount of horizontal travel?
Thanks for your help.
Larry


Tractor & Equipment Auctions

Komatsu PC138 (A50490)
2022 JOHN DEERE 332G (A50854)
2022 JOHN DEERE...
Roose Hog Cart (A50515)
Roose Hog Cart...
2016 Sooner STC 9042 LQ Tri-Axle Horse Trailer (A49461)
2016 Sooner STC...
John Deere 1110 Field Cultivator - Heavy-Duty Soil Finisher for Precision Tillage (A51039)
John Deere 1110...
2017 BIG TEX 16 T/A UTILITY TRAILER (A50854)
2017 BIG TEX 16...
 
Top