Raspy
Veteran Member
- Joined
- Dec 16, 2006
- Messages
- 1,656
- Location
- Smith Valley, Nevada
- Tractor
- NH TC29DA, F250 Tremor, Jeep Rubicon
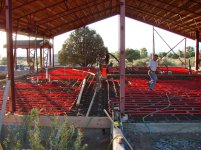
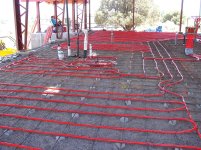
Use the 1/2" tubing (ID measurement) and lay it out on 9"to 12" on center. Keep the loop lengths to 300' max and close to each other in length. More loops of a shorter length is better. Lay out the loops to heat the various areas, in other words, bedroom loop, kitchen loop, bathroom loop, etc. Route the supply and return ends of the bedroom loops down the hall or through some common area, if needed. Don't worry about closer spacing in the hall or around the front door, they can be right next to each other, if needed, as they proceed to the bedroom or other area. You can run the whole thing on one thermostat or as many as you have loops.
It usually takes about 1 1/2' of tubing per square foot of floor with 12" spacing. More for 9" spacing. Get plenty of tube. I don't recommend splicing it in the slab, if you can help it, but I do if it gets kinked or cut.
Put a double pass or closer spacing near the exterior door and. Put the tubes at closer spacing in the bathroom, probably at 6" if the rest is at 12" or just make it a double pass with the tubes next to each other.
DON'T kink it and make it sweep a return bend no closer that about 9".
Tie the tubing with rebar ties directly to the structural rebar in the slab. Slip the tubing through 3/4" PVC conduit 90s where it exits/enters the slab.
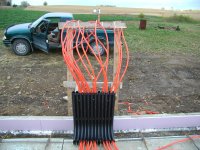
Set up a manifold with balancing valves on each loop. Set the manifold where the tubing can run conveniently to the heated area and where you can feed it from your boiler or hot water heater. The top of the manifold should be about 30" from the finished floor.
Be careful not to send scalding hot water to the tubing. 120 degrees is plenty and 90 will actually work gradually. So don't send the tubing water directly to the solar panels.
Have fun and "experience" the heat as you lay it out. More in the baths, less in the closet, more at the door, little or none in the pantry. Under the shower only if you can put in in the structural slab first. Closets are optional. Stay away 10" from the center of the toilet pipe. Lay the tube to pass through doors instead of under walls and plan ahead on where you might be drilling in door stops, closet door guides. Mark the plans carefully anywhere the tube passes under wall. Go through all doors in the same way so you can drill in thresholds later and know where the tube is.
Take LOTS of pictures or a video. Show reference points to measure from in the pictures.
Here is a picture of my place using 3/4" tube
It usually takes about 1 1/2' of tubing per square foot of floor with 12" spacing. More for 9" spacing. Get plenty of tube. I don't recommend splicing it in the slab, if you can help it, but I do if it gets kinked or cut.
Put a double pass or closer spacing near the exterior door and. Put the tubes at closer spacing in the bathroom, probably at 6" if the rest is at 12" or just make it a double pass with the tubes next to each other.
DON'T kink it and make it sweep a return bend no closer that about 9".
Tie the tubing with rebar ties directly to the structural rebar in the slab. Slip the tubing through 3/4" PVC conduit 90s where it exits/enters the slab.
Set up a manifold with balancing valves on each loop. Set the manifold where the tubing can run conveniently to the heated area and where you can feed it from your boiler or hot water heater. The top of the manifold should be about 30" from the finished floor.
Be careful not to send scalding hot water to the tubing. 120 degrees is plenty and 90 will actually work gradually. So don't send the tubing water directly to the solar panels.
Have fun and "experience" the heat as you lay it out. More in the baths, less in the closet, more at the door, little or none in the pantry. Under the shower only if you can put in in the structural slab first. Closets are optional. Stay away 10" from the center of the toilet pipe. Lay the tube to pass through doors instead of under walls and plan ahead on where you might be drilling in door stops, closet door guides. Mark the plans carefully anywhere the tube passes under wall. Go through all doors in the same way so you can drill in thresholds later and know where the tube is.
Take LOTS of pictures or a video. Show reference points to measure from in the pictures.
Here is a picture of my place using 3/4" tube