ampsucker
Platinum Member
Like a lot of others, we have had waaayy above average rainfall this year. The result is water coming in my mom's house in the half underground lower level everytime it rains several inches. I started tackling this job this week on Thursday night and have made pretty good progress. I have a couple of comments on the BX performance and a few questions I hope to get some help with from the folks on this forum. I'll post up more pics as it goes along.
First, I didn't really know what we would find once I started digging. We new the water was coming in from several different places. We had found some cracks in the cement wall on the inside during remodeling of one room and patching from the inside didn't solve the problem. My plan was to dig down from the outside and depending on what we found, most likely install some external drainage pipes and do some waterproofing.
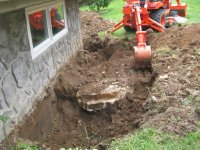
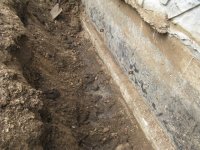
Once we got down to the bottom of the foundation, we found it originally had a drain pipe installed that seemed to have stopped working. The odd thing is none of us could ever remember seeing where the drain pipe came out. Keep in mind our familiy has lived here since 1980 and the house was built in the late 60s. So, this PVC perf pipe has been in there over 38 years and probably the end (or ends) of it was covered up long ago during landscaping or by grass and silt covering it up. Why it took so long to start leaking into the house is anybody's guess. It might have just been the extra wet weather we've been having the last few years.
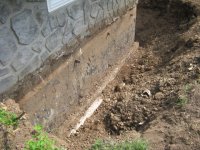
I also found the outside of the wall had been painted with black asphalt roofing material. From research, I found the pros call this "damp proofing" as opposed to actual waterproofing. Usually, damp proofing is done to save a few bucks during construction. The life expectancy of the asphalt material is about 20 or so years, so all things considered, we did pretty good to make it through with a dry house as long as we did.
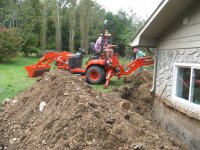
I did all the digging with the BX in about 10 hours. It took a little while to get the hang of it. The white windows you see in the photos are new and I was kinda worried I would nick one if the hoe got away from me, but so far, so good! I had done some smaller projects before, but this was definitely the real test of my hoeing skills. I had to stop once and tighten up the linkage under the controls and lube them up because they were squeeking.
Overall, I ended up digging about a four foot deep by 3 foot wide trench that extends about 55 linear feet around three walls of the house.
Here are some observations from doing the work:
- the BX is "capable" if digging down to 6 feet. this isn't a practical depth however because you would have to move the tractor ever linear foot or so to keep your depth and to keep the spoils pile from growing too high. it also takes longer to dig because you are waiting for the hoe arms to move from a close in curled position down in the hole to a fully opened extended position all the way up at the top of the pile.
- the hoe definitely has more lifting power than the front loader, but this rapidly goes away when the stabilizing feet are raised. i has able to lift the whole front of the tractor and loader when digging out the large rock in the pictures. once i got it loose, i could have lifted it and pulled it out by driving forward if i had more weight in the front bucket. i ended up just strapping it to the front of the tractor and pulling it out backwards. i hit the HST pressure release several times, but once it was out, it was easy to push it around the yard with the loader.
- you can pick up large rocks and move them to the top of the spoils pile with the hoe bucket where they promptly roll down and crash into the stabilizer hydraulics. this happened several times. i think pitting of the hydraulic ram probably is not a good thing, so it would be nice to avoid this if possible.
- it gets pretty warm in the backhoe seat due to the hydrostat cooling fan blowing over the hot hydraulics and the warm air coming out the back of the tractor and up around the operator. never noticed this before when performing other operations like mowing, moving dirt, etc. think i'm bring the ol' DC cigarette lighter fan next time around!
- there is some strategy involved in where to dig first. it's easy to dig a hole where you need to place the tractor later to reach the spots you need to reach.
I'm at the point in the project where the digging is done. I have power washed and cleaned and etched the foundation. Tomorrow I'm painting it with rubberized asphalt coating. I'll cover that with 6 mil black poly plastic and then cover that with 1.5" blue EPS foam for insulation and to protect the plastic from damage by the backfill. I'll flash the top of the foam so water will shed away from the wall.
Down in the bottom of the trench I'll install 4" perf pipe all along the base of the foundation. The perf pipe will have several cleanouts and will gravity drain about 80 feet away to a ditch in the driveway. I'll wrap the perf pipe with landscaping fabric to keep it from silting up and if it does get clogged, I'll have the cleanouts to blast water down through it. Then, I'll backfill against the blue EPS with the original material minus the large rocks I'll remove by hand. It was pretty much sandy gravel with very little clay, so it should drain down to the pipe pretty well.
Finally, I'll be installing downspout extenders to get the roof rain at least 10 feet out into the lawn and make sure the grade drains away from the foundations. I may have to do a little tilling to shave off a few inches and get a good flow away from the house. I'll treat the top 12 inchs of backfill for termites and then build a flower bed all around the perimeter with a white rock mulch to keep mud from splashing up on the windows and decorative wall rock.
That's pretty much the project. It's a big one. I think I have at least 3-4 more days to finish up if the weather holds.
If you've read this far, here's my question:
The original perf pipe was installed with the holes pointing downward. Is this correct? I am planning to have the black plastic go under the new pipe, so I'm thinking I'll be ok with the holes pointing up since they will be covered with landscaping fabric. The holes on the top of the pipe will still be several inches below the floor level of the slab, so the water shouldn't be able to build up anywhere near the seam where the walls join the floor.
I would appreciate any advice or thoughts on how to make this a successful project for my mom. I've already learned a lot.
The best part? Besides all the practice and seat time, all that digging used only a half tank of fuel. That's 10 hours of run time on about 3 gallons. I ran the engine around 2400 rpm during all the digging.
Thanks in advance and enjoy the pics!
amp
First, I didn't really know what we would find once I started digging. We new the water was coming in from several different places. We had found some cracks in the cement wall on the inside during remodeling of one room and patching from the inside didn't solve the problem. My plan was to dig down from the outside and depending on what we found, most likely install some external drainage pipes and do some waterproofing.
Once we got down to the bottom of the foundation, we found it originally had a drain pipe installed that seemed to have stopped working. The odd thing is none of us could ever remember seeing where the drain pipe came out. Keep in mind our familiy has lived here since 1980 and the house was built in the late 60s. So, this PVC perf pipe has been in there over 38 years and probably the end (or ends) of it was covered up long ago during landscaping or by grass and silt covering it up. Why it took so long to start leaking into the house is anybody's guess. It might have just been the extra wet weather we've been having the last few years.
I also found the outside of the wall had been painted with black asphalt roofing material. From research, I found the pros call this "damp proofing" as opposed to actual waterproofing. Usually, damp proofing is done to save a few bucks during construction. The life expectancy of the asphalt material is about 20 or so years, so all things considered, we did pretty good to make it through with a dry house as long as we did.
I did all the digging with the BX in about 10 hours. It took a little while to get the hang of it. The white windows you see in the photos are new and I was kinda worried I would nick one if the hoe got away from me, but so far, so good! I had done some smaller projects before, but this was definitely the real test of my hoeing skills. I had to stop once and tighten up the linkage under the controls and lube them up because they were squeeking.
Overall, I ended up digging about a four foot deep by 3 foot wide trench that extends about 55 linear feet around three walls of the house.
Here are some observations from doing the work:
- the BX is "capable" if digging down to 6 feet. this isn't a practical depth however because you would have to move the tractor ever linear foot or so to keep your depth and to keep the spoils pile from growing too high. it also takes longer to dig because you are waiting for the hoe arms to move from a close in curled position down in the hole to a fully opened extended position all the way up at the top of the pile.
- the hoe definitely has more lifting power than the front loader, but this rapidly goes away when the stabilizing feet are raised. i has able to lift the whole front of the tractor and loader when digging out the large rock in the pictures. once i got it loose, i could have lifted it and pulled it out by driving forward if i had more weight in the front bucket. i ended up just strapping it to the front of the tractor and pulling it out backwards. i hit the HST pressure release several times, but once it was out, it was easy to push it around the yard with the loader.
- you can pick up large rocks and move them to the top of the spoils pile with the hoe bucket where they promptly roll down and crash into the stabilizer hydraulics. this happened several times. i think pitting of the hydraulic ram probably is not a good thing, so it would be nice to avoid this if possible.
- it gets pretty warm in the backhoe seat due to the hydrostat cooling fan blowing over the hot hydraulics and the warm air coming out the back of the tractor and up around the operator. never noticed this before when performing other operations like mowing, moving dirt, etc. think i'm bring the ol' DC cigarette lighter fan next time around!
- there is some strategy involved in where to dig first. it's easy to dig a hole where you need to place the tractor later to reach the spots you need to reach.
I'm at the point in the project where the digging is done. I have power washed and cleaned and etched the foundation. Tomorrow I'm painting it with rubberized asphalt coating. I'll cover that with 6 mil black poly plastic and then cover that with 1.5" blue EPS foam for insulation and to protect the plastic from damage by the backfill. I'll flash the top of the foam so water will shed away from the wall.
Down in the bottom of the trench I'll install 4" perf pipe all along the base of the foundation. The perf pipe will have several cleanouts and will gravity drain about 80 feet away to a ditch in the driveway. I'll wrap the perf pipe with landscaping fabric to keep it from silting up and if it does get clogged, I'll have the cleanouts to blast water down through it. Then, I'll backfill against the blue EPS with the original material minus the large rocks I'll remove by hand. It was pretty much sandy gravel with very little clay, so it should drain down to the pipe pretty well.
Finally, I'll be installing downspout extenders to get the roof rain at least 10 feet out into the lawn and make sure the grade drains away from the foundations. I may have to do a little tilling to shave off a few inches and get a good flow away from the house. I'll treat the top 12 inchs of backfill for termites and then build a flower bed all around the perimeter with a white rock mulch to keep mud from splashing up on the windows and decorative wall rock.
That's pretty much the project. It's a big one. I think I have at least 3-4 more days to finish up if the weather holds.
If you've read this far, here's my question:
The original perf pipe was installed with the holes pointing downward. Is this correct? I am planning to have the black plastic go under the new pipe, so I'm thinking I'll be ok with the holes pointing up since they will be covered with landscaping fabric. The holes on the top of the pipe will still be several inches below the floor level of the slab, so the water shouldn't be able to build up anywhere near the seam where the walls join the floor.
I would appreciate any advice or thoughts on how to make this a successful project for my mom. I've already learned a lot.
The best part? Besides all the practice and seat time, all that digging used only a half tank of fuel. That's 10 hours of run time on about 3 gallons. I ran the engine around 2400 rpm during all the digging.
Thanks in advance and enjoy the pics!
amp


