You are using an out of date browser. It may not display this or other websites correctly.
You should upgrade or use an alternative browser.
You should upgrade or use an alternative browser.
Pond House
- Thread starter loghouse511
- Start date
- Views: 3121
More options
Who Replied?
/ Pond House
#1


VroomVroom
Veteran Member
- Joined
- Apr 30, 2010
- Messages
- 1,122
- Location
- Newfoundland
- Tractor
- Mahindra 2816 HST, Super M farmall, J5 bombardier, 230 timber jack skidder
How large?
OP
loghouse511
Bronze Member
12'x16' with a 8'x12' porch on both sides, with 1, being over the water
OP
loghouse511
Bronze Member


OP
loghouse511
Bronze Member
Made, a little progress.
It, should be noted, that I am not, building this as a residence, but, as a recreation/utility building, for my entertainment and pleasure, Just to look at.
Thank you, for sharing this journey.
Raymond
It, should be noted, that I am not, building this as a residence, but, as a recreation/utility building, for my entertainment and pleasure, Just to look at.
Thank you, for sharing this journey.
Raymond
Attachments


EddieWalker
Epic Contributor
It, should be noted, that I am not, building this as a residence, but, as a recreation/utility building, for my entertainment and pleasure, Just to look at.
Hi Raymond,
Nice setting and a fun project.
Since you are just doing this for something to look at, I understand that you are not building it to any code. A few things that you might want to do before you get too far into it is to use bolts on your floor joists where they attach to the posts. Nails are not structural and will not hold up the weight of anything. Bolts drilled through the boards and posts will last forever, nails will pull and bend over time. You can also add Simpson brackets that are designed for what you have done like you did with the joist hangers. I would also double up the boards that you have the hangers on. There is a very large load on the middle of those boards, between the posts, and if the likelyhood of cracking or spliting is very high at those locations.
Looking at your latest pictures, I would sister on a 2x12 to the outside of those boards that starts at the back post and out over the water, to create part of your deck. This will both give you a solid platform for your deck, it would also double up your floor joist.
With just one top plate on your walls, you need to do something to keep them together at the corners. Every building moves, and not having anything overlapping on those top corners will allow more movement then the building will be able to take over a short period of time.
Eddie
OP
loghouse511
Bronze Member
Eddie, Thanks, for the advice. I really, appreciate it. I, will look into all of those things, that you mentioned.
I, am a big fan of yours, and think what you have done with your place, is absolutely, amazing.
You, are to this site, what ,Elvis, was to music.Genius!!
A friend you haven't met.
Raymond
I, am a big fan of yours, and think what you have done with your place, is absolutely, amazing.
You, are to this site, what ,Elvis, was to music.Genius!!
A friend you haven't met.
Raymond
pat32rf
Veteran Member
Eddie-Elvis....Love it. Eddie has been an inspiration to most of us.
EddieWalker
Epic Contributor
A friend you haven't met.
Raymond,
Thank you, that was very generous of you
Eddie
OP
loghouse511
Bronze Member
Eddie, You, are most welcome. I think, you would be surprised, to know, how many people you have helped, inspired and encouraged.
Soldier on,buddy
Your Alabama, Friend.
Raymond
Soldier on,buddy
Your Alabama, Friend.
Raymond
EddieWalker
Epic Contributor
Good Morning Raymond,
If you don't mind, let me point out something else that I see in your pictures that have me a little nervous. The basics idea in stick framing is to stack wood on top of each other. In theory, it wold all stand there without any nails becaus ever piece is resting on another piece of wood. The nails are used to hold them in place, but have no structural value. You can hang a picture from a nail, but never a piece of lumber. For that, you need bolts or something solid under it to support it, which is why I commented on your floor joists.
Your rafters rest on the top plates that rest on your studs. The weight of the roof is carried down from the top to the floor. With your studs 16 inches apart, there is more then enough strength in the walls for a two story building and some pretty extreme snow loads. The rafters can be 24 inches apart because they don't carry the same load and the roofing sheething can handle the weight of what's on the roof over that much of a span. Your roof design isnt correct, but it's close enough that you don't need to redo it. What you do need to do is add support from the bottom of your ridge beam to the top of your wall. Idealy, there should be a stud lined up under that board to give you a straight line of support to the ridge beam. I would use two boards to hold the ridge beam in place. One under it and one to the side.
While you are not done with your doorways, I wanted to mention that the middle of the roof is always where the most weight is and where roofs begin to sag. Your doorways are in the middle of the wall and where the most weight of the roof will be located. Whenever you have an opening in a wall greater then 16 inches, you need a header to carry the load from what is above it down to the floor. For a door opening, two 2x6s with a half inch piece of plywood in between them is code where I live. Then that header needs to be held up by two shorter studs that are called Jack Studs. Above the Header, you need to install cripple studs to carry the weight of the rafters down to the Header, and then from the Header, out to the Jack Studs.
Depending on the size of the door you are putting in, you might want to just cut the existing studs that you already have in place and turn them into Jack studs, then add a King stud to the outside of your Jack Studs.
Standard exterior door sizes are 32 and 36 inches. Your inside framed in width for the door needs to be an inch to an inch and a half wider then the door size.
Thank you for your kind compliments. I've learned more from everyone on TBN then I'll ever be able to return.
Eddie
OP
loghouse511
Bronze Member
Update
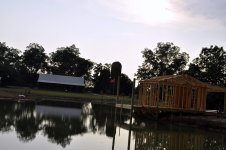
The first picture, was taken, from my front porch. If, all, goes according to plan
there will be, a water wheel on each side,with a stream carrying the water
back to the pond, hopefully, helping with aeration
The first picture, was taken, from my front porch. If, all, goes according to plan
there will be, a water wheel on each side,with a stream carrying the water
back to the pond, hopefully, helping with aeration