OP
BravoXray
Elite Member
- Joined
- Dec 17, 2019
- Messages
- 3,388
- Location
- Nothern Indiana
- Tractor
- Kubota BX2230, John Deere 430 Diesel
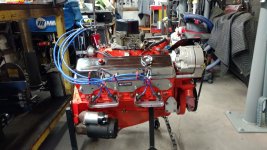
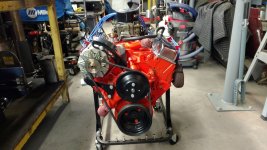
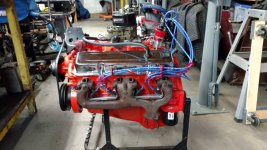
Since I'm still waiting on fenders for the Nova, I decided to pull the subframe off and install the engine and transmission so I can check to see if the TKO600 transmission will fit the tunnel without interference.
I've read a couple dozen forum posts on the subject, and the third generation Nova installations are about evenly split between fitting okay and having to modify the tunnel for clearance. So I figured I'd get it figured out now rather than later.
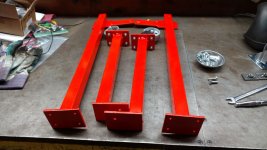
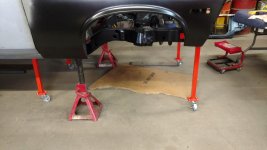
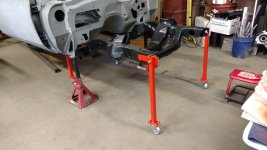
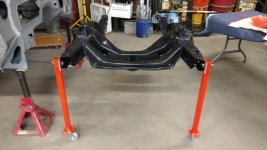
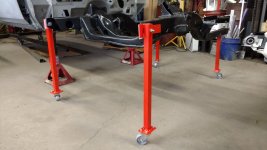
I picked up some 3" metal casters at Rural King, and used some 3" X 1/4" bar stock and 1 1/2" square 11 ga. tubing I keep on hand to fabricate four legs that bolt to the subframe so I can roll it around where I need it. Once I get the engine and trans dropped in it, I can just roll it into position under the body and bolt it back up to the body mounts to check the clearance. I made the legs about 1/4" - 3/8" shorter than the subframe is off the floor, so it will give me a little room to play with if it's really close.
Now I just have to move a few things so I can get my cherry picker unburied from the back of the shop and get out where I can use it.
Of course, I realize doing this means the fenders will show up right in the middle of this project. Well, I guess I can always dream...
I've read a couple dozen forum posts on the subject, and the third generation Nova installations are about evenly split between fitting okay and having to modify the tunnel for clearance. So I figured I'd get it figured out now rather than later.
I picked up some 3" metal casters at Rural King, and used some 3" X 1/4" bar stock and 1 1/2" square 11 ga. tubing I keep on hand to fabricate four legs that bolt to the subframe so I can roll it around where I need it. Once I get the engine and trans dropped in it, I can just roll it into position under the body and bolt it back up to the body mounts to check the clearance. I made the legs about 1/4" - 3/8" shorter than the subframe is off the floor, so it will give me a little room to play with if it's really close.
Now I just have to move a few things so I can get my cherry picker unburied from the back of the shop and get out where I can use it.
Of course, I realize doing this means the fenders will show up right in the middle of this project. Well, I guess I can always dream...
Attachments
-
 IMG_20211102_134422801 (Medium).jpg671.3 KB · Views: 158
 -
 IMG_20211102_150253031 (Medium).jpg477.6 KB · Views: 159
 -
 IMG_20211102_153642869 (Medium).jpg550.7 KB · Views: 162
 -
 IMG_20211102_154214458 (Medium).jpg516.4 KB · Views: 163
 -
 IMG_20211102_160959667 (Medium).jpg418.9 KB · Views: 155
 -
 IMG_20211102_161037319 (Medium).jpg528.6 KB · Views: 160
 -
 IMG_20211102_161051305 (Medium).jpg487.7 KB · Views: 158

 we'll put headers on it and run the exhaust."