Restarting My '70 Nova Project

   / Restarting My '70 Nova Project
  • Thread Starter
#221  
Sorry dodge man, but I happen to disagree with 100% all the way around. Vinyl tops are simply to cover up a lot of crappy workmanship by the factory. Ask me how I know - BTDT. I removed the vinyl top from my '69 Dodge Cornet RT. Cost to completely make it look good was high. Lots of unfilled voids as well as rust taking hold.

Then on to the mechanical secondary's, I had the vacuum secondary's on both my '59 Chevy Impala 348cid as well as my '69 Dodge RT. Changing from vacuum to mechanical improved performance 100%.

Of course, I respect your opinion. It just happens to not sync with mine.
When I pulled the vinyl top off the Nova and finally got all the padding and adhesive removed, the roof looked just fine. Other than the rust shown in the pictures above, there weren't any problems the body man or I could see.
I seriously doubt that bodies that had workmanship defects were tagged for vinyl tops. As my uncle, who worked at Fisher Body for over 20 years explained it to me many years ago, the bodies were built to order, as there could be differences depending on certain options. and defects in the roof, sail panels or A-pillars would likely be visible even after the top was installed.
Maybe Mopar did it differently though.

2013-12-01_16-49-06_349.jpg
 
   / Restarting My '70 Nova Project #222  
As a rule I think the vinyl tops weren’t to hide defects but they would get moisture under them and cause rust. An exception to that would be a 70 Superbird that had a fiberglass rear window plug to make it more aerodynamic. They all had vinyl tops. On the 69 Dodge Daytonas they didn’t have vinyl tops and they spent a bunch of time getting the body work smooth around the rear window plug for paint.
 
   / Restarting My '70 Nova Project
  • Thread Starter
#223  
At least I have a little experience installing a vinyl top, as a few years ago we put a new vinyl top on Brian's 70 Charger R/T. Watched a lot of videos on YT, and it went pretty well, looked great when we got it finished up.
 

Attachments

  • 2012-05-27_18-37-55_585.jpg
    2012-05-27_18-37-55_585.jpg
    2.4 MB · Views: 88
  • 2012-07-14_14-41-10_833.jpg
    2012-07-14_14-41-10_833.jpg
    2.6 MB · Views: 91
   / Restarting My '70 Nova Project
  • Thread Starter
#224  
Got the driver side rocker panel finished up, finally. I scuffed the EDP primer on underside of the hood and the cowl panel yesterday, and Brian stopped on his way to work and gave them a coat of urethane primer.
I rolled the body over so I could look at the roof and found three small dents that showed up while block sanding it, and an area where the sail panel meets the roof at the drip rail that need a little filler to make the transition smoother. Mixed up some filler and applied it to the areas so I can work on them tomorrow. Sanding the roof is a little tricky as the metal oil cans pretty easily since it has little support. So far I've almost used up a whole can of filler on this project, but doubt I'll need much more unless the fenders have dents I haven't seen yet.
Also going to try to get the fenders on the stands tomorrow so they can be primed and block sanded, but have to figure out where to put the hood so it it out of the way and doesn't get dinged up. I still have the edge protector packing that it was in when shipped, so I can use that too.
 

Attachments

  • IMG_20221006_174116152 (Medium).jpg
    IMG_20221006_174116152 (Medium).jpg
    567 KB · Views: 73
  • IMG_20221006_174154960_HDR (Medium).jpg
    IMG_20221006_174154960_HDR (Medium).jpg
    626.4 KB · Views: 77
  • IMG_20221006_174207102 (Medium).jpg
    IMG_20221006_174207102 (Medium).jpg
    394.8 KB · Views: 75
  • IMG_20221006_174216284 (Medium).jpg
    IMG_20221006_174216284 (Medium).jpg
    358.1 KB · Views: 72
  • IMG_20221006_174254755 (Medium).jpg
    IMG_20221006_174254755 (Medium).jpg
    484.1 KB · Views: 80
   / Restarting My '70 Nova Project
  • Thread Starter
#225  
Another day in the body shop.
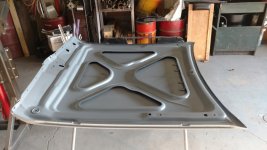
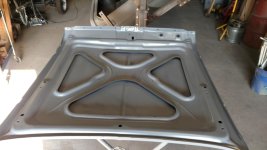
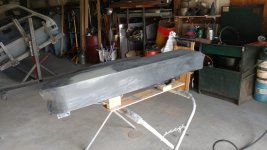
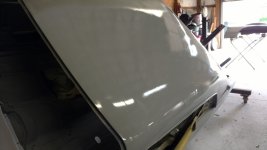
First thing was to (eeek!) drill holes in the hood for the simulated louvers that are on the SS cars. On the underside, there are holes in the hood reinforcements for the studs on the ends but since the center ones fall in an unreinforced area I had the use the bezels to locate them. That worked out fine, and I only had to file one hole a little bit to get the louvers to drop in place. I shot a little primer on the raw metal in the holes, them put the packing protectors on each side and secured them wit a couple of ratchet straps. I found a place in the back of the shop to store it for now so it doesn't get dinged up.
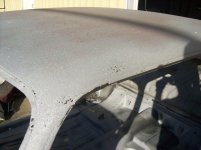
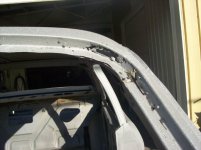
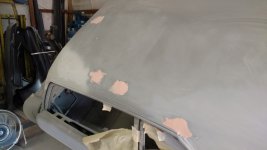
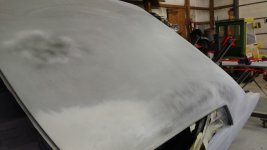
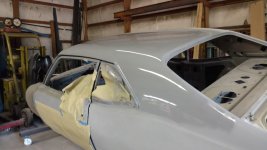
Worked on the four spots on the roof and got them looking pretty good. I block sanded the driver's side of the roof, as the primer the body man applied was really rough and needed to be knocked down and smoothed up.
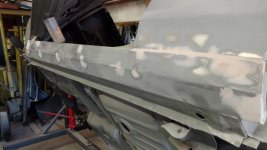
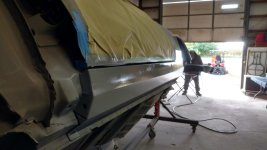
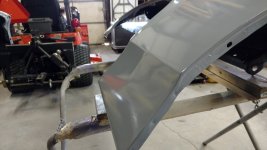
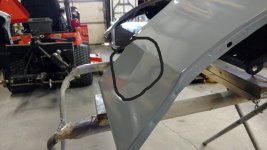
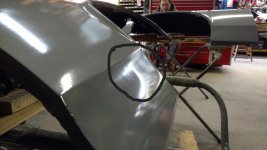
When Brian got there, we moved the hood off the paint stand to it's place in the back, and set the front fenders up on the stands so he could give them a coat of primer. He gave the left rocker and rear fender behind the wheel opening another coat of primer and also a coat to left side of the roof and A-pillar.
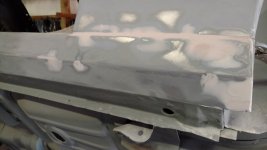
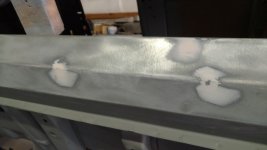
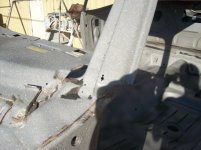
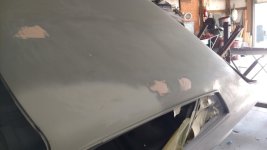
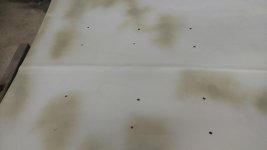
After priming the fenders, he noticed that both have a little crease in the same spot behind the wheel opening on the area above the bottom of the fenders. Neither he nor I had noticed these before, I hadn't when I had scuffed the fenders for priming. They aren't bad, as you can see in the pictures, so he thinks a little work with a hammer and dolly will flatten them out.
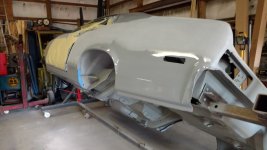
At this point I can see the light at the end of the tunnel for getting it ready for paint. I'm going to have the paint shop owner come by and look at it once I get done with it so he can check it over for any spots that need further attention. Better to have it completely ready when he gets it, so all he has to do is paint and buff it out. He likes that it will be on the rotisserie, as it will make it much easier to paint the inside and underside.
 

Attachments

  • IMG_20221007_140219355 (Medium).jpg
    IMG_20221007_140219355 (Medium).jpg
    270.9 KB · Views: 75
  • IMG_20221007_140751027 (Medium).jpg
    IMG_20221007_140751027 (Medium).jpg
    426.2 KB · Views: 70
  • IMG_20221007_154304784 (Medium).jpg
    IMG_20221007_154304784 (Medium).jpg
    360.2 KB · Views: 68
  • IMG_20221007_164544730 (Medium).jpg
    IMG_20221007_164544730 (Medium).jpg
    584.4 KB · Views: 62
  • IMG_20221007_164555648_HDR (Medium).jpg
    IMG_20221007_164555648_HDR (Medium).jpg
    541.1 KB · Views: 64
  • IMG_20221007_165020082_HDR (Medium).jpg
    IMG_20221007_165020082_HDR (Medium).jpg
    469.9 KB · Views: 64
  • IMG_20221007_171102539 (Medium).jpg
    IMG_20221007_171102539 (Medium).jpg
    504.3 KB · Views: 65
  • IMG_20221007_171114049 (Medium).jpg
    IMG_20221007_171114049 (Medium).jpg
    469.6 KB · Views: 65
  • IMG_20221007_171138788 (Medium).jpg
    IMG_20221007_171138788 (Medium).jpg
    353.7 KB · Views: 70
  • IMG_20221007_172717539 (Medium).jpg
    IMG_20221007_172717539 (Medium).jpg
    454.8 KB · Views: 64
Last edited:
   / Restarting My '70 Nova Project
  • Thread Starter
#226  
Better pics of the creases.
 

Attachments

  • IMG_20221007_172717539 (Medium) #2.jpg
    IMG_20221007_172717539 (Medium) #2.jpg
    487.4 KB · Views: 73
  • IMG_20221007_172733194 (Medium) #2.jpg
    IMG_20221007_172733194 (Medium) #2.jpg
    487.2 KB · Views: 84
   / Restarting My '70 Nova Project
  • Thread Starter
#227  
Spent yesterday afternoon and this afternoon doing more filling, priming and sanding. Got the driver side front fender looking pretty good except for the crease near the bottom, and the passenger side started. found a couple of spots so far, but nothing very bad.
Most of it is pretty straight. Worked on the passenger side of the roof also, found a couple of spots that needed attention on the rear window channel, and another spot where the A-pillar meets the roof. Put some filler in them and after it set got them sanded out and looking okay. The one rear one at the top of the rear window looked like a weld seam of some sort.
When I was sanding on the fenders, I had to be careful not to knock them off the stands as they are just resting on some 2X4s, so I used some long Ty-Raps through bolt holes to tie
one of them down to the stands, which made it a lot more stable to work on it. Going to do the same to the other one.
Still have a problem spot between the door jamb and rear wheel opening on rhe left side, but I'm getting closer on it. It probably wouldn't be noticed, but I know it's not quite right, so I'll try to get it as close to perfect as I can.
 

Attachments

  • IMG_20221012_152546006 (Medium).jpg
    IMG_20221012_152546006 (Medium).jpg
    293.6 KB · Views: 59
  • IMG_20221012_154457720.jpg
    IMG_20221012_154457720.jpg
    1,022.6 KB · Views: 57
  • IMG_20221012_154512507 (Medium).jpg
    IMG_20221012_154512507 (Medium).jpg
    458 KB · Views: 57
  • IMG_20221012_154523503 (Medium).jpg
    IMG_20221012_154523503 (Medium).jpg
    396.9 KB · Views: 63
  • IMG_20221012_160320650 (Medium).jpg
    IMG_20221012_160320650 (Medium).jpg
    391.5 KB · Views: 53
  • IMG_20221012_160329988 (Medium).jpg
    IMG_20221012_160329988 (Medium).jpg
    512.6 KB · Views: 61
   / Restarting My '70 Nova Project #228  
Looking good!
 
   / Restarting My '70 Nova Project
  • Thread Starter
#229  
Been working on the creases in the lower area on the front fenders, and have them looking good. Forgot to get pictures of them though, will get a couple tomorrow.
Also been working on the forward wheel openings where the quarter panel and rocker panels meet. There were pie shaped gaps in the metal that needed to be filled in with patches, so I did that on Sunday afternoon. Sloppy looking weld jobs, but I was having a problem feeding .024" wire through the .035" liner in the feed cable to the MIG torch, it kept binding and wadding up between the feed roller and the entrance to the cable. I have done this before, but for some reason it wasn't cooperating this time.
Got it welded up and ground down then applied filler (a couple of times), sanded it down, applied more filler, sanded some more, and added more filler just to be sure, sanded tha down and shot some primer on the areas.
I think both areas look pretty good now.
Brian will come over this week and put some primer in the insides of the front fenders, and they will be pretty much finished other than a close inspection for any flaws I missed.
 

Attachments

  • IMG_20221021_155513820 (Medium).jpg
    IMG_20221021_155513820 (Medium).jpg
    407 KB · Views: 62
  • IMG_20221021_155526139 (Medium).jpg
    IMG_20221021_155526139 (Medium).jpg
    371.6 KB · Views: 65
  • IMG_20221024_164407082 (Medium).jpg
    IMG_20221024_164407082 (Medium).jpg
    359.4 KB · Views: 56
  • IMG_20221024_164415100 (Medium).jpg
    IMG_20221024_164415100 (Medium).jpg
    263.2 KB · Views: 56
  • IMG_20221025_151021569_HDR (Medium).jpg
    IMG_20221025_151021569_HDR (Medium).jpg
    404.6 KB · Views: 55
  • IMG_20221025_170152305_HDR (Medium).jpg
    IMG_20221025_170152305_HDR (Medium).jpg
    329.8 KB · Views: 51
   / Restarting My '70 Nova Project #230  
I used to into the vintage Mopars from the same era as your Nova. They have a car auction about three times a year in a nearby town, Carthage Illinois. The prices some of these cars are going for has sort of turned me off to the hobby. I saw a newer Gran Sport Corvette go for what I thought was cheap, something lije $38,000. I saw someone in two days time put up an ad selling the car for $60,000 on Facebook Market Place. It could be a scam but I suspect it’s legitimate.

It makes me fell good when I see your work and what I consider a true hobbyist. Keep the pictures coming, I’m enjoying them.
 
 
Top