Well, I finally got the electrical work done in my workshop to test the plasma cutter. The previous owner had a 50A 240Vac outlet, but it was a different receptacle than my welder and plasma cutter required, so I needed to redo it, and while I was at it, I decided to add a local disconnect and decided to wire up both the old receptacle and the new one to be more flexible. I also needed a 20A 120VAC circuit to run my compressor next to the plasma cutter since it won't run with the voltage-drop of an extension cord. I ran 10AWG three wire with ground from a 20A 240VAC breaker, but hooked it up as two phases of 20A 120VAC to give me lots of power tool capacity with very little voltage drop. I already had the 10AWG wire on hand.
So..., air filter plumbed, compressor charged up, 50A 240VAC wired up, and Hypertherm service manual in hand, I decided to sit down and go through the diagnostics in the service manual.
I checked all the resistance checks and didn't find anything amiss, so I switched on the Hypertherm's three pole breaker, and the fan started spinning up, the top LED for input power came on, and then "CLICK" the breaker snapped back off with the "Low Line Voltage" LED lit yellow momentarily, and a moment later, the fan shut off.
I did that enough more times to get through the voltage checks and could see that it was firing up looking good for a brief moment, but something was shutting it off???
Looking at their troubleshooting guide for that symptom didn't quite help, it didn't list that exact combination of symptoms. It did mention the circuit breaker snapping off as soon as you switch it on, but not with the Low Voltage LED lit. It suggested the cause could be Over Voltage, or shorted components. But in the brief instant when it was first coming on, I could briefly measure roughly the correct voltages everywhere I should, so it didn't really act like a dead short, and I knew the 240VAC was dead on, and besides, the "Under Voltage" light was lit?
I studied the schematic and then something jumped out at me: Right at the top of the drawing was a little rectangle labeled "W14" indicating a winding that was labeled to indicate it was used to detect "Over Voltage", it showed a dotted line to the circuit breaker indicating that it could trip the breaker, and it had a note that said "208/240VAC Unit Only." There is not enough circuit detail in the schematic to understand how that fault condition is detected, but it connected to J5 on the circuit board. I could see that J5 had a jumper that was connected across the third unused pole of what is a three pole circuit breaker. On three phase units, all three poles are used for power phases, but on 240VAC single phase units like mine that third pole is used somehow to trip the breaker if the system detects overvoltage... Hummm...
I said to myself, "The system acts like a safety circuit is shutting it down, I know it is not connected to the wrong voltage, what can it hurt to disconnect the overvoltage trip? The three phase units don't bother with an over-voltage safety circuit, and I don't have any higher voltage to connect it to anyway. What could it hurt to discnnect that jumper?"
I pulled J5, clicked on the breaker, the fan came on, the power LED came on, and ... NO CLICK! The "OK" LED came on with no error LEDs! Eureka! I put on my welding mask, grabbed the torch and held it up to my test piece and IT CUT LIKE A HOT KNIFE THROUGH BUTTER, WITH SPARKS FLYING!!! I realized later that I had been cutting at the lowest power setting 20A. Did a couple more cuts and took the picture in the previous posting with the camera on self timer. The first time I tried, I had finished cutting before the self timer went off. I had to trip the shutter and wait till it started beeping fast to begin the cut!
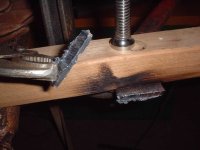
I've attached here a picture of the second cut I made. Pretty ugly, I have to learn how fast to move it and get a smooth cutting surface so it doesn't hang up and skip. I also realized as you can see in the picture that I wasn't holding the torch tip perpendicular.
Tomorrow I'll call the Hypertherm Service Department and see if they won't help me replace whatever is wrong. It should be pretty simple to find now that I've got this much figured out. Something obviously wrong with their overvoltage detect circuit. Frankly, if they won't help me with it, I'll just used it with this circuit disabled and not worry about it, but I have a hunch they'll help me get it fixed correctly.
I now have a 40A Plasma Cutter!!! /forums/images/graemlins/grin.gif /forums/images/graemlins/grin.gif /forums/images/graemlins/grin.gif
So..., air filter plumbed, compressor charged up, 50A 240VAC wired up, and Hypertherm service manual in hand, I decided to sit down and go through the diagnostics in the service manual.
I checked all the resistance checks and didn't find anything amiss, so I switched on the Hypertherm's three pole breaker, and the fan started spinning up, the top LED for input power came on, and then "CLICK" the breaker snapped back off with the "Low Line Voltage" LED lit yellow momentarily, and a moment later, the fan shut off.
I did that enough more times to get through the voltage checks and could see that it was firing up looking good for a brief moment, but something was shutting it off???
Looking at their troubleshooting guide for that symptom didn't quite help, it didn't list that exact combination of symptoms. It did mention the circuit breaker snapping off as soon as you switch it on, but not with the Low Voltage LED lit. It suggested the cause could be Over Voltage, or shorted components. But in the brief instant when it was first coming on, I could briefly measure roughly the correct voltages everywhere I should, so it didn't really act like a dead short, and I knew the 240VAC was dead on, and besides, the "Under Voltage" light was lit?
I studied the schematic and then something jumped out at me: Right at the top of the drawing was a little rectangle labeled "W14" indicating a winding that was labeled to indicate it was used to detect "Over Voltage", it showed a dotted line to the circuit breaker indicating that it could trip the breaker, and it had a note that said "208/240VAC Unit Only." There is not enough circuit detail in the schematic to understand how that fault condition is detected, but it connected to J5 on the circuit board. I could see that J5 had a jumper that was connected across the third unused pole of what is a three pole circuit breaker. On three phase units, all three poles are used for power phases, but on 240VAC single phase units like mine that third pole is used somehow to trip the breaker if the system detects overvoltage... Hummm...
I said to myself, "The system acts like a safety circuit is shutting it down, I know it is not connected to the wrong voltage, what can it hurt to disconnect the overvoltage trip? The three phase units don't bother with an over-voltage safety circuit, and I don't have any higher voltage to connect it to anyway. What could it hurt to discnnect that jumper?"
I pulled J5, clicked on the breaker, the fan came on, the power LED came on, and ... NO CLICK! The "OK" LED came on with no error LEDs! Eureka! I put on my welding mask, grabbed the torch and held it up to my test piece and IT CUT LIKE A HOT KNIFE THROUGH BUTTER, WITH SPARKS FLYING!!! I realized later that I had been cutting at the lowest power setting 20A. Did a couple more cuts and took the picture in the previous posting with the camera on self timer. The first time I tried, I had finished cutting before the self timer went off. I had to trip the shutter and wait till it started beeping fast to begin the cut!
I've attached here a picture of the second cut I made. Pretty ugly, I have to learn how fast to move it and get a smooth cutting surface so it doesn't hang up and skip. I also realized as you can see in the picture that I wasn't holding the torch tip perpendicular.
Tomorrow I'll call the Hypertherm Service Department and see if they won't help me replace whatever is wrong. It should be pretty simple to find now that I've got this much figured out. Something obviously wrong with their overvoltage detect circuit. Frankly, if they won't help me with it, I'll just used it with this circuit disabled and not worry about it, but I have a hunch they'll help me get it fixed correctly.
I now have a 40A Plasma Cutter!!! /forums/images/graemlins/grin.gif /forums/images/graemlins/grin.gif /forums/images/graemlins/grin.gif