You are using an out of date browser. It may not display this or other websites correctly.
You should upgrade or use an alternative browser.
You should upgrade or use an alternative browser.
SAE-8 Banjo Fitting Autocad
- Thread starter tomrscott
- Start date
- Views: 7553
More options
Who Replied?
/ SAE-8 Banjo Fitting Autocad
#21
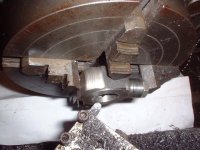
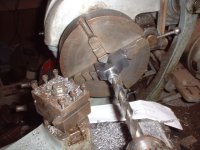
Then I used a center drill to mark the center of the first port sleeve, and drilled it with an 1/8", 1/4", .406", and .5" drills. The first three drills I drilled through to what will be the core of the banjo, but with the 1/2" drill I stopped at 1/2" depth to make a shoulder to stop the tubing.
The profile radiusing is almost impossible to get very smooth by hand. I just don't the proper trig calibration in my hands to CNC it manually. /forums/images/graemlins/smirk.gif The last thing you want to do is to cut too far, so I left it a little big. I will be cutting a similar radius profile at a right angle to this which will allow me to take some of the roughness out.
/forums/images/graemlins/smirk.gif
Attachments

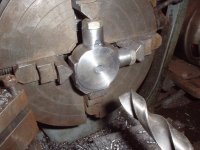
I forgot to take shots of cutting the second port, but of course that would have looked just about like the first port. I got kind of distracted because I had gotten impatient and fed the starting 1/8" drill too fast and snapped it off. Steel is pretty unforgiving of impatience. Anyway, it was just the very tip and I was able to drill past it with the through hole and then push it out with a drift punch (ie: I got lucky).
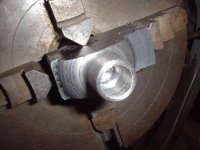
This shot shows the piece turned flat so I can face it, and drill the 3/4" through hole. I set the piece as flat in the chuck as I could get it, and then cut a clean face. Then center drilled the piece, drilled with an 1/8" starter drill, 1/4", 3/8" 1/2", 5/8", and finally a 3/4". I did a bit of deburring and here it is.
/forums/images/graemlins/smirk.gif
Attachments

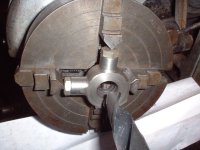
In this shot you can see that I decided to put some stubby bolts in the braze sleeves to spread out the chuck jaw pressure. With the violence of boring a 3/4" hole, I had to clamp down the chuck jaws real tight and it would have left deep impressions on the braze sleeve ends. This way they came out without a scratch.
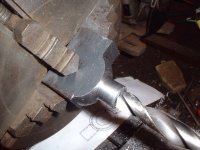
This shot is a bit misleading. It looks like the profiling is about done, but the far corners are still pretty rough and will get profiled more in another setup.
/forums/images/graemlins/smirk.gif
This shot is a bit misleading. It looks like the profiling is about done, but the far corners are still pretty rough and will get profiled more in another setup.
/forums/images/graemlins/smirk.gif
Attachments
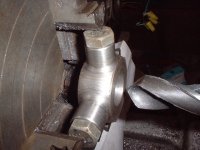
Finally a quick deburr with the tool bit that I used to face the piece (forgot to shoot that process).
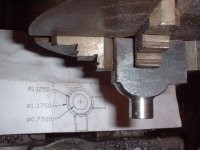
I've left the whole body a bit oversize on purpose. I can cut it down if I want to later, but I was thinking that since this is a two port banjo, maybe I'd make it a bit oversize inside for increased flow. I would rather cut the inside bore first and leave a little extra beef for now.
I am not trying to follow the print exactly, but having the print handy keeps me from overcutting and it is real hard to "cut it bigger."
/forums/images/graemlins/smirk.gif