Snow Blower now Loader Mt'd

   / Snow Blower now Loader Mt'd #1  

Balerguy2

Bronze Member
Joined
Nov 1, 2012
Messages
87
Location
N. Illinois
Tractor
L4610 GST/ LA 852 loader, GrassHopper 725DT
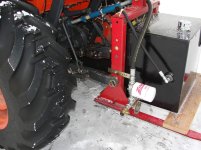
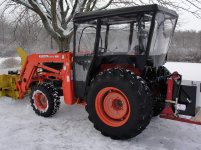
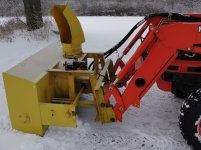
I am now beginning the 3 rd winter after moving the PTO 3PH snow blower to hydraulic drive mounted 4 PH on the LA-852 Loader. Just a couple days ago we got 16" of snow over night. Blowing Snow going forward is clearly more fun! My "Mule" is a 14 year old Glide Shift Kubota L4610 with a "pin on Loader" (bought new in 2001). I have chains but don't use them and "no load" in the tires. The "chute" is moved via a 50 dollar 12 vdc winch. Simple and reversible instantly and very strong.

Every now and then some questions about fabricating DIY or locating an OEM setup like this pops up here on TBN. This is just an effort to help some one understand the concept. I used 3/4" for HP & LP lines ie (one each) and 3/8" case drain. No QD on these lines and the only valve necessary is Pressure Relief. My mule has an over running sprag clutch as OEM and to turn the snow blower on is simply sliding the PTO lever to "engage". I don't know how it could be more simple.

Some design & fabrication info: http://www.tractorbynet.com/forums/hydraulics/286706-pto-snow-blower-hydraulic-drive.html

I had some steel and the Hyd. Power Pack 3 PH Rack mount plus the 3 PH Snow Blower. Hydraulic fittings, cast iron Prince 21 gpm pump, Tank & Motor all came from Surplus Center, Lincoln, NE. Hoses from Discount Hydraulic Hose (DHH) Philadelphia, PA.
 

Attachments

  • DSC01753.jpg
    DSC01753.jpg
    312.9 KB · Views: 487
  • DSC01748.jpg
    DSC01748.jpg
    365 KB · Views: 424
  • DSC01752.jpg
    DSC01752.jpg
    270.4 KB · Views: 571
  • DSC01833.JPG
    DSC01833.JPG
    877.4 KB · Views: 447
Last edited:
   / Snow Blower now Loader Mt'd #3  
I bet your neck is happy!
Nice job and thanks for bringing your original post back. As much as I'm "on here", I still miss some good posts of projects.
 
   / Snow Blower now Loader Mt'd
  • Thread Starter
#4  
Farmer495
Rustyiron

Thanks for the good comments.

Balerguy2
 
   / Snow Blower now Loader Mt'd #5  
Very nice!
 
   / Snow Blower now Loader Mt'd #6  
There is only one thing I don't like about your setup is your plastic windshield. As the inside of the cab warms up, the snow swirling outside will begin sticking to the plastic. The simplest solution is to give the plastic a hard rap with your fist.
 
   / Snow Blower now Loader Mt'd #7  
I remember that post. Very impressive job.

And I like you chute deflector control...haha. We dont need no stinking chute deflector controls.
 
   / Snow Blower now Loader Mt'd
  • Thread Starter
#8  
Roy
smfcpacfp
GPintheMitten

Thanks guys for the good pointers! I used this blower about 20 years ago on the front of my skid-loader. It was great in the arc of the wiper but not so good else where! I'rd break up a steel/glass cab in the woods pretty quickly. The best I can do (winter time)is the CMT enclosure and it works really well. Heat? I use electric heated (12 vdc) clothing that I have designed and made for motorcycling. Turn the 12 v on and I am toasty warm although when the sun is out that cab heats up and I have to slide one of the doors open.

The 12 vdc winch control is push button L or R and can rotate 240 degrees. Works really well and costs dirt cheap. Simple and it is easy to wind the cable on the drum so it will pull in either direction instantly. One of these days I'll do a vertical deflector! I still have the temporary ties and bungie(s) put on as I proto typed the build! Good for me .......... a new production loader mounted front snow blower costs 3 times what mine has cost.
 
Last edited:
   / Snow Blower now Loader Mt'd #9  
How do you move the chute the other way with the winch?
 
   / Snow Blower now Loader Mt'd
  • Thread Starter
#10  
A 2 way winch can wind 2 ways by winding "clockwise" one end of the drum and running to the chute & fasten*. Take the remaining cable and wind to the other end of the drum "counterclockwise" 1 or 2 turns and then run to the chute(circling the chute 2 or more times) and fastened.
Note this is 1 cable ie one single cable that is divided about 50-50 at the winch drum...... and wound as described.
So now pressing either In or Out on your controller the cable pays out from the bottom of the drum and winds onto the top of the other end of the drum. And, vice a versa. Voila! If it is going the wrong way just reverse the power + & - leads and the winch motor will run the other way and correct your problem. HTH!

*Have the chute outlet set at 12 oclock (ie straight ahead) or 1 oclock which will allow control 90 left and over 100 + to right. Don't fool with hydraulic or electral/hydraulic actuators. They are costly and complicated. A powerful winch is 50 dollars at Menards or similar store.

You use a 45-70 rifle?
 

Tractor & Equipment Auctions

Chevrolet C8500 Flat Bed with a Moffet Kit (A51039)
Chevrolet C8500...
2005 Big Tex 10PI 16ft. T/A Pipe Top Utility Trailer (A49461)
2005 Big Tex 10PI...
48in Forks Loader Attachment (A49346)
48in Forks Loader...
2006 Ford F-550 4x4 Flatbed Pickup Truck (A50323)
2006 Ford F-550...
1997 EZ Spool Trailer (A49461)
1997 EZ Spool...
2019 Fontaine Traverse HT T/A 48ft Loyboy Trailer (A49461)
2019 Fontaine...
 
Top