Here's a couple of pics.
As for sealing the air gap at the bottom, I used 1/8" mesh galvanized hardware cloth. I cut strips about 3" wide and long enough to fit snugly between the 3/8" spacer strips. I bent them into a J shape and used long roofing nails to hold them in place. The Hardie plank compresses against them to complete the seal. I did not try to seal the foam. In retrospect, next time I would put the hardware cloth up, then put the foam and spacers up and bend the hardware cloth over the combination.
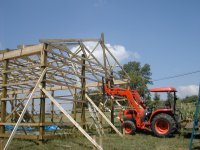
The first picture is what the inside looked like when we moved into it. We still had the trim around the windows and baseboards to do and something for a floor covering. The second shows us setting the trusses. They are 24' clear span and the heaviest weighed about 170#. Normally, one would start with the truss upside down and put one end on the top plate then the other end on the opposite wall, then rotate it upright. It was to heavy and the wall to tall for us to do that. Also note: That tractor is rated for 3000# at the pins, but with that 20' extension, 200# is about all I'd attempt to lift with it. If you do this, be sure to go very very slowly. A one inch movement at the pins is about 20" out at the end of the boom.
Note: The mini-split does a good job of cooling the whole thing. The cabin is 36' long (35' inside dimension)
We were comfortable enough with it at this point we stopped working on it and went to other projects that were higher priority. A few years later we, took out the cabinets and replaced them with better quality ones and added upper cabinets. We hired a company to put in an epoxy floor, and all the trim work is now done.
The important thing is to have a plan and identify everything you want on it. There is an electrical outlet to the upper right of the window near the wall corner. That was put there for lighting both under cabinet and above cabinet when we finally got all the cabinets in. You can add things easily if the basics are already there for them. (i.e. There is another outlet up high behind me that is for above cabinets that may get installed in a few more years.)
This cabin was originally designed to do two things. 1st a place to live that wasn't in a camper while we figured out a house plan and found a builder for our permanent house and 2nd this would then become my wife's studio/she shed or a place for her to work on her hobbies. So the design is different than if it was going to be our permanent house or if we had different plans for it. (Things such as size and placement of windows and interior walls.)