SSQA Snow Plow

   / SSQA Snow Plow
  • Thread Starter
#21  
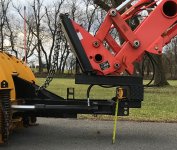
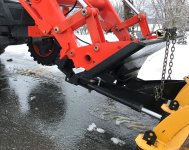
There are only two hoses. If you scroll up to Post#16 you can see where they connect to the factory third function ports on the loader frame. Each hose goes to one cylinder. There is only one place to connect a hose to each cylinder. I am on an iPad at present and am having trouble getting the picture of the cylinders posted.
 
   / SSQA Snow Plow #22  
Here..... plow piston.jpg
 
   / SSQA Snow Plow
  • Thread Starter
#23  
Pretty much it. Thank you Peter.

Edit to add: been semi laid up the last several weeks and using an iPad some of the time. Surely there are things which can be done that I am not familiar with.

One thing I did pick up was to type I am having .... rather than I’m having....do not in lieu of don稚 and so on because contractions and some punctuation show up with strange symbols.
 
   / SSQA Snow Plow #24  
Feel better and when you have a chance send a picture of how the hoses are routed. Thank you
 
   / SSQA Snow Plow #25  
From 1 port on the 3 function to one cylinder and the other pot to the other cylinder?
 
   / SSQA Snow Plow #27  
Mr. Chim, thanks very much for the detail related to not using a cross-over...looks like it's a feature of the cylinder design.

Good luck on quickly getting back to your normal routine.

... //TJ
 
   / SSQA Snow Plow #28  
Mr. Chim, thanks very much for the detail related to not using a cross-over...looks like it's a feature of the cylinder design.

Good luck on quickly getting back to your normal routine.

... //TJ

You still could/should add a cross over relief valve;simple hook-up and may save you down the road.
 
   / SSQA Snow Plow #29  
How far up from the bottom of the adapter plate are the snow plow brackets welded?
 
   / SSQA Snow Plow
  • Thread Starter
#30  
How far up from the bottom of the adapter plate are the snow plow brackets welded?

The brackets are below the plate. There are two 3x3 square tubes running back from the plate, reinforced with a large angle running across the lower front edge of the plateplate. The 3x3 square tubes are welded to a 4x4 that crosses them at the rear ends. The part of the plow bracket that was attached to the donor truck is welded to the bottom of the 4x4 square tube. This picture and those in Post#1 should show it better than I can explain.

The stacked 2x2 square tube is welded to the A frame parallel with the SSqa plate. That's where I get down pressure when needed. The bottom front corner of the angle contacts the center of the top 2x2 square tube when the loader is dumped a bit. In the one photo you can see the front axle is dangling with all the weight of the front of the tractor bearing down on the 2x2 square tube.

Using the up/down/curl/dump on the joystick allows control of the blade with regard to how aggressive the angle will be at any point. This is true for floating, floating with the weight of the loader arms or even with the weight of the front of the tractor on the blade. That makes it handy for removing packed snow or to backdrag away from garage doors, etc.
 

Attachments

  • ZZ.JPG
    ZZ.JPG
    638.8 KB · Views: 267
  • IMG_4822.JPG
    IMG_4822.JPG
    2.3 MB · Views: 272
Last edited:

Tractor & Equipment Auctions

2025 Single Cylinder 40in Grapple Rake Skid Steer Attachment (A46683)
2025 Single...
2013 Hyundai Sonata Hybrid Sedan (A46684)
2013 Hyundai...
JMR 72" Root Grapple (A47307)
JMR 72" Root...
Terms and Conditions (A42021)
Terms and...
Ingersoll Rand PD-24 Double Drum Vibratory Roller - Low Hours/Jobsite Ready! (A48561)
Ingersoll Rand...
2017 Caterpillar 973D Crawler Tractor Loader (A45336)
2017 Caterpillar...
 
Top