KenKubota
Member
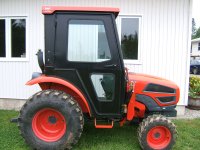
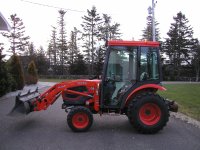
Review of my new Sims/Cab Depot cab for my Kubota B26
I致e just completed assembling and installing a cab I purchased on-line and I thought it might be beneficial to other members if I shared my experience and opinion about this product. Overall, I would Grade the design a D and the instructions a C-. I took notes and pictures during the installation after it quickly became clear to me just how big a mistake my purchase was. I want to share the specifics of the flaws I encountered that will definitely affect other B26 owners and perhaps purchasers of other Sims Cabs as well. I should point out that I consider myself fairly handy and have a complete shop full of tools. The basic instructions are condensed into 7 pages and fewer than 20 steps. This was accomplished by simply leaving out critical steps and explanations. Following are the problems I found with the instructions:
1.[FONT="] [/FONT]There is no listing of parts with descriptions referenced to photos of drawings of the part so you can determine easily if you have everything you should. Thus for example, when the instructions call for the 塗eader extension you have to take an educated guess as to what that is. (The photo of it being installed on page 9 shows it with a different shape).
2.[FONT="] [/FONT]Step 4 in the instructions call for 兎ight 5/16 x 18 1,1/2 bolts these were not supplied, instead all the bolts are セ in length.
3.[FONT="] [/FONT]The photo on page 4 shows bolts to hold the cowl to the tractor in front of the floor, the only direct connection between this part and the tractor. In reality there is no way to make this connection. The company rep said they decided not to have that attachment.
4.[FONT="] [/FONT]The photo in step 8 shows the rear fender of the tractor covered in many pieces of masking tape. There is no explanation of why and in fact this photo has nothing to do with the installation at all.
5.[FONT="] [/FONT]Step 13 says to remove the rear work lights to add the backhoe extension, but fails to say how or where to re-install them or that additional wiring will be required.
The Design Flaws I encountered:
1.[FONT="] [/FONT]First and most important, I ordered the backhoe extension so that I could use the backhoe while enclosed in the cab. The B26 is a TLB and switching between backhoe and rear implement use with no cab is a 15 minute operation requiring no tools. If you put the Sims backhoe extension on you will spend at least an hour with help and tools converting back and forth. Here is what you have to do to go from backhoe to tractor implement use:
a.[FONT="] [/FONT]Unbolt the lower rear cab panel from the backhoe foot guard.
b.[FONT="] [/FONT]Remove the rear work lights, their brackets and wiring.
c.[FONT="] [/FONT]Remove the side curtains and bottom curtain from the backhoe extension.
d.[FONT="] [/FONT]Unbolt the ten bolts holding the rear extension panels. (You will need a partner to hold two locknuts inside the cab while you unbolt from the outside).
e.[FONT="] [/FONT]Unbolt the rear header extension from the rear header and side panels.
f.[FONT="] [/FONT]Unbolt the rear lower panel from the rear upper panel
g.[FONT="] [/FONT]Bolt the rear upper panel to the rear of the tractor and side panels (get your partner to hold your nuts again) (hey, that doesn稚 sound good).
h.[FONT="] [/FONT]Install the curtain around the bottom of the rear panel and under the seat.
i.[FONT="] [/FONT]Re-install the rear work light brackets and lights.
After I saw what was involved I requested to return the back backhoe extension on the grounds that it is completely unsuited for the tractor. Sim痴 agreed to take it back for a refund less a 25% 途estocking fee? and of course I paid the freight both ways. The rep from Sims claimed that I am the 登ne and only person who has complained?
2.[FONT="] [/FONT]The cab includes two flat floor panels that go over a portion of the rubber floor of the tractor. These have no surface protection and will soon be paint free and rusted. They also make it impossible to sweep dirt out the door of the tractor; it just goes under the floor plates.
3.[FONT="] [/FONT]The front of the Cab consists of two panels, an upper and lower that are bolted together. The seam between them is perfect for water and dirt to penetrate. I sealed it with black silicone but found the inside still wet because:
4.[FONT="] [/FONT]The front window gasket has a seam right in the middle of the bottom, where water is best able to penetrate and it does.
5.[FONT="] [/FONT]The rear side safety and signal lights must be removed from the ROPS during installation. The holes in the cab sides where they are supposed to be re-installed are larger than they should be so additional washers are required.
6.[FONT="] [/FONT]Installing the side panels requires removal of four bolts from each of the tractor痴 fenders. Two of these bolts are then used to hold the side panel on. The other two are covered and cannot be replaced, even if you want to drill new holes for them.
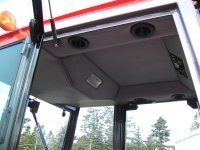
7.[FONT="] [/FONT]The rear header is attached to the ROPS in the area where the wires for the side signal lights and rear work lights run. It is very difficult to re-route the wires and secure the header without straining or pinching these wires. The header appears to have a cut-out at one end to accommodate the wire harness, but it is at the wrong end from where the wires actually are.
8.[FONT="] [/FONT]The door catch is a metal stud that protrudes about 2 inches into the door opening; it is very difficult to go through either door without catching something on this stud, particularly since the door opening is narrowed by the cab.
I致e just completed assembling and installing a cab I purchased on-line and I thought it might be beneficial to other members if I shared my experience and opinion about this product. Overall, I would Grade the design a D and the instructions a C-. I took notes and pictures during the installation after it quickly became clear to me just how big a mistake my purchase was. I want to share the specifics of the flaws I encountered that will definitely affect other B26 owners and perhaps purchasers of other Sims Cabs as well. I should point out that I consider myself fairly handy and have a complete shop full of tools. The basic instructions are condensed into 7 pages and fewer than 20 steps. This was accomplished by simply leaving out critical steps and explanations. Following are the problems I found with the instructions:
1.[FONT="] [/FONT]There is no listing of parts with descriptions referenced to photos of drawings of the part so you can determine easily if you have everything you should. Thus for example, when the instructions call for the 塗eader extension you have to take an educated guess as to what that is. (The photo of it being installed on page 9 shows it with a different shape).
2.[FONT="] [/FONT]Step 4 in the instructions call for 兎ight 5/16 x 18 1,1/2 bolts these were not supplied, instead all the bolts are セ in length.
3.[FONT="] [/FONT]The photo on page 4 shows bolts to hold the cowl to the tractor in front of the floor, the only direct connection between this part and the tractor. In reality there is no way to make this connection. The company rep said they decided not to have that attachment.
4.[FONT="] [/FONT]The photo in step 8 shows the rear fender of the tractor covered in many pieces of masking tape. There is no explanation of why and in fact this photo has nothing to do with the installation at all.
5.[FONT="] [/FONT]Step 13 says to remove the rear work lights to add the backhoe extension, but fails to say how or where to re-install them or that additional wiring will be required.
The Design Flaws I encountered:
1.[FONT="] [/FONT]First and most important, I ordered the backhoe extension so that I could use the backhoe while enclosed in the cab. The B26 is a TLB and switching between backhoe and rear implement use with no cab is a 15 minute operation requiring no tools. If you put the Sims backhoe extension on you will spend at least an hour with help and tools converting back and forth. Here is what you have to do to go from backhoe to tractor implement use:
a.[FONT="] [/FONT]Unbolt the lower rear cab panel from the backhoe foot guard.
b.[FONT="] [/FONT]Remove the rear work lights, their brackets and wiring.
c.[FONT="] [/FONT]Remove the side curtains and bottom curtain from the backhoe extension.
d.[FONT="] [/FONT]Unbolt the ten bolts holding the rear extension panels. (You will need a partner to hold two locknuts inside the cab while you unbolt from the outside).
e.[FONT="] [/FONT]Unbolt the rear header extension from the rear header and side panels.
f.[FONT="] [/FONT]Unbolt the rear lower panel from the rear upper panel
g.[FONT="] [/FONT]Bolt the rear upper panel to the rear of the tractor and side panels (get your partner to hold your nuts again) (hey, that doesn稚 sound good).
h.[FONT="] [/FONT]Install the curtain around the bottom of the rear panel and under the seat.
i.[FONT="] [/FONT]Re-install the rear work light brackets and lights.
After I saw what was involved I requested to return the back backhoe extension on the grounds that it is completely unsuited for the tractor. Sim痴 agreed to take it back for a refund less a 25% 途estocking fee? and of course I paid the freight both ways. The rep from Sims claimed that I am the 登ne and only person who has complained?
2.[FONT="] [/FONT]The cab includes two flat floor panels that go over a portion of the rubber floor of the tractor. These have no surface protection and will soon be paint free and rusted. They also make it impossible to sweep dirt out the door of the tractor; it just goes under the floor plates.
3.[FONT="] [/FONT]The front of the Cab consists of two panels, an upper and lower that are bolted together. The seam between them is perfect for water and dirt to penetrate. I sealed it with black silicone but found the inside still wet because:
4.[FONT="] [/FONT]The front window gasket has a seam right in the middle of the bottom, where water is best able to penetrate and it does.
5.[FONT="] [/FONT]The rear side safety and signal lights must be removed from the ROPS during installation. The holes in the cab sides where they are supposed to be re-installed are larger than they should be so additional washers are required.
6.[FONT="] [/FONT]Installing the side panels requires removal of four bolts from each of the tractor痴 fenders. Two of these bolts are then used to hold the side panel on. The other two are covered and cannot be replaced, even if you want to drill new holes for them.
7.[FONT="] [/FONT]The rear header is attached to the ROPS in the area where the wires for the side signal lights and rear work lights run. It is very difficult to re-route the wires and secure the header without straining or pinching these wires. The header appears to have a cut-out at one end to accommodate the wire harness, but it is at the wrong end from where the wires actually are.
8.[FONT="] [/FONT]The door catch is a metal stud that protrudes about 2 inches into the door opening; it is very difficult to go through either door without catching something on this stud, particularly since the door opening is narrowed by the cab.