ICF'S hands down without a doubt. I built my home completely from ICF's from footing to top plate. I am a carpenter by trade and I can tell you I would never never ever did I say never build a house for my self any other way. Don't worry its one of those things if you dont use them you will never know what your missing.
You are using an out of date browser. It may not display this or other websites correctly.
You should upgrade or use an alternative browser.
You should upgrade or use an alternative browser.
stick built or other ??????
- Thread starter Beavis
- Start date
- Views: 9222
/ stick built or other ??????
#21
patrick_g
Elite Member
Time constraints prevent a full description of my proven DIY approach for a safe room but I will get to it soon.
Walk out basements are great. I have one now. All the walls, earth covered or not, are 12 inch thick steel reinforced concrete. I have a guest room in the basement. It too is a safe room. It has a window but provisions for interior steel shutters. The rest of the not buried wall of the basement is glass, windows and sliding glass doors, and I made no provision to storm proof it. In case of a tornado just retreat around the corner to the guest room.
My master suite is a safe room too (on main ground floor level.) The upstairs bedrooms and other spaces have no safe room capability as they are traditional stick construction (2x6) and would not survive a robust tornado.
My approach to tornado warnings is to just go to bed at bedtime and not worry about it. If the rest of the house is gone in the morning we will still be safe and can call our insurance company.
One of the down sides to a saferoom/bedroom is lack of environmental sounds. You can't hear bird song or coyote singing and can just barely hear it thunder with the windows closed. I considered some outside microphones feeding the distributed whole house audio system so it would sound like the windows were open all the time if I wanted.
Pat
patrick_g
Elite Member
...and now time permits as all our guests are sleeping in (maybe I entertained them too hard yesterday?)
There are several ways to build an above ground shelter that will meet the guidelines. I gave it some thought and worked out a simple plan whereby working alone I could do everything except pump the concrete. Access to other means of lifting concrete could elliminate the requirement for a concrete pump.
I tend to be a bit conservative in my engineering (tend to overbuild when I don't know exactly how much is enough) so I may have overdone it a bit on the specs. I'm not including a PE stamp with this description/prescription so if you use anything I mention you will do so at your own risk/peril sans any warranty.
The larger the safe room the greater must be the strength of the components so stay reasonably small to conserve materials and keep the cost down.
The floor is typical poured concrete with a heavier that typical rebar schedule and thicker than most slab-on-grade construction. I used 1/2 rebar in a N-S x E-W mat on 8 inch centers. In fact ALL rebar was on 8 inch centers. I used a similar pattern in the walls and likewise in the ceiling except I used two parallel mats in the ceiling. I used 5/8 inch by 4 ft long rebar bent into 90 degree angles at the center giving 2 ft from the bend in both directions.
I augured pier holes under two of the corners. I attached the safe room I am describing to an existing garage with a monolithic slab floor and foundation. I drilled into the existing foundation/floor from the outside to dowel the floor of the safe room to the existing garage foundation with horizontal rebar. I drilled pier holes under the two corners of the safe room NOT connected to the garage. If the safe room was to have been built free standing I would have drilled piers under all four corners. The piers were not augured vertically but at a slant away from the safe room so as to give it more stability (about 15-20 degrees) and the holes were about 3 ft long and 12 inches in diameter (largest auger I had.)
I wanted some weight so I formed the floor and dug out some dirt to make for an 8-10 inch thick slab. To reduce the consumption of concrete I placed a lot of rocks in the bottom of the excavation but not to interfere with having the rebar mat 3 inches below the surface of the floor slab.
The walls were NOT formed up but were made of "knock out blocks" AKA bond beam blocks. ICF's would have been a good alternative but more expensive and I wasn't looking for insulation.
Bond beam blocks:
1. come in varioius sizes - I chose 16 inch long 8 inch high and 12 inches thick. They are also available in thinner sizes which may well be plenty strong but I had recently watched a rerun of "Twister" and may have been influenced by the scene with the "flying 18 wheeler."
2. are pre-scored on the ends to allow you to easily "knock out" 1/2 of the end wall of the block. When placed end to end with the top half of the end walls knocked out it is easy to get concrete to flow laterally through the blocks AND there is a channel for the horizontal rebar.
The pieces you knock out can be used for filler in the floor.
The rebar in the N-S walls is tied to the rebar in the E-W walls by the right angle rebar you bent (or bought pre-bent) every 8 inches in height (one per course of block.) Similarly the rebar mat in the floor is tied to the vertical rebar in the wall by the "corner pieces."
The block walls need not be constructed in the traditional manner with mortared joints but instead "dry stacked." Dry stacking is easy and requires little expertise. You can use small pebbles, larger pieces of sand or little fragments of the knocked out block pieces placed between blocks to make minor corrections to keep the stacked blocks plumb as you proceed course by course.
Each course of blocks (8 inches of height) has a horizontal rebar running through it, around the corners, continuous. Each cell of the block (2 cells per block) has vertical rebar in it. Odd and even courses are staggered so the ends of the blocks are not all aligned vertically.
"Corner rebar" connects the floor rebar to the wall rebar. The floor and piers are poured first and can be done by a single person with about any cement mixing method but to be practical skip the wheel barrow and hoe and use at least a small electric mixer or 3PH PTO driven mixer (what I used.)
NOTE: the corner rebar that is to connect the floor to the walls has to be spaced accurately enough so blocks will fit over them.
I poured the floor and piers in several small batches and stayed with it till finished so I did not get any "cold" joints by sort of "flowing" the job from one corner across the floor to ensure no cold joints. There will be a kinda sorta cold joint between the floor and walls but with all the rebar in use it just was not a strength issue to me. After pouring the floor, as soon as the concrete firms up enough you can put down the first course of block. Use care and get it plumb and true as that will make the next courses easier to get right. You can put a little concrete in the cells to help brace the first course against the rebar so it holds its position well. I would fill the cavities/cells no more than about 1/4 full, plenty to hold the block firmly in place on the rebar.
Once the floor cures sufficiently to support the weight of the walls, start stacking additioinal courses of blocks, staggering the ends like a traditional wall.
To be continued... Where we discuss door frame installation, ceiling forming, and other topics including ventilation and why the door must be an in-swing.
OK, I'm back (had a computer glitch and had to recover this post to submit it again so no real delay in original post and this continuation.)
The door frame must be secured very well to prevent it from bowing in under the tremendous force of the concrete. I recommend cutting a piece of OSB or plywood to fit in place of the door to hold the frame against the concrete. Sheet metal screws will secure it to the metal frame and the edges of the little holes can be sanded off or ground down (to elliminate little "meat hooks") after the OSB or ply is removed subsequent to the concrete curing sufficiently.
Forming the ceiling is done with shores (shoring like in a mine). OSB is a good choice for a form to go under the ceiling pour. The OSB is cut to fit the ID of the walls. Multiple pieces (or scraps) may be used by lapping another piece under the joint were two pieces come together. A 2x4 (at least a 2x2 or 2x4 ripped in half) is placed around the edge in contact with the walls and under the OSB. Virtually all fasteners used in forming this project are drywall screws. I prefer pairing 2x4's at right angles to each other (joined on their long sides in an "L" or "T" shape to be used as support columns to hold up the weight of the ceiling pour. These need to be located about every 16 inches like studs. Columns can be 4x4's but usually cost more than a pair of 2x4's screwed together. You can rent shoring such as pairs of 4x4 held together by a metal contraption that makes raising and lowering and securing the shore in length quite easy. I did not use these for my mom's safe room but did in my walk out basement. Work great but extra hassle getting, returning and do not rent for free.
I recommend running 2x4's on edge under the OSB of the ceiling form to make ribs for distributing the forces. The vertical shoring supports those 2x4's which are screwed to the OSB. I poured a 14-16 inch thick ceiling with two mats of rebar on 8 inch centers. This is quite heavy so significant shoring is required. You get back most of the wood forming and shoring material so it is not a loss, even recovering most of the drywall screws.
Vertical 2x4's are placed on the outside surface of the dry stacked blocks. Use boards longer than the wall height so they can be easily connected side to side over the top of the wall with horizontal 2x4's. "Kickers" (AKA diagonal braces) are run from the ground to the vertical 2x4's just mentioned. These kickers are screwed to stakes driven in the ground and the other end is screwed to the vertical 2x4's on the outside of the walls. These braces keep the walls standing vertical (plumb) during the pour of the ceiling and walls.
Extra care is taken to ensure there is a good fit on the forms where the ceiling meets the inside walls. You can caulk the joints if you want but mixing a little mortar or a small batch of concrete to use as caulk and applying it from above the ceiling forming will also work. It is best to do this only a little before you pour the ceiling so the mortar bonds to the fresh pour. You don't want big leaks when the ceiling and walls are poured as you can not access the interior if the room until the concrete cures sufficiently to allow removing the OSB from the door frame. Alternatively you can run 2x4 inside the door frame and use lateral 2x4 bracing screwed to these uprights to brace the door frame and leave a gap to let you crawl inside the room BUT I DO NOT RECOMMEND IT as if there were a failure you could be dead in an instant.
The door frame is installed so the door is an in-swing. This is important. If debris blocks the door you would be sealed inside a steel reinforced concrete vault. Opening the door inward gives you access to that debris and a chance of getting through it. I strongly recommend keeping certain tools permanently in the shelter, NEVER removed for use elsewhere. These include a shovel, axe, super HD prybar, and a saw.
Other items to be kept inside include drinking water intended for long term storage (not the typical over the counter Sparklets, Ozarka, or brand X) candles and water proof matches. A little food intended for long term storage.
Things to exclude: Electricity in the form of an extension cord or an outlet (lighting is a killer) Hard wired "land line" telephones are lightning dangerous too. A cordless phone with the base outside the room is safe but must be tested for sufficient operation as not all phones will work through a steel reinforced concrete wall (differs from model to model and which freq band it uses.)
Think sitting or reclined or mattress ( a futon is nice) for comfort as you might be there for several hours. Battery operated music is nice. If a NOAA weather radio will work for you in your location inside your shelter you want one.
Ventilation: form up at least 2 each 4x4 vertical holes in the ceiling or use 3 each 4 inch PVC pipes to form up for ventilation. Better to have mopr vents of smaller area as it reduced the liklihood of penetration by debris. Expanded metal is a good screening idea. "Dorade" vents as used on boats should be used on top of the vents to let air pass but not water from rain.
I used a 3-0 door which I reinforced inside and out with multiple horizontal 3x3 angles. I don't recommend a small door due to the debris blockage issue. The safe room door I got was bored for 3 deadbolts, the minimum I would use (nothing wrong with 4-5 except price.) The door frame is elevated to give a little clearance under the door. About an inch sufficient. This is where cool fresh air comes in allowing the warm moist stale air to exit at the ceiling level through the formed in place air vents. If you opt for mosquito screens on the air vents then go for more like an inch and a quarter or so under the door and use expanded metal inside and out at the bottom of the door. You can weld (or attach with sheet metal screws from the outside side of the door) expanded metal to prevent debris from getting in under the door. If using mosquito screen on the ceiling vents then add an extra vent in the ceiling as the screens inhibit air flow.
Pouring the ceiling and walls:
I hired a concrete pumper to be there when the redimix truck arrived. The cement truck dumps into the pumper's hopper and the puimper pumps the concrete through a hose. Yoi will need a couple ladders so you and the pumper can get above the top of the ceiling/walls of the shelter. You start pumping concrete into the wall cavities working your way around and back and forth till all the walls are full and overflow into the ceiling forms. keep pumping until the ceiling forms are full.
Do not pump one section of wall until it fills up. This makes for too much hydrostatic pressure and you invite a blow out. Do not pump the initial concrete onto the ceiling forms and let the excess drip into the walls. This tends to separate the aggregate out and results in poor concrete. Pour concrete into the walls in shallow "lifts" working all the way round the building making the depth increase just a few inches per pass (I would not exceed a foot per lift unless the pumper wants to accept the liability (he won't.)
I do not recommend the use of a water reducer plasticizer additive as it will encourage leaks. I do recommend 4000 PSI or greater mix. You want a fairly dry mix to avoid blowouts and get better final cure strength. The pumper will try to get you to let him make it super wet and fluid like oatmeal stirred with too much milk.) You want the thickest mix the pumper can adequately pump. While the pumper is going round and round back and forth lift after lift you (and any helpers if you are that lucky) can be doing likewise with long pieces of rebar and ladders, rodding the concrete by running the rebar up and down in the concrete to encourage it to flow out evenly to get a 100% fill of the cavities with no voids.
Alternative DIY approach:
I have done this for an 8 ft high block wall but not for a safe room. Put up scaffolding and fill 5 gal buckets about 1/2 to 2/3 full of concrete from your mixer. Hand the bucket to the guy on the scaffold who dumps it into the wall. Repeat until the wall is full at that location and then move a bit and repeat till the entire wall is full. Keep doing it till the ceiling form is full too. You need to stay at it to avoid cold joints. Stopping for lunch will give a cold joint. This Is quite possible to do as I have done it with one helper but 4 or 5 workers would be better if not using a concrete pumper.
With 12 inch knockout blocks you get a 12 inch thick concrete wall. The blocks are your forms. There IS NO REASON you have to put the blocks together with mortar. Even in San Diego the code allows you to go 6 ft high with dry stacked blocks that are not filled at all but that are stuccoed on the outside to hold them together. (Meets earthquake codes.)
You can adopt the stucco idea to the safe room. If after you dry stack your blocks you stucco the walls inside and out fairly thickly and the chances of blowout are greatly reduced so you can add some water reducer plasticizer to the concrete to promote easy flow, make the pumper happy, elliminate rodding, and make the job go fast. Each lift can be higher now which also makes the job go faster.
Make sure the water reducer plasticizer is added on site NOT at the cement plant as pot life is relatively short. It should be added on site, run to mix it properly and then poured with little delay.
I tried to put in everything I could recall but since I suffer from CRS (Can't Remember ****) I may have left stuff out. Just ask and if I can I will answer.
In general concrete cures to 90% of its final strength in 28 days. Don't be too hasty removing the shoring that holds up the ceiling. I'd wait 3 days before I started to remove ANY of the forms (kickers and outside vertical 2x4's) and longer before removing any load bearing shoring.
Pat
Last edited:
yooperdave
Veteran Member
- Joined
- Nov 28, 2001
- Messages
- 1,159
- Location
- Marinette, WI
- Tractor
- Tool Cat 5600, LS XJ2025H, Branson 4215HC
As a professional structural engineer, here is my $0.02:
ICF is very nice, air tight, quiet, and if reinforced properly, can be as structurally strong as you want. Usually much stronger than any similar wood framed structure.
The important thing is to get a qualified contractor who knows what he is doing. This type of construction is becomming more popular, so there are usually more contractors trying to get your business. Strength of concrete, admixtures, mix design, use of super plasticizers, vibrators/vibration, strength of rebar, dowels, lap lengths, etc. all need to be taken into consideration.
I structurally designed a roundish concrete house for my (former) Architectural Boss. The long headers were curved, and had cages of rebar to resist the resultant torsion due to the curved geometry. The construction firm went bankrupt, so it never got built.
I noticed that the forms are VERY expensive in my area - even with a professional courtesy discount.
Regardless of construction I would get a RADON detector. Radon kills many people. It is invisible and does not have an odor. Concrete buildings usually give off more Radon, so make sure your structure is well ventilated.
Good Luck,
Yooper Dave
patrick_g
Elite Member
ICF adventure. I hired a guy who was repping for an ICF manufacturer to do a bit over 1000 sq ft box (my master suite.) They cut holes in the top surface of the bottom horizontal part of the extruded plastic window frame. The reason was it was hard to get the mud to flow into that area so they would pour in extra from the top to avoid the void.
This guy had built several decent sized all ICF homes (in double digits) for clients and for spec and talked like he was really experienced. He was experienced. Experienced in doing the same thing wrong over and over.
I ordered the concrete delivery and requested a water reducer plasticizer additive to be added on site shortly before pouring. This makes the mud slipperier and it flows really well without having to add water/reduce the cured strength. The ICF genius said they would go around with a block of wood and a hammer, placing the wood on the ICF and tapping it with a hammer to help clear voids. Given the stiff mix (minimal slump) he said he used (usually a good thing strength wise) I suspected there would be oodles of honeycomb and voids left after the hammer taps hence the additive I ordered.
Then during the pour when the level of the lift significantly exceeded the bottom of the window frames the concrete was shooting up vertically out of the holes they had cut like miniature old faithful geysers. NO need to add any material to fill the voids (he he) Just slap a scrap over the hole and wedge a board on top. The ICF "expert" nearly soiled his linen. He was blissfully ignorant of water reducer plasticizers and how they would go a long way toward eliminating voids.
Through out this entire ICF evolution I was told over and over they were "the pros from Dover" and to let them do their job. I, a lowly customer had nothing for them.
It is not a happy occasion when you have to take the pros to school against their will. Another insult was the ICF genius insisting on another full truck when my calcs showed we needed 2-3 yds. I now have a monument to his stupidity in the form of a relatively short and quite crude concrete driveway to nowhere in a pasture. My dime of course!
If I had known then what I know now I would have done it myself.
A piece of advice:
It is more important that you get a contractor with a good system/approach than one who may have lots of experience doing it wrong the same way over and over.
I would be willing to wager $1,000 that if you peeled the styrofoam off one of the ICF houses he did before he did mine I could find at least one and probably more places where you could see daylight through a hole, maybe even fist size or larger in the concrete and of course areas with insufficient rebar-concrete contact.
Pat
patrick_g
Elite Member
Kubby Fan, I can make a comment... Concrete homes can be done extremely well and be not only nearly hurricane and tornado proof but extremely energy efficient, comfortable, low maint, termite and other wood destroying organism proof, and be as grand in appearance as your pocket book will allow.
There are traditional looking concrete homes in stormy areas which received minor cosmetic damage when the rest of the neighborhood was slicked. If you build a traditional appearing home (with or without basement but not earth bermed, earth sheltered/covered it can be made essentially indistinguishable in appearance to a traditional built home.
The concrete home of the type described above can be a real energy star. If you earth berm/shelter/cover on top and three sides with a major axis running E-W and a southern exposure with appropriate fenestration (assuming a northern latitude bld site or northern exposure for those down under) and overhangs compatible with your latitude and climate then you can get all the advantages of the structure referred to above but gain additional solar energy benefits and terrific daylighting as well as even better thermal performance.
If you like to listen to the crickets, cicadas, frogs, bob whites, or other environmental sounds then there is a shortcoming of a well built concrete home in that it is hard to hear thunder with the windows closed. Some folks use external microphones to "pipe" ambient environmental sounds to their sound system so the house is not as quiet as a tomb.
Most shortcomings attributed to concrete homes should be attributed to the architect or builder for not doing it right or the owner who may out of ignorance force some issues to be improperly dealt with. Unfortunately many homes are built (concrete or otherwise) that are NOT given appropriate attention to an integrated systems engineering approach. You can't just take an eclectic collection of "neat" ideas, force the builder to incorporate them, and expect them to all dovetail seamlessly, especially since it is a very very precious few architects and builders who really understand the concrete home and how to do it right.
Pat
inveresk
Platinum Member
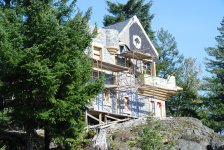
I'm with the concrete aficionados. A well designed and built concrete structure will out perform stick built in just about every aspect except cost and construction speed. Here are a couple shots of a stone clad, insitu concrete home we designed for a client and which we've spent the last eighteen months building. The stone couldn't be readily hung from the structure using a construction method other than insitu concrete. There is just no way we could have built this using stick frame. The complexity of the structure, including curved stone corbels and the need to hang eight stone gargoyles from the envelope, shows just how versatile a material insitu concrete can be.
Attachments


woodlandfarms
Super Member
- Joined
- Jul 31, 2006
- Messages
- 6,139
- Location
- Los Angeles / SW Washington
- Tractor
- PowerTrac 1850, Kubota RTV x900
If you can, go get the latest issue of Dwell. Fantastic Prefab Concrete home. Looks pretty amazing.
Carl
Carl
patrick_g
Elite Member
How difficult is it to finish the home inside and out? In our area vinyl siding is commonly used on the outside. Is it difficult to attach door casing and jambs? What about the baseboard trim? How is it attached? How are cupboards supported on the walls? These are a few things I have wondered about.
Not all interior walls of concrete homes are load bearing or concrete.
My home has three doors in concrete walls. Two out of the three were NOT properly installed. One was cut out using a carbide tipped hydraulically powered chain saw running on a steel rail anchored to the concrete wall and replaced with a new jamb (virtually a perfect fit) and since it is doweled to the existing structure it is plenty strong for a safe room.
The second bad frame was left in place and a new door (HD steel bored for three deadbolts, yes another safe room... we have two, on separate floors) and a door was custom modified to fit the frame. Kind of ironic and funny actually as the concrete guy who installed the second of the above mentioned disasters was highly amused when the ICF installer messed up one of the two doors he installed AND THEN I found his installation to defy door installation.
In both cases not enough bracing was placed horizontally inside the door jam to withstand the force of the concrete before it began to take a set. Every time I would suggest such an outcome I got the "We are the pros from Dover" speech.
The above described door frames were HD steel frames. Regular wooden frames can be put in concrete "door holes" by forming the door hole oversized to permit fastening rough framing wood to the hole (sized like a standard stick built door situation) and then installing the frame, jams, and casing in the routine stick built manner. Tapcon screws are one way to attach pressure treated wood to the concrete. (Pressure treated wood when wood touches concrete is a good idea.)
Typically the location of a kitchen's wall cabinets is known prior to pouring the concrete wall. You can inset pressure treated blocking (2x4 is sufficient) in the forms. Screw some screws through the blocking into the empty cavity into which concrete will be poured so that the concrete will grab the threads and the board will be secured. Alternatively (I like this better) you can rip the edges of the 2x blocking (pressure treated 2x4 or 2x6, whatever you like) such that the cross section (as viewed from the end of the board) is a trapezoid. Place the trapezoidal blocking into the formed wall cavity such that the wider dimension is inside the wall and the narrower dimension is flush with the forms for the inside surface of the wall. After the forms are pulled you have pressure treated wood embedded in the concrete wall. You will want two horizontal runs of this embedded wood located to accept the fasteners which hold the wall cabinets to the wall.
You don't really need full length horizontal blocking if you know were your cabinet's wall hanging fasteners will be with some precision. I'd use the full length ones so any screws at the height above floor of the blocking will hit wood, not concrete. You can use Tapcon fasteners and the supplied carbide bit to attach the cabinets to the concrete but... most cabinet installers are used to and set up for fastening to wood and may not be happy fastening to concrete. I have a pneumatic "T" nailer that shoots nails into cured concrete and it could be used for hanging cabinets on a concrete wall but it would not be my first choice.
I got lots of use out of the "T" nailer when I put 4 ft high wainscot over the concrete walls of my lower level. I used rough ERC (Eastern Red Cedar) slabs with the bark on for most of the covered walls and planed ERC for a guest room. From the 4 ft above floor level to the 9foot plus ceiling I used very short pile carpet glued to the concrete walls and trimmed around the edges with ERC.
HMMMM I posted a jillion pix at
South Central Oklahoma Farmhouse
But they seem to have fallen into the bit bucket or evaporated into cyber space when a NEW style forum application was instituted.
Pat
EddieWalker
Epic Contributor
Could you give more information about this?
As you've read by the replies already, it is more expensive and less forgiving. There are huge advantages to concrete, but at a cost that comes out of your pocket. Some advantages are worth the expense of going with concrete walls, like a basement. For me, the price you pay for a concrete house can give you a much better home using larger lumber, better windows and spray in insulation.
When the home is all said and done, you shouldn't be able to tell what it was made out of anyway, so the advantage of concrete is structural. If you need that kind of strength, like Inveresk showed in his post, then it makes sense. For a residential home, it's not needed.
I tell my clients to start out with what they want out of a home. Put in every bell and whistle that they can think of. Then let me add to it with things that I can think of, and then figure out what it will cost. We're always way over budget right off the top, so then we scale it back to what they really want, but in a building that's big enought accomodate all those extras in case they decide to add them later. During the planning process, there is never enough money, and always allot of compromises. Making your walls as expensive as possible just isn't an option for my clients.
On a practical sense, figure out what the R value is for a concrete wall and what it costs to build that wall. Then figure out what a similar R value will be using stick framed walls with spray in insulation. Now add your R-4 double paned windows to that and realize that no matter how much insulation and how thick your walls are, you still have windows that only have an R-4 value to them. Of course you can go to tripple or four paned windows that have a much higher R value, but are also extremly expensive.
It's all about money and what you want to spend it on. If you want to spend it on your walls, then concrete walls have allot of advantages. If you want to spend it on cabinets, trim and appliances, then having Fort Knox for walls is something that most home owners deside isn't all that important.
Eddie
