Swap ROPS bolt / pin

/ Swap ROPS bolt / pin #1  

marting

New member
Joined
Aug 4, 2019
Messages
8
Location
Melbourne, Australia
Tractor
Kioti CK4210
Hi all,

I have just acquired my first tractor - a Kioti CK4210 to help manage our little hobby farm in Australia.

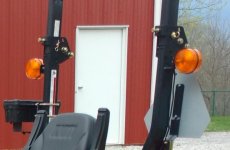
With the ROPS up it is too tall to fit through the door of my shed where I'd like to park it. I've worked out how to fold it down but the way it's setup makes this quite time consuming.
Since this is a safety feature and I'm quite new to tractors I had a couple of questions around this.

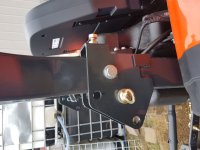
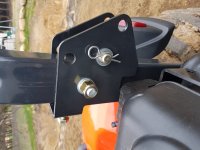
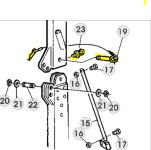
They way it was delivered there is a bolt+nut in the top hole that locks it in place and a pin with a handle in the hinge slot lower down. I'll attach pictures if it lets me.
Given the lock bolt is the one that has to come out to fold it and the hinge pin stays in place this seems backwards. Can anyone see a reason it would be setup this way? I'd like to just be able to pull out 2 pins, fold, replace pins instead of getting out 2 wrenches.

They are easy to swap so next question would be if there are any safety concerns in doing that? For instance is the upper locking hole more structurally significant than the hinge? I don't know how to evaluate the strength of the pin vs the bolt. I've read about grades 2,5,8 on this forum but we don't use that system here. The bolt has 7T DS written on it; I did not notice any markings on the pin. What kind of pin would I need to be at least as strong as a 7T bolt?

Lastly as it was delivered those lock bolts were extremely tight. Took 2 people with extended leverage wrenches to get it loose. Is the tightness of these bolts a significant factor in performance of the rops? They have nylon lock nuts so don't think they'll come loose on their own. I've not made them as tight now and it leaves the rops with a small amount of forward/backward free play which I can compensate for by pushing it back with the little knock bolt at the front but it leaves it sitting at a very slight angle instead of straight up. Would that be a problem?

Thank you for reading and any advice you can share.
-Martin.
 

Attachments

  • 2019-08-04 15.31.43.jpg
    2019-08-04 15.31.43.jpg
    3.6 MB · Views: 883
  • 2019-08-04 15.32.03.jpg
    2019-08-04 15.32.03.jpg
    3.6 MB · Views: 596
/ Swap ROPS bolt / pin #2  
Kubota uses a similar setup. Following offered for what it is worth:


Quote Originally Posted by AGTtactical
"I have an L6060 ROPS. Right now I have to fold the ROPS down to fit it in my temporary barn. Has anyone replaced the factory bolts with pins so you don't have to bolt and unbolt these every time you use it?"


The ROPS are made in Kubota plants in Georgia, not Japan. ROPS fittings are inch standard, not metric.

The factory bolt is 5/8" X 16 threads per inch (fine thread). 5/8" bolts are easy to find but are usually 12 tpi, (coarse thread). If you find a 5/8" X 16 tpi thread bolt in your local hardware store it will almost certainly be Grade 8.

5/8" X 16 tpi bolts are always available on eBay.


I replaced the two factory ROPS hinge bolts with 9/16" X 4" clevis pins.

Link: Clevis Pin Universal 9/16 x 4 LCS ZC (8 Pieces) | eBay

These are perfect length. Hairpin clip goes in hole #2.

After you hit your garage header a couple times, plus a few tree branches, the ROPS will vary a few 1,000s, so the pin holes will not line up.

On the front of the ROPS there is a welded on nut on each side, there so one can insert a bolt as a stop, to line up the ROPS pin holes perfectly. Welded on nuts on the front of the ROPS take 3/8" - 24 thread per inch (fine thread) X 1" bolts to align the ROPS holes. Tight fit the last 1/8", probably due to paint in threads. Turn well lubricated bolts with a wrench the final 1/8" during first insertion.

Tractor Supply Company (TSC) has 3/8" fine thread bolts NOT in the bin section, where 3/8" coarse thread bolts are, but in the Grade 8 drawers, in two-bolt packs.

As stops will seldom be moved I suggest lubricating bolts with anti-seize compound.

Note: One of the "cup holder" type bays on the operator's console has a channel cut on the inner side, so two ROPS bolts will fit in the bay with an inch of the bolts and perpendicular hairpin clips protruding through the channel.
 
/ Swap ROPS bolt / pin #3  
View attachment 615999 . This is the setup on my 2009 Kubota M6040. To lower the ROPS - remove the hair pin, unscrew that bolt, pull it out, lower the ROPS. I never have to touch the bolt with the nylock nut. My bolt/nylock nut are just tight enough so the ROPS will not flop over of its own accord.

There is a nut on the bolt with the hairpin. This nut is welded onto the back side of the bracket. I just screw that bolt in all the way - finger tight - attach the hairpin.
 
Last edited:
/ Swap ROPS bolt / pin #4  
I guess the pictures aren't really showing what I need to see. On mine, I never have to touch the bolt/nut unless I want to adjust resistance on the pivot point. I pull the pin, move the top section up or down, then reinsert the pin, no wrenches needed. Even my small one can get heavy though and could do one's head a bit of damage if they lost their grip on it. That's where the bolt/nut come into play and need to be adjusted properly to allow easy movement but not completely free.
 
/ Swap ROPS bolt / pin #5  
You are saying the ROPS swings on the bolt with the hairpin & is locked into place with the bolt with the nut???? JMHO - but somebody, in assembly, got those two bolts reversed. The ROPS should swing on the bolt with the nut & be locked into place with the bolt with the hairpin.

Check with your local Kioti dealer on this situation BEFORE you make this change.
 
/ Swap ROPS bolt / pin #6  
I think you just need to loosen the bolt on the front so you can pull the pin out and drop the ROPS.
 
/ Swap ROPS bolt / pin #7  
marting - the more I look at your pictures and think about it - I think your OEM ROPS setup is correct. You are just doing the "fold down" the wrong way. Do like PhantomOfHeat say. Forget about the big bolt with the nut. Pull the hairpin - unscrew THAT bolt - drop the ROPS. Use the bolt/big nut to adjust the tension on the ROPS. Just to the point where it can be folded but not flop down by itself.
 
/ Swap ROPS bolt / pin #8  
jeff9366, you have your thread per inch wrong; it's 5/8-11 and 5/8-18 for coarse and fine threads.
 
/ Swap ROPS bolt / pin #9  
It looks like it was assembled wrong. I would swap the bolt and pin so you can pull the pin to fold the ROPS
 
/ Swap ROPS bolt / pin #10  
This is how mine are attached on my CK3510SE.
 

Attachments

  • Image 1.jpg
    Image 1.jpg
    367.8 KB · Views: 410
/ Swap ROPS bolt / pin
  • Thread Starter
#11  
Thank you all for reading & responding.

Oosik/Zebra - I tend to agree it feels like they just assembled them backwards.

Phantom - I did try just pulling the pin and folding around the bolt the first time but it's physically not possible. Trying to pivot from the center of the bar like that means the bottom part of it would need to come down slightly and it impacts the top of the frame underneath. Pivoting from slightly in front where I have the pin works.

DiggingIt - Great advice on the hinge bolt tightness; I'll keep that in mind.

Chevy - Your setup seems to confirm it - I think that is how it should be. What is the purpose of the 3rd/lowest bolt on yours? Does the rops just sit on that so it doesn't come all the way down?

I'll try to contact the dealer and see what they say about it; not too confident in their knowledge (mostly a rural supplies store) but maybe they can pass it on to Kioti to check.

Cheers,
-M.
 
/ Swap ROPS bolt / pin #12  
I'm a novice here, it looks correct to me, but it would e helpful to see a picture from the rear.

I assume below bolt #2 (see photo) is the separation in the bottom and top of the ROPS. The plate is welded to the bottom half.
Three scenarios perhaps?

First: Pin (#3) should be in the top hole (A) to keep it vertical. Bolt #1 is used to press the ROPS against the pin to keep from rattling.
Second: Pin in existing hole (B) allows the ROPS to drop through doorways. The end of the ROPS when dropped should swing near the area circled in black with red arrow.
Third: Pin in hole (C) allows it to drop even further. Although not sure why, maybe shipping.

I also assume if the ROPS isn't dropping per this photo, Bolt #2 has been over tightened to keep it in place. It should be loose enough to move without any tools necessary.
ROPS Capture.JPG
 
/ Swap ROPS bolt / pin
  • Thread Starter
#13  
East - thanks for taking the time to mark up that picture. Attached is one that shows it from the rear.
The plates are welded to the bottom frame. The round tube which the pin currently sits in is welded to the front of the top frame.
The reason it cannot pivot around bolt #2 is because the top half tries to fold down into that little gap and hits the bottom half. That doesn't happen when pivoting around the tube (B) so that is definitely the hinge point. When folding from there it does indeed swing out as you show with the arrow & circle. Bolt #2 must be removed for that to happen.
I think C does line up to allow locking part-way down. Don't recall A...I don't think it did so not sure what that one is for. If you don't pin it at all it'll fold all the way down...at least as far as resting on the flail mower currently attached.
Cheers.
 

Attachments

  • 2019-08-08 10.12.56.jpg
    2019-08-08 10.12.56.jpg
    4 MB · Views: 174
/ Swap ROPS bolt / pin
  • Thread Starter
#14  
Feedback from dealer:
"Sorry you can't swap the bolts as the secure ones are high tensile just in case of a roll over. Means you have to loosen off each time".
He was not aware of an equivalent high tensile pin.
What a pain...maybe I need to build a bigger shed.
 
/ Swap ROPS bolt / pin #15  
Feedback from dealer:
"Sorry you can't swap the bolts as the secure ones are high tensile just in case of a roll over. Means you have to loosen off each time".
He was not aware of an equivalent high tensile pin.
What a pain...maybe I need to build a bigger shed.

I don't buy that. I am not an engineer, but do not think a bolt would be any better than a pin in roll over.
John Deere (on my 6415) uses pins. There is an eye bolt 23, (highlighted yellow) to prevent rattles. Probably an eye bolt, so no tool required to tighten. The pin 19 with the tethered hairpin (also highlighted yellow) is the pin you pull to fold the ROPS. 22 is the hinge pin. See drawing
 

Attachments

  • 6415ROPS.PNG
    6415ROPS.PNG
    108.6 KB · Views: 158
/ Swap ROPS bolt / pin #16  
"High tensile". Are there such things a tougher than Grade 8?? In a real roll over both the bolt AND the pin could be stressed. I would hope that both are "high tensile" - or whatever.
 
/ Swap ROPS bolt / pin #18  
^^ Perhaps we can post pictures here for all to see, now and in the future. Even those of us who are not Vidiots?
 
/ Swap ROPS bolt / pin #19  
This is how mine works. Can't find pictures of the OP's exact model, but some other brands appear to work differently.


ROPS Down 2.jpg ROPS Down.jpg ROPS Up 2.jpg ROPS Up.jpg
 
/ Swap ROPS bolt / pin #20  
Applying my version of common sense...

A removable pin should be used in a location where it is removed sometimes. Otherwise a bolt would suffice.

BOTH locations need a strong pin/Bolt to ensure the integrity of the ROPS if an accident occurs.

Putting the bolt in the location that facilitates the folding operation, without its removal makes sense.

Putting the pin in the location where it will be removed, when needed to fold the ROPS, makes sense.

In my world I would swap the bolt and pin and not think twice about it.
 

Marketplace Items

2008 Godwin Dri-Prime CD103M Towable Trash Pump (A59228)
2008 Godwin...
2014 VOLVO A40G OFF ROAD DUMP TRUCK (A60429)
2014 VOLVO A40G...
UNUSED SDLANCH SDLGC100 ELECTRIC GOLF CART (A60430)
UNUSED SDLANCH...
(2) NOS-8 LUG- 7000Ib 74SC-93 HUB FACE DROP AXLES (A60432)
(2) NOS-8 LUG-...
UNUSED KJ K3325G 33' X 25' DOUBLE GARAGE (A60432)
UNUSED KJ K3325G...
Unused 2025 CFG Industrial QH12R Mini Excavator (A59228)
Unused 2025 CFG...
 
Top