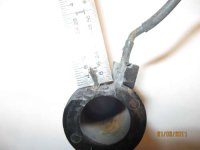
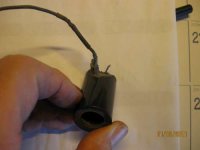
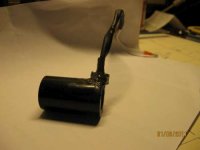
Since I figured this coil was toast, I continued to nibble away at it. Got it down to what you see here. I may (if I'm carefull and lucky) get the old lead soldered on to it. It's too bad I don't have enough material to use a crimp type connector. I need to find my old beast soldering iron and heat shrink tubing.


You are using an out of date browser. It may not display this or other websites correctly.
You should upgrade or use an alternative browser.
You should upgrade or use an alternative browser.
TC 40D
- Thread starter ENTS
- Start date
- Views: 8217
More options
Who Replied?
/ TC 40D
#21
jimmysisson
Veteran Member
- Joined
- Jul 11, 2005
- Messages
- 2,358
- Location
- W.Mass
- Tractor
- 1993 NH 2120 (the best), 1974 MF 135 (sold, but solid), 1947 Farmall A (bought, sold, bought back, sold again), 1956 MH50 lbt (sold, in 1980, darn it)
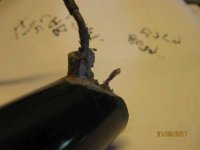
No, it's good you can't crimp on a connector. A soldered joint is best here. Maybe you can clamp on some forceps or equivalent as heat sink to confine heat to the joint. Clean and good flux will help. Or Jim Inman can tell you exactly how to do it!
Best, Jim
Best, Jim
JFS2295
Silver Member
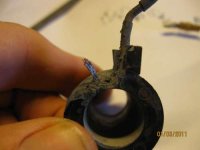
I doubt that wire is the winding wire, rather the connection wire. Coils are usually wrapped with single stand magnetic wire, something available readily.
If it were mine, I would use something like Deoxit to clean the copper then splice solder in a new length of wire, heating from the new wire side. Some of the connection may be cold soldered, but you should get enough to make the connection. The new wire could be insulated with a heavy grade of heat shrink, possibly adhesive lined.
You'll never find a third party replacement for that coil. However, if it is replaced with a new one I would start taking some measurements, then slowly abrade it down to base wires. If you are not comfortable doing it, there are people out there (haven't used one for decades) that restore old automotive coils like this that could rewind the coil with new magnetic wire and rebuild it. It might turn out less expensive then the whole valve deal.
jinman
Rest in Peace
- Joined
- Feb 23, 2001
- Messages
- 21,059
- Location
- Texas - Wise County - Sunset
- Tractor
- NHTC45D, NH LB75B, Ford Jubilee
Yessiree! You have plenty to solder to there. You did good.:thumbsup:
Here's how I would proceed. I'd try to find some liquid rosin flux to coat the wire before soldering. The wire needs to be twisted back close to it's original twist and then pretinned. Coat the wire with flux and then apply a nice thin coat of solder. Don't glob on the solder, it's not necessary nor desirable. Do the same thing with the wire you are going to attach: Clean twist, flux, and pre-tin. Next, flux both wires and put them together end-to-end with an overlap while heating. You only have to melt the solder since both wires are pretinned, but add a tiny bit of solder to make a full connection, remove the heat and hold very steady to let the joint cool. Slide some heat shrink tubing on there and shrink it down. Next, apply the JB weld to build the area back up and give the joint physical strength. You'll be done and back operating in no time.
That's how I'd do it, but it's not my job to do and this is just all a suggestion. The hardest part may be finding liquid rosin flux. Electronic repair shops used to have it, but they are scarce as hen's teeth these days. If you can't find liquid flux, you may just use the rosin core solder, but extra liquid solder will surely help. Everytime you think it's too much trouble, just remember, you are saving $372.
EDIT: Whatever you do, DO NOT use plumbing solder or acid flux. Radio Shack has solder and this paste flux that is ideal for the job.
djradz
Veteran Member
Yes, definetely use some rosin paste flux. Simply smear a a small amount onto the entire 1/4" lead and if possible, even get some between the strands but be careful not to bend the strands so much that you start to break them off. Definetely do the pre-tinning Jim describes.
You mention you have an old heavy-duty soldering iron. I would NOT use that here. You don't need that much heat here, and it would be sort of like trying to paint a masterpiece with large magic-markers. Try to locate a soldering pencil, with a tip about the same size as the broken wire or at most, only slightly larger. Maybe it's time to invenst in a nice automatic-temperature-regulating one? Your work will be much more precise, neater, and you'll get the heat right where it is needed most.
When you select the piece of wire you plan for the splice, try to find one that is rather flexible. Until you repot (JB Weld as others suggest) the entire area, the less stress you exert on that little stub of wire the better. Keep the diameter (gage) of the wire small too. At less than 2 amps, you don't need much of a wire. In fact, the existing larger wire is probably only that size for physical strength. I would think an 18 awg will work just fine, but 16 might also be OK.
Good luck, I'm sure you'll do fine!
jinman
Rest in Peace
- Joined
- Feb 23, 2001
- Messages
- 21,059
- Location
- Texas - Wise County - Sunset
- Tractor
- NHTC45D, NH LB75B, Ford Jubilee
You mention you have an old heavy-duty soldering iron. I would NOT use that here. You don't need that much heat here, and it would be sort of like trying to paint a masterpiece with large magic-markers. Try to locate a soldering pencil, with a tip about the same size as the broken wire or at most, only slightly larger. Maybe it's time to invenst in a nice automatic-temperature-regulating one? Your work will be much more precise, neater, and you'll get the heat right where it is needed most.
+1 on the pencil tip soldering station. . . however, they are an expensive purchase for someone doing a single job. This Hakko on Amazon is around $100. I got lucky a few years ago at an electronics flea market in Dallas. I picked up a whole box of Hakko stations for $25. There must have been 12 solder stations in that box and I salvaged enough good parts for three perfectly operating solder stations.:thumbsup:
EDIT: And since we are turning Fred into a NASA certified solderer,
the rosin flux should be cleaned off the connection before applying the heatshrink. That's because some rosin fluxes are "mildly activated" with a tiny bit of acid. The best cleaner I have found is simple ol' rubbing alcohol. What you buy at the drug store is 75% pure. We used 99% pure for aeronautical soldering, but for this application normal Isopropyl Alcohol and a soft bristle brush will clean that connection without doing any damage to the insulation or potting material of the coil.Okay, I admit I'm a bit **** about my soldering. Sorry...
djradz
Veteran Member
Yes, they typically are rather high. This Velleman unit however, at All Electronics, appears as if it would work just fine and is only $25. Maybe not the best, but surely adequate.
TEMPERATURE-CONTROLLED SOLDER STATION 50W | AllElectronics.com
... or this slightly better one, but with only a few left for sale.
http://www.allelectronics.com/make-...PECIAL-TEMP.CONTROLLED-SOLDER-STATION//1.html
TEMPERATURE-CONTROLLED SOLDER STATION 50W | AllElectronics.com
... or this slightly better one, but with only a few left for sale.
http://www.allelectronics.com/make-...PECIAL-TEMP.CONTROLLED-SOLDER-STATION//1.html
Last edited:
Hooked_on_HP
Veteran Member
Why couldn't you replace the coil with one like this. https://www.surpluscenter.com/item.asp?item=9-6301012&catname=hydraulic
If you could find the right i.d. and height you should be able to use it.
Bill
If you could find the right i.d. and height you should be able to use it.
Bill
jinman
Rest in Peace
- Joined
- Feb 23, 2001
- Messages
- 21,059
- Location
- Texas - Wise County - Sunset
- Tractor
- NHTC45D, NH LB75B, Ford Jubilee
Well, it certainly isn't pretty but I've got continuity thru it and good connectors. I'll get it back on the tractor tomorrow.
:thumbsup::thumbsup::thumbsup: You're gonna love having done this and saving big bucks.:cool2:
