The Log house Project begins........

   / The Log house Project begins........ #1,241  
Rick,
What are you going to use to put a finish on the walnut?
hugs, Brandi
 
   / The Log house Project begins........ #1,242  
Ron your a riot.:D These spikes where really nails about a foot long and about 1/2 inch diameter. My Dad was an Aggie, but an honest Aggie.:laughing:
hugs, Brandi

I'm sure he was.
You wouldn't believe the number of old iron RR spikes in trees up here leading to old rotted out deer stands.
Of course now they use fold up ladders with padded perches and porta-potties built in.:cool:
 
   / The Log house Project begins........ #1,243  
pacerron - and don't forget the add-on pockets for cell phone and MP3 player. :)
 
   / The Log house Project begins........ #1,244  
Yep, That's the old tried and true method.
Ok for some small projects, but I sure wouldn't want to have to do it to
a couple thousand linear feet of door, window, and base molding.
The problem with Walnut is the finer you sand it the more the color and contrast dulls. Then it takes some oil to get the richness alive again.
Then rub, rub, rub.

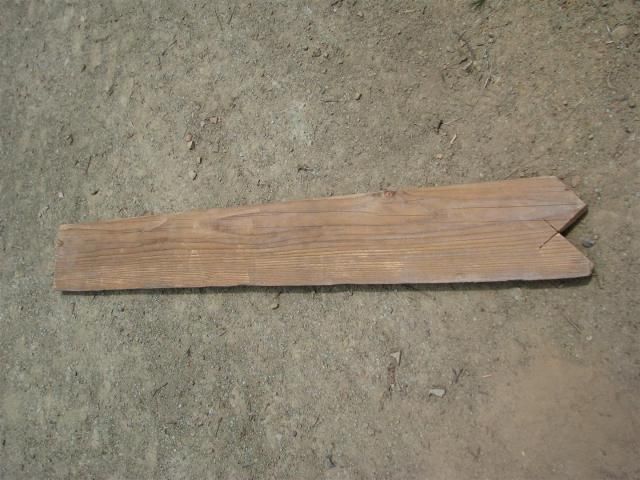
I can see the natural curve of an old flintlock on that first crooked piece
of walnut you pictured:D
It is usually easier to deal with the fuzzies after your first coat of finish is on and cured. The finish tends to lock them in place, so when you hit it with fine sandpaper (nothing coarser than 220) it shears them right off and leaves a baby-butt smooth surface. You need to continue adding finish layers of course, as the first one gets scuffed up pretty bad, but you weren't stopping at one coat anyways, now were you? :D

If you just use oil, you will need to wait a while (a few days) as that stuff cures very slowly.
 
   / The Log house Project begins........ #1,245  
pacerron - and don't forget the add-on pockets for cell phone and MP3 player. :)

For sure.. and lunch:D
They are not supposed to use the walkie talkies or cell phones to let their buddy know a big one is heading there way but don't bet on it:)
 
   / The Log house Project begins........ #1,246  
It is usually easier to deal with the fuzzies after your first coat of finish is on and cured. The finish tends to lock them in place, so when you hit it with fine sandpaper (nothing coarser than 220) it shears them right off and leaves a baby-butt smooth surface. You need to continue adding finish layers of course, as the first one gets scuffed up pretty bad, but you weren't stopping at one coat anyways, now were you? :D

If you just use oil, you will need to wait a while (a few days) as that stuff cures very slowly.

Not me, I used red oak for my trim, a pre-stain conditioner, and some custom dark stain my cabinet maker witched together and sold me so the trim would have an exact match, and a spray gun for the final finish. Still a fun beginning
became a labor of dedication and a case of "cabin fever" long before I got all the trim done and the panel doors as well. But it turned out well.
It is strange though, how when you do stuff yourself, everybody oohs and aahs about it, but you remember right where every blemish is located and how you tried to fix it.
I was really just interested in M-7's plan to attack the fuzzies and what finish he will use since I hate laborious time consuming sanding anyway and remember the time spent getting Walnut right on past projects.
Thanks for your input. I've done that method as well.
 
   / The Log house Project begins........ #1,247  
I'm sure he was.
You wouldn't believe the number of old iron RR spikes in trees up here leading to old rotted out deer stands.
Of course now they use fold up ladders with padded perches and porta-potties built in.:cool:

Ron,
I can't see using RR spikes. Kinda short for a full foot width to step on. Must have just been knubs to step on.
hugs, Brandi
 
   / The Log house Project begins........ #1,248  
Ron,
I can't see using RR spikes. Kinda short for a full foot width to step on. Must have just been knubs to step on.
hugs, Brandi

You must have big feet:laughing:
The boots of yesteryear weren't all puffy with quilting and bottoms to make you 3 inches taller and your feet 2 inches wider. They didn't even keep your feet warm!
Most trees had the spikes up both sides so you used both hands and both feet and climbed like a monkey. 3-4 inches sticking out was plenty.
You pulled your gear up with a rope after you got up there.
Geez.. I wouldn't want to take you rock climbing:D
 
   / The Log house Project begins........
  • Thread Starter
#1,249  
Rick,
What are you going to use to put a finish on the walnut?
hugs, Brandi

Why more Tung Oil of course:thumbsup:

Love the stuff!

No sanding on the Walnut...it's going up right off the sawmill...after drying of course.
 
   / The Log house Project begins........
  • Thread Starter
#1,250  
I framed up all the main floor interior walls, took pictures and now they didn't show up on the camera download
scratch.gif


So then I started on the vaulted ceiling rafters in the bathrood and master bedroom. I had to make a template first:
Studwallsandvaultedceilings002.jpg


Then replicate them and put 'em up:
Studwallsandvaultedceilings006.jpg


Studwallsandvaultedceilings004.jpg
 

Tractor & Equipment Auctions

2017 Ford F-150 Pickup Truck (A54814)
2017 Ford F-150...
2018 Chevrolet Malibu Sedan (A53424)
2018 Chevrolet...
IRMC High-End Massage Chair (A53316)
IRMC High-End...
Sterling AT (A55301)
2018 John Deere 470G LC Hydraulic Excavator (A53421)
2018 John Deere...
2015 Ford F-350 Utility Flatbed Truck (A51692)
2015 Ford F-350...
 
Top