Tips to modify / solder a brass radiator

   / Tips to modify / solder a brass radiator #1  

Sodo

Elite Member
Joined
Apr 21, 2012
Messages
3,197
Location
Cascade Mtns of WA state
Tractor
Kubota B-series & Mini Excavator
I need to move this radiator outlet. My plan was to unsolder it, pull ot off, cut a hole and solder it in, then solder a brass cover over the old hole.

I was planning to just use flux & solder from my plumbing kit. I've done lots of plumbing with copper, but never soldered a radiator. I will be paying good attention to avoid melting the long seam between the tank and core.

Any tips?

Where can i get a piece of brass to cover the hole?

Where can I get 'new' outlets? (would like a size 3/8" larger)

willys_rad_4.jpg

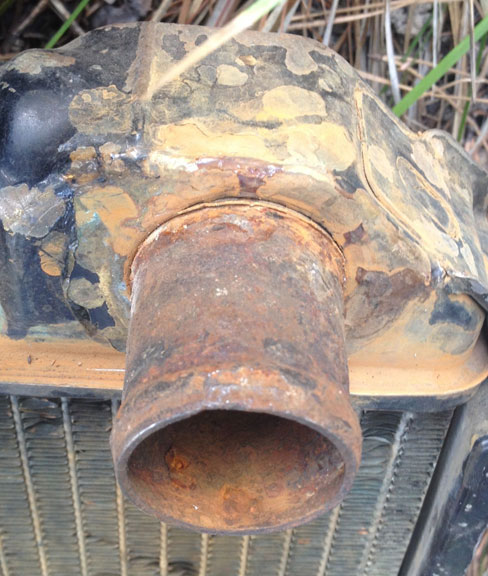
This inlet leaks, you can see the broken solder joint, it had a sealer on it which I peeled off. Is it likely that I can get this clean enough to re-solder?

attachment.php
 

Attachments

  • willys_rad_5.jpg
    willys_rad_5.jpg
    77.2 KB · Views: 3,617
   / Tips to modify / solder a brass radiator #2  
If that joint is that bad, the core is likely messed up too. Anyway, sure, with a torch you could heat that up enough to twist and pull it, but dropping it off at your local radiator shop will likely be far less of a hassle.
 
   / Tips to modify / solder a brass radiator #3  
I cant give any good advice on finding the material you need but I have soldered a radiator before. Yes, I simply used the solder I had on hand that I normally used for sweating copper. I've used flux and solder and flux core with equal success.
 
   / Tips to modify / solder a brass radiator #4  
Why does that hose bib look like it is made from carbon steel. Most radiators I have seen, that is brass also. Clean it up good after removing the hose bib and flux it good with solder flux and it should solder up really well. Don't heat it more than needed to make the solder flow around the joint so you don't disturb the tank top.

If the core is stopped up a bit, this may be a good time to rod out the core or at least get it boiled out by a radiator repair shop especially if you have some problems getting the solder joint to hold.
 
   / Tips to modify / solder a brass radiator #5  
If that joint is that bad, the core is likely messed up too. Anyway, sure, with a torch you could heat that up enough to twist and pull it, but dropping it off at your local radiator shop will likely be far less of a hassle.

I second the Radiator Shop inspection and repair. They would know instantly if what is being proposed is feasible. A radiator Shop may also have a new bottom they could install with the hose connector exactly where you want it.
 
   / Tips to modify / solder a brass radiator
  • Thread Starter
#6  
Why does that hose bib look like it is made from carbon steel. Most radiators I have seen, that is brass also.
Gary I was surprised about that too. Going to a radiator shop is at least an hour, and $200 and doesn't satisfy my urge to 'fix something'. Besides today I'm blowing money like there's no tomorrow (2014 F-150?) and have to take some lumps.

By what I can see thru the filler hole, the core looks 'clean'. If it behaves under the torch I think I could be done in an hour (but of course that always takes 3 hours).
 
   / Tips to modify / solder a brass radiator #7  
I agree with Gary on material. I brazed steel and brass with a brass rod but don't remember ever trying to solder carbon steel.

Hygiene is paramount so you need to get the wire brush/sandpaper on the steel out and something like Chem Tool carburetor cleaner and get the paint flakes and rust off and shine it up and degrease it.

A good acid flux is paramount. Flux, flux, flux. Sometimes, on really dirty stuff, I dab on the flux with an acid brush while running the heat over the metal and after it gets hot I take a rag and wipe off the residue. The flux before you flux and solder/braze helps the final process flow smoothly and be strong.

As others stated, only heat the metal enough to melt the solder and hitting the solder with a tad of heat to soften it up helps to get it where you want it which I just blob on and let the metal melt it. The steel will need more heat so just watch the brass and only move the flame over there enough to get a good slick covering with a smooth sloping interface to the brass. For rigidity, I'd come back after it cooled and put another layer on the center of the joint.

A big thing to watch is that you don't melt the joint where the top/bottom tank is soldered to the core. If you melt it, and it will probably happen where the pipe is close to the core, just wipe it with a brush full of flux, getting it nice and shiny, and come back with solder there too.

That's the way I would do it.

HTH,
Mark
 
   / Tips to modify / solder a brass radiator #8  
Maybe wrap a wet cloth around where the tank attaches to the core to keep it cool while you solder?
 
   / Tips to modify / solder a brass radiator #9  
I agree with Gary on material. I brazed steel and brass with a brass rod but don't remember ever trying to solder carbon steel.

Hygiene is paramount so you need to get the wire brush/sandpaper on the steel out and something like Chem Tool carburetor cleaner and get the paint flakes and rust off and shine it up and degrease it.

A good acid flux is paramount. Flux, flux, flux. Sometimes, on really dirty stuff, I dab on the flux with an acid brush while running the heat over the metal and after it gets hot I take a rag and wipe off the residue. The flux before you flux and solder/braze helps the final process flow smoothly and be strong.

As others stated, only heat the metal enough to melt the solder and hitting the solder with a tad of heat to soften it up helps to get it where you want it which I just blob on and let the metal melt it. The steel will need more heat so just watch the brass and only move the flame over there enough to get a good slick covering with a smooth sloping interface to the brass. For rigidity, I'd come back after it cooled and put another layer on the center of the joint.

A big thing to watch is that you don't melt the joint where the top/bottom tank is soldered to the core. If you melt it, and it will probably happen where the pipe is close to the core, just wipe it with a brush full of flux, getting it nice and shiny, and come back with solder there too.

That's the way I would do it.

HTH,
Mark

I've never done it before but I think the technique will be akin to welding thin material to thick. You keep the heat on the thick and quickly run in and out of the thin material. In other words, you keep the heat moving the steal and run the torch in and out of the brass quickly.
 
   / Tips to modify / solder a brass radiator
  • Thread Starter
#10  
OK I tackled this project today. Thanks you guys for the tips. This took about 3 hours.

Willys_Rad01.jpg
Heated and removed outlet

Willys_Rad02.jpg
Drilled a 1" hole because that's the only holesaw I had. The outlet is 1 3/8"

Willys_Rad03.jpg
Used a hammer and a socket to bang a lip onto the hole, while enlarging it. Hole looks similar to original.

Willys_Rad04.jpg
Material started to tear. I probably should have filed the hole out to a larger starting diameter (larger than 1").

Willys_Rad05.jpg
Pre-tinned the other side with a blob of solder to hold the outlet nipple's support.

Willys_Rad06.jpg
First soldered the support to the backside. Then soldered the outlet nipple into the new hole.

Willys_Rad07.jpg
Bought a sheet of flat brass at the hardware store for $7. Cut out a disc and clamped it between a couple sockets to form the plug. It was not working as I hoped, so heated it and it formed better. I used a socket extension as a 'hammer", lightly tapped o the brass a few hundred times to get the shape I wanted.

Willys_Rad08.jpg
Pics of the socket/clamp arrangement to form the plug.

Willys_Rad09.jpg
Plug ready to go in.

Willys_Rad10.jpg
Plug pressed into the hole.

Willys_Rad11.jpg
Plug soldered into the hole.
 
 
Top