Top and Tilt DIY Kubota B21

   / Top and Tilt DIY Kubota B21
  • Thread Starter
#11  
Many thanks for the comments. I've been using it for a while now, it works as planned. Just some fine tuning. Since the upper shackle/snubber assemblies do not interfere with the backhoe, I installed them with locknuts and they stay on the lift arms. I switch between backhoe and three point often and that speeds the swap. I also replaced the cylinder bolts with pins to ease the changeover.

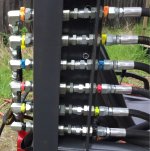
After I worked out the most intuitive use of the valve controls I color coded the couplers with zip ties.

It did take a lot of thought, over several weeks, to decide on a design for using the off the shelf cylinders. But the actual work was done in a few hours, just cutting metal to length and drilling holes.

Given how easy and relatively inexpensive this installation was, I should have done it a long time ago. As others have said it makes a big improvement in the utility of the tractor.


image-1481473694.jpg
 
   / Top and Tilt DIY Kubota B21 #12  
Nice job... you will have to do a lot of gravel lane grading, now. When I cleared snow on our lane with a rear blade, I was constantly lifting and dropping one side, and would have loved having that set up! With a floating front plow, no need now.

In one photo, looks like your canopy is twisted to match the box blade's angle. Just a coincidence, I trust?
 
   / Top and Tilt DIY Kubota B21 #13  
Many thanks for the comments. I've been using it for a while now, it works as planned. Just some fine tuning. Since the upper shackle/snubber assemblies do not interfere with the backhoe, I installed them with locknuts and they stay on the lift arms. I switch between backhoe and three point often and that speeds the swap. I also replaced the cylinder bolts with pins to ease the changeover.

After I worked out the most intuitive use of the valve controls I color coded the couplers with zip ties.

It did take a lot of thought, over several weeks, to decide on a design for using the off the shelf cylinders. But the actual work was done in a few hours, just cutting metal to length and drilling holes.

Given how easy and relatively inexpensive this installation was, I should have done it a long time ago. As others have said it makes a big improvement in the utility of the tractor.


View attachment 464971

Could you show a few more pics of the bulkhead and valve mounting setup from different angles? This appears to be a very well thought out design.
Thank you.
 
   / Top and Tilt DIY Kubota B21
  • Thread Starter
#14  
In one photo, looks like your canopy is twisted to match the box blade's angle. Just a coincidence, I trust?

Some years ago I pushed on a dead pine tree that was overhanging a walkway. The top 30 ft broke off and fell on the tractor. Bent the canopy but not the ROPS. Or my head. I left the sheet metal bent as a reminder to myself to stay away from dead trees.
 
   / Top and Tilt DIY Kubota B21
  • Thread Starter
#15  
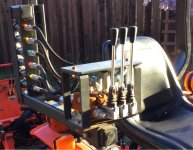
Here is a better picture of the valve and coupler mount. There is no room next to the fender so I put it on top. I wanted it accessible from the seat facing forward or backward. So the valve slides on the arm. The cover protects it from tree limbs and provides an arm rest. It is one piece with the coupler bulkhead and is clamped to the ROPS. The ROPS mount also has a guard to protect the couplers from tree branches.


image-2088160532.jpg
 
   / Top and Tilt DIY Kubota B21 #16  
The valve is a Bucher with three spools and float on all three.

Your setup looks great!

In retrospect I think I would like to have float on two valves, so your decision to put float on three valves is probably the right one. Maximum flexibility!

Bill
 
   / Top and Tilt DIY Kubota B21
  • Thread Starter
#17  
Thanks Bill. I was waffling on one vs two until I saw your posts. I don't yet have any real experience with it, so can't say much about performance, although automatic levelling is indeed very convenient.
 
   / Top and Tilt DIY Kubota B21
  • Thread Starter
#18  
I should add on float - I thought it might be useful to be able to choose which side floats. The incremental cost to the valve was just $34 so I figured might as well give it a try.
 
   / Top and Tilt DIY Kubota B21 #19  
After some years of struggling with 3pt hitch implements, I decided to install a hydraulic top link and hydraulic side links.

The top link was straightforward. I bought a $185 top link from Surplus Center (2x8). It had a double pilot operated check valve, which I don't want for this application, but I do want for another use. So for purposes of this project, the cost of the hydraulic top link was about $120 (the check valve is about $65 separately). The only modification was, I had to grind 1/8" off each side of the base end swivel eye to fit the B21 bracket. The retracted hydraulic top link is about 1/2" longer than the retracted length of the factory top link, which is OK.

For the side links things are more complicated. The usual way is to fabricate angled clevises and weld them to the rod and base ends of a cylinder. One way or the other, various operating angles and motions need to be accommodated. I decided to use off-the shelf cylinders, and then accommodate the angles and motions with fabricated shackles.

The cylinders, also from Surplus Center, are 1.5" bore x 3" stroke, with retracted length of 11". Each end has a swivel eye (spherical bearing) with 5/8" hole. Usually 2" cylinders are used for the side links, but the 1.5" cylinders have plenty of power to lift my implements which weigh 500-600 lbs. They cost $89 each.

The bottom shackles are pinned to the lower 3pt arms using the two factory adjustment holes. The shackles can be swapped end for end to provide different lifting geometry, same as the factory side links. A clevis is used to attach the tilt cylinder to the bottom shackle. The clevis is made from 1.5"x4"x3/16" tubing, with a 1/2" bolt welded in, that screws into the shackle. The clevis swivels to accommodate operating motion.

The upper shackles are the same as any leaf spring shackle, made from 1/4" bar. The attaching bolts are 5/8" with spacers. The spacers are needed to keep the shackles far enough apart to let the swivel eyes in the lift arms and the cylinder base end move freely to accommodate various angles and motions.

To function properly the shackles work in conjunction with snubbers. The snubbers prevent the shackles from rotating forward and backward. They are made from 2"x3/8" angle. They clamp to the lift arms with 5/16" bolts. The lift arms are tapered, so the snubbers clamp against the taper, and cannot move anywhere.

I could have used one tilt cylinder, that would have been satisfactory, with 1.5" up and 1.5" down movement. I used two because I wanted to use two, and the incremental cost was not that great. The combination allows for 3" drop on either side, which is more than adequate for anything I might do. With both cylinders retracted, the hitch is level. That is convenient. The installed length of the tilt cylinders (retracted length plus top shackle plus bottom shackle) is about 1.25" shorter than the fixed factory side link. This provides useful additional height.

The photos below show the details. I owe great thanks to the many TBN contributors who have shared their TNT experience and knowledge, especially MtnViewRanch, henro, 3RRL, bcp, and ovrszd. No way could I have figured this out on my own.
LIKE !!!!
 
   / Top and Tilt DIY Kubota B21 #20  
I'm in line next to have you come & do mine:thumbsup:

Ronnie
 

Tractor & Equipment Auctions

2021 Chevrolet Tahoe SUV (A48082)
2021 Chevrolet...
2022 Club Car Tempo Golf Cart (A48082)
2022 Club Car...
DIESEL PANASONIC CF-31 LAPTOP (A48992)
DIESEL PANASONIC...
2009 HINO 185 18FT BOX TRUCK (A45679)
2009 HINO 185 18FT...
2015 John Deere TS Gator 4x4 Utility Cart (A49346)
2015 John Deere TS...
2014 Jeep Grand Cherokee Laredo SUV (A48082)
2014 Jeep Grand...
 
Top