Valve Lash Adjustment 2008 Jinma 284 with QC395T Engine

   / Valve Lash Adjustment 2008 Jinma 284 with QC395T Engine #1  

3RRL

Super Member
Joined
Oct 20, 2005
Messages
6,931
Location
Foothills of the Giant Sequoia's, California
Tractor
55HP 4WD KAMA 554 and 4 x 4 Jinma 284
I know there are many threads about setting the valve lash and torquing the head bolts by now, but this one is for Loretta's 2008 Jinma 284 with the QC395T EPA conforming engine. Loretta helped me with the whole procedure and did several things herself.
It might help some guys who have that engine?

Prior to that, I recommend a few safety precautions and set up the tractor the night before so the engine is "cold" or ambient temperature when doing this adjustment.
-Transmission in neutral.
-Set parking brake.
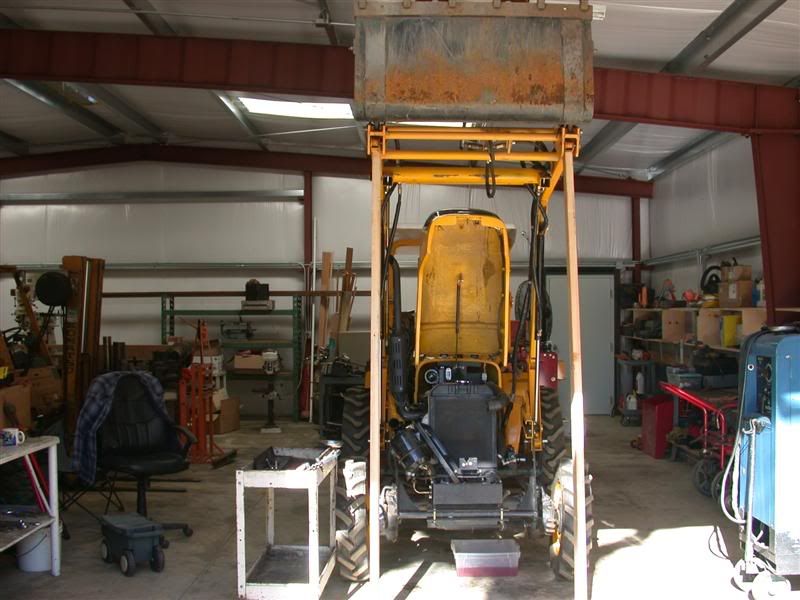
-Move the fel and bucket up and out of the way and prop it up with restraints.
-Turn off the fuel.
-Pull the "kill switch" out and hold it back with vice grips.
-Disconnect the ground at the battery terminal, not the frame.
You don't want to "accidentally" start the tractor.

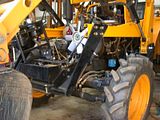
I don't know about you guys, but I found it extremely difficult to get in there to do any wrenching. Everything is so much smaller and tighter than my Kama 554. Even trying to take off the alternator shield was undoable for me (couldn't get to the bottom bolt). I was planning on tightening the alternator belt and use that nut to turn the crankshaft, but couldn't do it that way. I had the bucket resting on the toothbar and the fel partially up, but I would recommend having it all the way up and propped/lock up there so you can move around better.

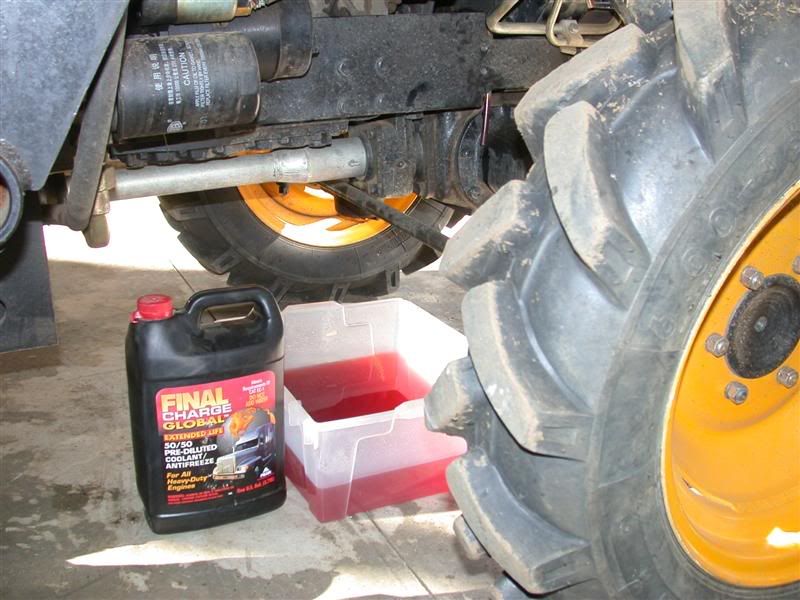
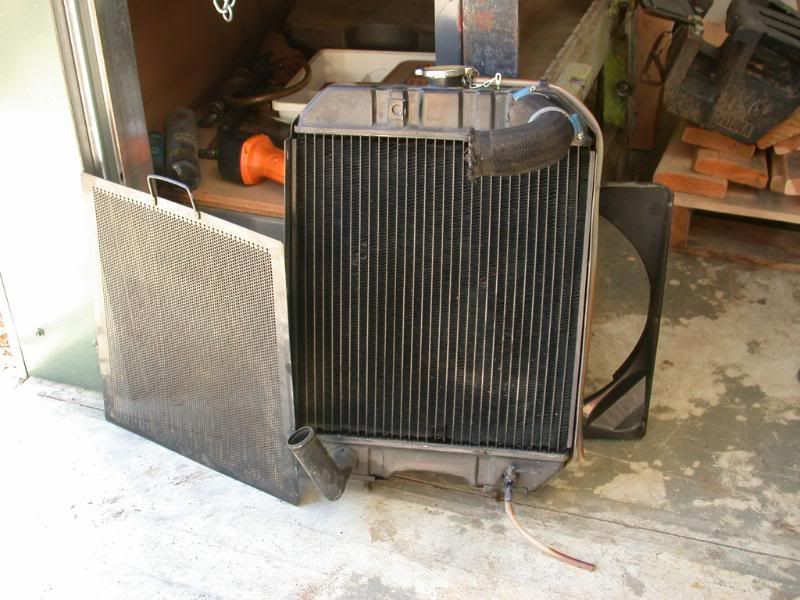
Since it was so cramped and tight to get to the nuts and bolts, I started by taking off the power steering and air filter bracket. Remove the air hose to the filter. Then I drained the radiator and removed it. Loretta had a chance to thoroughly clean it while it was off.


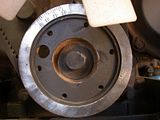
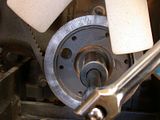
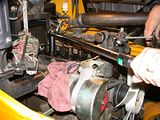
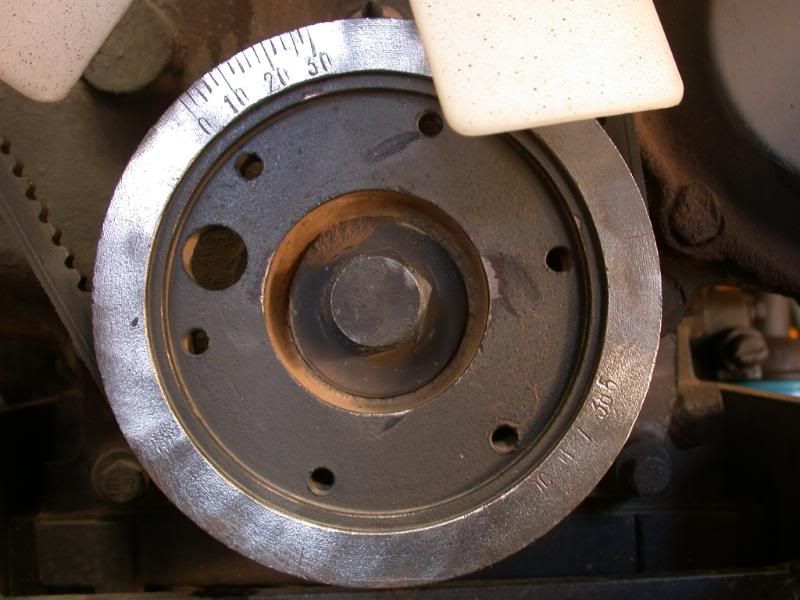
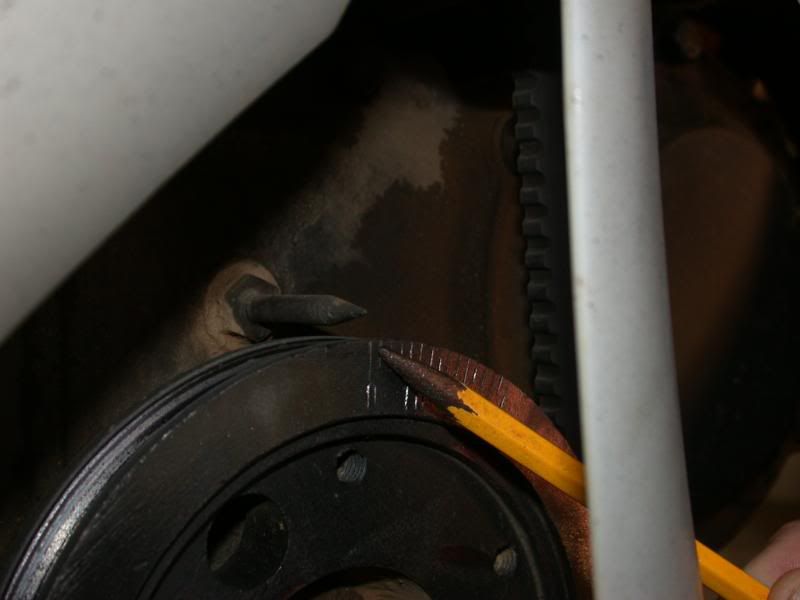
Once that was out of the way, I cleaned off the front of the crankshaft pulley to reveal the timing marks on it to find top dead center as per the instructions in the manual. You can verify the marks by removing the inspection cover that exposes the flywheel and there are corresponding marks on it too. I was able to use a large wrench right on the crankshaft pulley nut to rotate the engine.


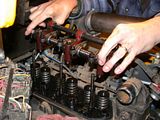
I removed the fuse box to get it out of the way and then the valve cover to expose the valves. But first, I disconnected the compression relief lever at the back of the valve cover, nearest the cab. In order to re-torque the head bolts (8 of them) you have to remove the rocker shaft assembly. Remove the nuts (3) and bolts (3) evenly since it is under pressure from the valve springs. Then lift the assembly off and put it in a clean place. You will replace it in the same fashion when setting the valve lash later.


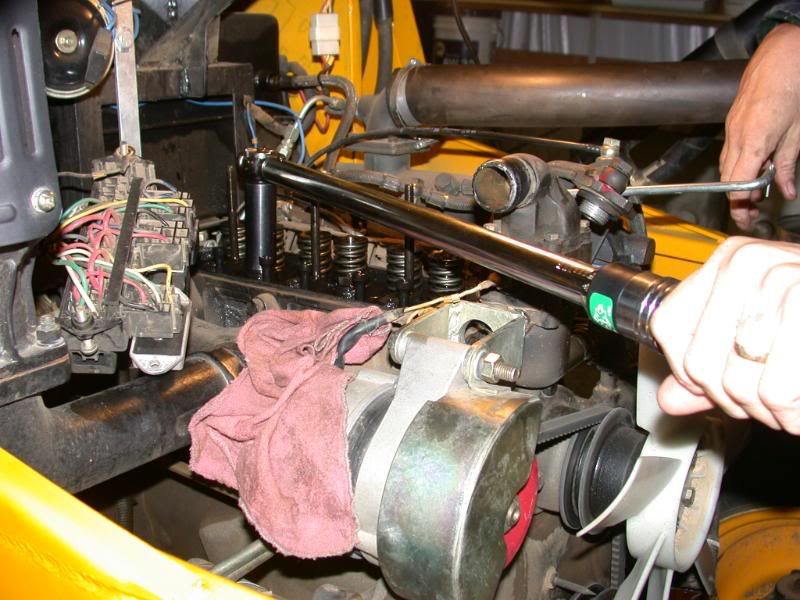
Then you can get a good torque wrench in there to re-torque the headbolts. There are several thoughts of how to do this. Some guys loosen them up, clean and then re-torque. I personally only re-torqued them, not loosening them first. My thoughts are they only need to be tight per spec and I don't want to ruin a head gasket accidentally. I found only 2 head bolts that moved. I used 125 ft/lbs on the torque wrench. Her manual calls out 150-170Nm. (110-125ft/lbs)


Ok, so now you can replace the rocker shaft assembly. On Loretta's tractor, I noted when removing the nuts and bolts from the shaft assembly that they were not very tight. In re-torquing those, I only used 36ft/lbs (50Nm) because I was afraid to strip them. I know some guys use more than that, but since they were not even that tight when I took them off, I decided to use that figure.
Anyway, then you can get to adjusting the intake and exhaust valves on each cylinder.

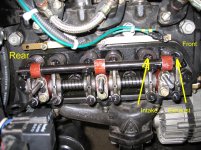
Start by finding top dead center on cylinder #1, which is nearest the radiator. The manual says to line up the "O" mark on the crankshaft pulley with the pointer. On her engine, the valve closest to the the radiator is the intake valve and the one next to it is the exhaust valve. You can verify this by rotating the engine to see the how the valves work. Rotate the engine clockwise looking from the front of the tractor. The vanes on the radiator fans will help you verify that too. When you rotate the engine so that intake valve just starts to close, and just before the exhaust valve just starts to open, that's top dead center. After "eyeballing" the valves, I checked the crankshaft "O" markings and, indeed, it lined up with that position, and also the flywheel mark to make sure ... it all lined up.
Plus, that is exactly what her instructions in the manual said to do.

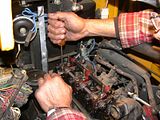
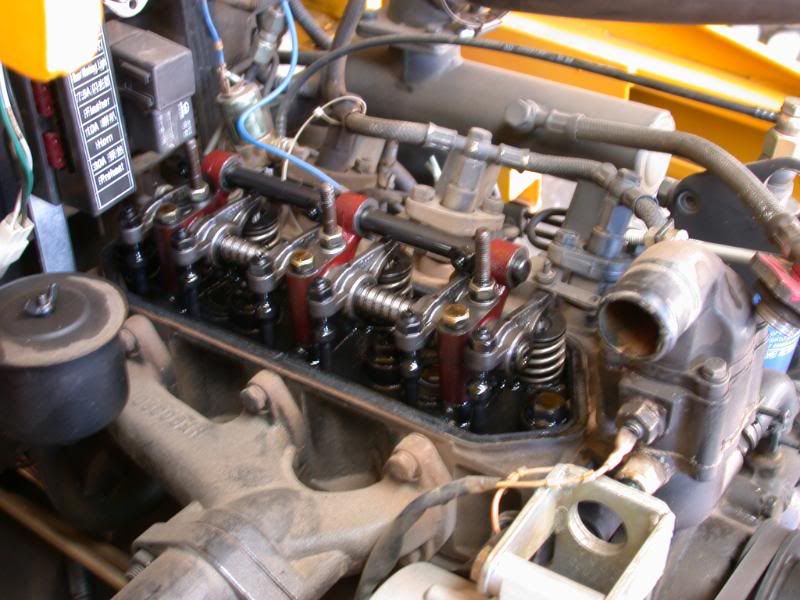
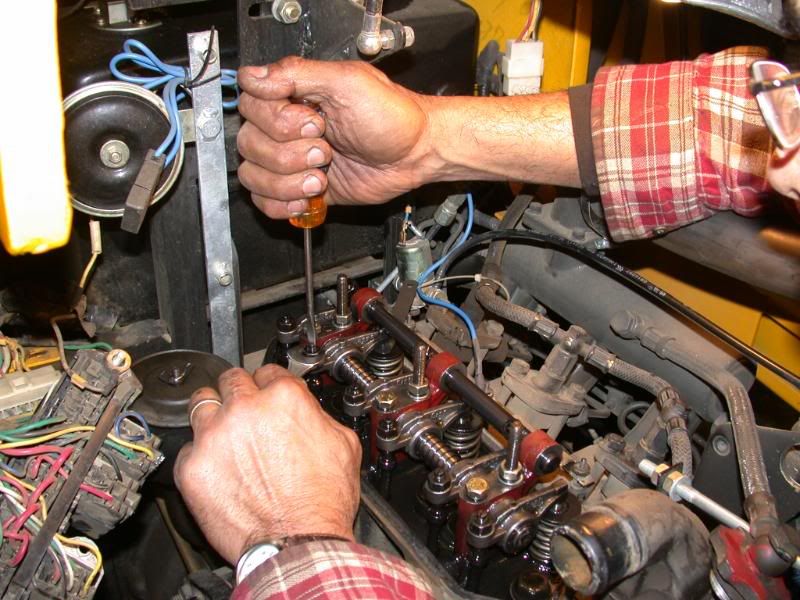
Then you can set the valve lash on both intake and exhaust valve for cylinder #1. Loosen the nut above the push rod and adjust the gap between the valve stem and rocker arm. Use a screw driver to adjust the rod until you feel the feeler guage slide smoothly in between. Hold the screw driver steady and re-tighten the locking nut and re-check the gap. Her manual called out 0.20-0.25mm (.008"-.010") for the intake valve clearance. I used the middle tolerance and used a 0.23mm feeler guage. The exhaust clearance is called out at 0.25-.030mm (.010"-.012") so I used a 0.28mm feeler guage.

After setting cylinder #1, rotate the crankshaft 240 degrees clockwise and do cylinder #3, which is the one nearest the cab. Then rotate another 240 degrees to do cylinder #2 (in the middle). That is the firing order on this engine. Each time the crankshaft was rotated, the pointer lined up with another mark on the crankshaft pulley as well. So we were on the right track.

When you're done, put everything back together again. I had a re-usable rubber valve gasket but you might a new one or need to make one. So be prepared for that. when you replace the valve cover, be sure to check if the little coupler for the compression relief lines back up. You can check it by moving the compression relief valve (once the valve cover is back on) by feeling the shaft rotate through the oil fill hole on top of the valve cover. You can see where the feeler guage is in the photo and how to adjust the valves with screwdriver and wrench.


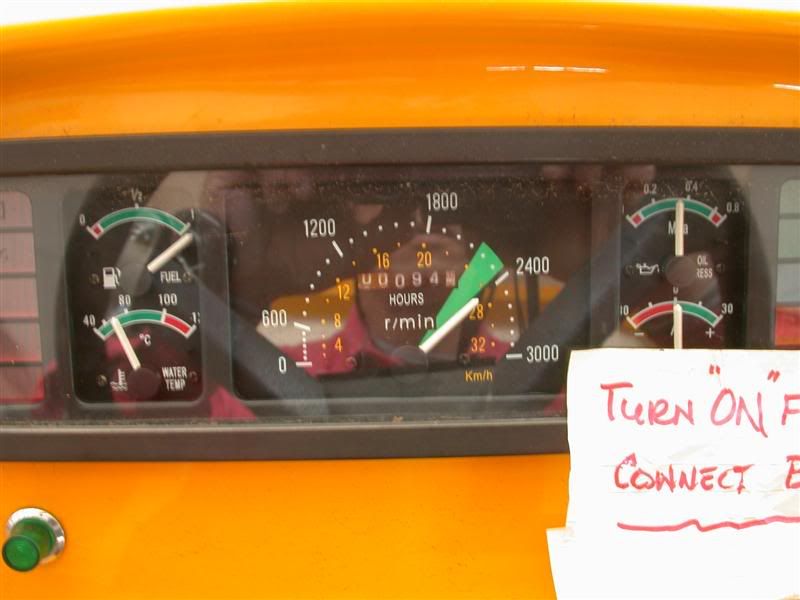
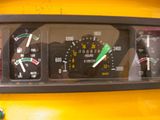
Also, before I removed the rocker shaft assembly I had checked the valve lash first and all the valves were super tight. I mean really tight like I could barely get a .003" feeler guage in there! Some were net and NONE of them were loose! Maybe that's why she could never rev the engine up to high rpms. She would always come up just short of the green zone, or about 2100 rpm max before. I was hoping this valve adjustment would help that.
I started the tractor and let it warm up a bit. It was noticeably clacking a little more than before, just like my Kama did. Then I reved it up and it went right past the green zone, in fact right to 2400rpm right on the nose.
I followed the instructions in the manual and it must be alright since the results were good.


Rob-
 
   / Valve Lash Adjustment 2008 Jinma 284 with QC395T Engine #2  
It is always a pleasure to read your post! I have a 04 224, and whenever I check out the newer ones like Lorreta's I get jealous. They sure have made many good changes over the years, like the new hood, the better battery placement, and I believe the spin on hydro filter. I really love the hood that totally flips everything up out of the way. Btw nice repair on your Kama steering.
Dave
 
   / Valve Lash Adjustment 2008 Jinma 284 with QC395T Engine #3  
Rob, why did you do all this ?

I know the reason behind the retorque (beings an old small block chevy rebuilder).

But I've never heard of anybody doing it to their tractor, and on this forum yet, not once.
 
   / Valve Lash Adjustment 2008 Jinma 284 with QC395T Engine
  • Thread Starter
#4  
Thank you Dave,
I try to post what I do just like those who did the same for us when I was looking/searching how to do stuff. Maybe it will be of help to someone with the same engine? Her Jinma sure is sweet. It's got a lot of refinements even over my 2005 Kama. They've come a long way making them better.
Thanks for checking out the Kama repair too!
 
   / Valve Lash Adjustment 2008 Jinma 284 with QC395T Engine
  • Thread Starter
#5  
Rob, why did you do all this ?

I know the reason behind the retorque (beings an old small block chevy rebuilder).

But I've never heard of anybody doing it to their tractor, and on this forum yet, not once.
Chinese tractor owners generally do their own maintenance where valve lash adjustment and head bolt re-torque are listed in the manual to perform on a schedule.
Maybe the other guys don't post what maintenance they do on their tractors but I do. I was under the assumption valve lash and head bolt re-torque had been discussed on this forum before too?
 
   / Valve Lash Adjustment 2008 Jinma 284 with QC395T Engine #6  
and head bolt re-torque are listed in the manual to perform on a schedule.
I guess this is where I'm getting confused. I searched a number of tractor manuals (mostly JD) and never found any mention of head bolt retorque. Valve lash yes, bolt retorque no.

Is this service procedure more 'brand' related ?

If this isn't in our manuals, should we be checking it anyway ?, if so, at about what hours ?

Is there a difference in head gaskets from your Jinma to my JD ?
(trying to find a reason why its listed in yours and not mine)

What other tractor brands recommend head bolt retorque ?
(this ? goes out to everybody else)
 
   / Valve Lash Adjustment 2008 Jinma 284 with QC395T Engine
  • Thread Starter
#7  
I guess this is where I'm getting confused. I searched a number of tractor manuals (mostly JD) and never found any mention of head bolt retorque. Valve lash yes, bolt retorque no.

Is this service procedure more 'brand' related ?

If this isn't in our manuals, should we be checking it anyway ?, if so, at about what hours ?

Is there a difference in head gaskets from your Jinma to my JD ?
(trying to find a reason why its listed in yours and not mine)

What other tractor brands recommend head bolt retorque ?
(this ? goes out to everybody else)
First Will, I'm SURE there is difference between your JD and our Jinma. Quality control of Chinese stuff is still lacking a decade behind IMHO. That goes for material selection used in their construction as well. There steels are not as good as ours either because for similar reasons.
Then there's the dealer factor, where you have literally thousands of JD dealers in the States, there are relative only a few Chinese tractor dealers around. And they are really guys who import the tractor and parts so they are not 100% in control of that either.
I would follow your manual and do what is suggested for your brand tractor. Plus, if your dealer services your tractor, he may have head bolt re-torque on HIS list of things to do, not necessarily on your list? I dunno. Don't forget that we paid for the entire tractor (brand new) almost as much as some complete grapple set ups costs that I've seen posted here.

You get what you pay for, but it's more important as to if it fits the bill and what you can do with it that counts. I've managed to make alterations to make our tractors do everything we've wanted. Doing our own maintenance is part of it. I'm also fortunate that I can do whatever repairs myself if there are failures ... something I anticipated and figured into the reason for buying what I did. For me, there are just some things I think I can do and am willing to do vs buying more expense and better stuff. That is to say I'm not a cheapskate, since I do own some quality stuff too that I don't work on myself but wanted top quality good stuff. Example, I just had my Rolex GMT serviced and geez, the bill was $2200 bucks!!!! I have a couple of them. And that goes for my rifles and shotguns too ... Weatherbys and Brownings. But there are just some things that I think aren't as important to pay top dollar for, like my tractors that I beat the crap out of and can fix myself.
 
   / Valve Lash Adjustment 2008 Jinma 284 with QC395T Engine #8  
Hey Rob,

Great write up on the Valve lash adjustment and head bolt re-torque. I'm sure Jinma owners will appreciate the detail and photos to follow for future reference. Checking the head bolt torque sure beats blowing a gasket. It's no big deal, easy to do and cheap insurance. I mean as long as you have the valve cover off to set the valves, how hard is it to remove the rocker arm assembly? what is it? four nuts? big deal. Before adjusting the valves on mine I too removed the rocker arm to check the head bolt torque, sure there are as many opinions as there are "experts" on how that should be done, Like you, I put a torque wrench to them and got two to tighten up ever so slightly.

I wonder how many have even bothered to set the valve lash, let alone take the time to document it such as you have with a detail procedure and pictures. Thanks for taking the time to share your experience and to remind us that the valves and head bolts should be adjusted and checked. I just love my 354, it has exceeded all my expectation and all for 1/3 rd the price. Now that Ive saved so much on my tractor maybe it's time for me to get that Rolex I've always wanted. ;) :D

BTW (Off topic) - Wow, amazing Loretta has 100 hours on her tractor already? She just got it in March of this year right? Plus she works a day job, and you guys commute back and forth to Rancho once a week. Not only that you've adorned it with some custom hydraulic add ons, re-engineered the FEL bucket geometry so as to suite your specific needs, just to name a few. Which brings up another point I like about these tractors. No one is afraid to "chop and channel" their tractor to personalize it. Like, how many "Other Brand" tractor owners would do this to their dash panel to add a couple of Kubota Cup holders, a clock, Air filter minder and a volt meter? Just chop up the dash without hesitation like this:


No worries about scratching expensive unobtainable special color paint, just go to wal-mart and get a 99 cent rattle can and your good to go. . Jinma - Gota Love it :D

Larry
 
Last edited:
   / Valve Lash Adjustment 2008 Jinma 284 with QC395T Engine
  • Thread Starter
#10  
UPDATE: !! Important correction !!
I received a very polite PM from rayh. Here's what he said:

Very good job on showing valve setting. I noticed a little mistake that would give you the wrong valve clearance. When you set your engine up to TDC. You watched the valve change from exhaust to intake. The engine is on exhaust stroke and should be rotated 360 degres to bring it up on compression stroke. Watch for the mark again on pulley, but the valves will not being moving. This is the correct place to start your setting procedure. The rest of your explanation is right on track.

Thanks for catching that Ray!
This means a couple of changes from what I said earlier.
On this QC395Tengine, as you rotate the crankshaft in the clockwise direction (looking from the front of the tractor to the rear) you will see the valves work. There is a point during the rotation where one valve closes and the other one just starts to open. It is the EXHAUST valve that is closing (finishing the exhaust stroke). The valve just starting to open is then the INTAKE valve. At this point the "O" marking on the crankshaft pulley lines up with the pointer.

1) But you have to rotate the crankshaft another 360 degrees to the same "O" mark on the pulley to be at TDC of the COMPRESSION stroke. The valves will not be moving as you rotate the crank shaft to this "O". This was not explained in the manual and stupid me, I missed it ... sorry.
So do that and set your valve lash at that point. Then proceed in the same fashion to do the other cylinders rotating 240 degrees clockwise for #3 next and another 240 degrees for #2 after that. There are marks on the crankshaft pulley that will line up when the crankshaft is turned 240 degrees each time.

2) This also means the valve I thought was intake is really the exhaust valve. The first valve nearest the radiator on cylinder #1 is the EXHAUST valve and the one next to it is the INTAKE valve. The exhaust valve always exhausts and starts to close just prior to the intake valve opening.

3) Additionally, that also means that the compression relief opens the INTAKE valves and not the exhaust valves like I thought. You can see in the photos above which set of valves the compression relief operates. They are the 2nd set of valves for each cylinder which are the intake valves.

I sincerely apologize for my mistake and appreciate rayh giving me the opportunity to let me correct this procedure rather than flaming me. Even though Loretta's tractor ran great in the manner I adjusted the valves per my first post, I will re-do the adjustment this week when we get back to 3R. I'm pretty sure if it ran with little or zero valve lash before, being adjusted with a little more valve lash hasn't hurt it. I'll post the results of it when done.
I know some of you will be doing your valve lash adjustment soon so please follow the corrected procedure.
Thanks,
Rob-
 
   / Valve Lash Adjustment 2008 Jinma 284 with QC395T Engine #11  
Thanks for the clarification. My engine is a 2007 Y385, which looks the same as yours in the photos. The valves from front to rear are:
Exhaust - intake , exhaust - intake , exhaust - intake .
I know there have been some confusing posts in the past about the valve order , and it's probably not a big issue since the adjusments are very close. ( Some of mine were out by .4 mm)
Incidentally , at 100 hours my rocker arms and valve stems showed unusual wear.
Mike
 

Attachments

  • Labelled.jpg
    Labelled.jpg
    614.6 KB · Views: 1,521
   / Valve Lash Adjustment 2008 Jinma 284 with QC395T Engine
  • Thread Starter
#12  
Thanks for the clarification. My engine is a 2007 Y385, which looks the same as yours in the photos. The valves from front to rear are:
Exhaust - intake , exhaust - intake , exhaust - intake .
I know there have been some confusing posts in the past about the valve order , and it's probably not a big issue since the adjusments are very close. ( Some of mine were out by .4 mm)
Incidentally , at 100 hours my rocker arms and valve stems showed unusual wear.
Mike
Hi Mike,
Thanks for letting me do so... It's hard to eat crow!:)
Yeah, your engine looks just like mine. You can see it's really hard to tell to which valve the fuel injector goes and which valve goes to the exhaust manifold. On my big 4 cylinder 55hp Kama, it was easy to see. But you can bet I'm gonna check it that way when I do another valve lash adjustment on it. It's almost got 600 hours on it now.

About the confusion, I learned for sure that when rotating the engine the exhaust valve ALWAYS starts to close just before the intake valve starts to open. So that's the end of the exhaust stroke and beginning of the intake stroke. That is THE sure fire way to determine which valve is which. Continuing the rotation from that point is the intake stroke lasting 180 degrees and the compression stroke follows with another 180 degrees. So when the engine has been rotated 360 degrees that's TDC on the compression stroke. The engine rotation can be checked by turning it over with the starter motor or from the fins on the radiator fan. The fan should be sucking air through the radiator when the engine is running.
BTW, I noticed your compression relief also opens the intake valves. That has been confusing as well.
Rob-
 
   / Valve Lash Adjustment 2008 Jinma 284 with QC395T Engine #13  
Rob
I noticed that it looks like your front tire has hit the loader frame when turning (probably on uneven ground). Is that why your front wheels are flipped and if so did it help? I had that problem and it caused front tire damage.
Mike
 
   / Valve Lash Adjustment 2008 Jinma 284 with QC395T Engine
  • Thread Starter
#14  
Rob
I noticed that it looks like your front tire has hit the loader frame when turning (probably on uneven ground). Is that why your front wheels are flipped and if so did it help? I had that problem and it caused front tire damage.
Mike

Good eye Mike,
Yes that's one of the reasons. The other is for added stability. Some may argue the point since the front axle pivots, but I still feels it helps with the stability and for sure when the axle pivot hits it's maximum deflection.
Moving the fronts (and rears) out to their widest position made an increase in overall stability on my steep slopes. If I crank the front wheels over all the way, they still nick a little. I think I need to set the wheel stop a little. The turning radius is fine right now, so a little restriction wouldn't hurt me.
BTW, do you have an FEL? If so, also check yours to see if your curl is adequate so material doesn't fall out when transporting it in the bucket held low. And see if your cylinder rods are touching the FEL arms and bending. The bending cylinder rods are a must fix.

I had to fix both problems on this Jinma.
Maybe you have already seen these threads: Add More Bucket Curl to Jinma 284

This is my wife's Jinma, but we did a lot of modifications to it. Here's another thread about: MY Very Own Grapples

Also one about changing out the stock ZL-20 loader valve with one from: Ranch Hand Supply Loader Vavle
 
   / Valve Lash Adjustment 2008 Jinma 284 with QC395T Engine #15  
Hello All,
I am sorry, but I do not completely understand how to find TDC, Am I correct to assume that I turn the crankshaft until no valves move on the #1 cylinder? Help and I am sorry I don't completely get it!
By the way Rob, I now feel like I may be able to do this after reading your post, Great Job!
BTW, my tractor has never made it to the green area of my tach and my valves have never been adjusted, I am almost ready to tackle this job as soon as I figure out the TDC issue.
Thanks again,
Rick
 
   / Valve Lash Adjustment 2008 Jinma 284 with QC395T Engine #16  
Hello All,
I am sorry, but I do not completely understand how to find TDC...
TDC occurs when the piston has reached the absolute end (top) of its exhaust stroke. The intake valve was already closed while the cylinder was pushing burned fuel out the exhaust valve. Then by the time the piston reaches the very top, the exhaust valve will have fully closed. That's TDC. After that, the piston starts back down again - the beginning of the intake stroke - at which time the intake valve starts to open again.

Hopefully you don't have a loader mount blocking the flywheel viewing port. There should be a series of marks on the flywheel, one of which indicates TDC. When you rotate the flywheel by the way, you should have the decompression release tied open. If not so equipped, tie the fuel cutoff valve closed. Both are safety measures to prevent accidental starting of the engine.

Alternatively, there may be a mark on the crankshaft pulley - but on my tractors I find that harder to see without removing the radiator. Either mark should tell you when the #1 cylinder is getting close to TDC. But understand that just rotating the engine till you see the mark - is the gross adjustment. I use a large screwdriver as a lever on the flywheel, or you can use a socket and breaker bar on the crankshaft pulley or alternator). After finding the mark, shift your attention to the valve train. Fine tune the engine rotation until all the spring tension is off BOTH valve stems on the #1 cylinder. That means they're both fully closed, and that you can now start the actual valve lash adjustment on that pair of valves. The firing order determines which cylinder you work on next.

But don't put the cart in front of the horse. After finding TDC of #1 the procedure and sequence often differ slightly between and among engines. Your JM304 probably doesn't have the same engine as Rob or Larry. So you must first take into consideration the number of cylinders and whether intake or exhaust is used for decompression (if so equipped). Then you have to confirm the intake/exhaust/decompression gaps, and the firing order specific to YOUR engine.

//greg//
 
   / Valve Lash Adjustment 2008 Jinma 284 with QC395T Engine #17  
Hey Greg,
Thanks for that, it clears up alot for me. The bad news is that I do have a loader blocking the inspection plate for the flywheel. I also have a Jinma 304 with a 3 cylinder. I think after yours and Robs advice I can do this
Thanks again,
Rick
 
   / Valve Lash Adjustment 2008 Jinma 284 with QC395T Engine #18  
Greg G wrote: "TDC occurs when the piston has reached the absolute end (top) of its exhaust stroke."

Technically, Top Dead Center (TDC) occurs when the piston is at the top of its stroke, regardless of which revolution it is on, I believe. There is a TDC on the exhaust stroke and one the compression stroke as well. For the purpose of setting valve lash, and for fuel injector timing, TDC must be on the compression stroke, since that is where the firing takes place.

I too have a Jinma 304 (with the TY395I-3 engine) and will be doing the valve lash adjustments in the next few days myself. The tutorials posted here and on other forums are an invaluable guide to doing this important procedure correctly. My tractor tool kit came supplied with the proper feeler gauges for setting the valve lash, even. Handy, that.

I hope this hasn't muddied the waters for you. Follow the manual and you'll be fine, I'm sure.
 
   / Valve Lash Adjustment 2008 Jinma 284 with QC395T Engine
  • Thread Starter
#19  
Hi Rick,
Glad to hear you have the confidence to adjust your valves now. Both Greg and Rich gave good information. You want to set the valve lash when the #1 cylinder is at TDC on the compression stroke. To find that point, use the information I gave earlier and also what Greg and Rich wrote.

Here's the sure fire way to find TDC on the compression stroke.
Rotate the engine in the direction it runs. I explained above exactly how to do that. You can click the starter motor and see which way she starts to spin and also use the vanes on the radiator fan. When your engine is running, the fan should be sucking air through the radiator.

After making sure the tractor will not start using the recommended safeties I mentioned, and after removing whatever is in the way and removing the valve cover, you start rotating the engine in the direction it runs.

When you see the two valves working together, one right after the other, the valve that is closing is the exhaust valve and the valve that just starts to open is the intake valve. Make a note of that.
Like said above, to be sure you are right in the middle, move the crankshaft back and forth to the find the spot where they are not moving. That spot should also correspond to a mark on the crankshaft pulley and also on the flywheel. Now the piston is at TDC of the EXHAUST stroke. Do NOT set your valves at this point.

Now rotate the crankshaft 360 degrees in the direction the engine runs.
This is TDC of the COMPRESSION stroke now. The corresponding mark on the pulley and flywheel should again line up.
This is where you set the valve lash for cylinder #1.
Then follow the instructions in the manual to set the next cylinder according to the firing order. For a 3 cylinder engine, you will turn the crankshaft 240 degrees to set the next cylinder according to firing order, and then another 240 degrees to set the last one.
Rob-
 
   / Valve Lash Adjustment 2008 Jinma 284 with QC395T Engine
  • Thread Starter
#20  
I just went through all that again to find TDC on the compression stroke and set the valve lash there.
When I set it before, it was TDC of the exhaust stroke, so I corrected it today. I checked them before I adjusted them and found there was way more lash then what I thought. That's why it clacked so loudly, I'm sure. But dang, those Chinese engines just run and are obviously not too picky, lol. But I got it all re-adjusted and it now runs very quietly like it did before, and I can still get over the green area to 2400 rpm with throttle wide open.
Oh, and this time I propped up the FEL all the way.
It was much easier getting in and out of there like that. Over all, including draining the radiator and removing it all again, it took me about an hour and a half this time from start to finish since I didn't have to take off the rocker arm shaft or torque the head this time.
Here are a couple photos of the loader way up, draining the radiator and the engine reved up to 2400 rpm again.
Rob-


Tractor & Equipment Auctions

2016 Toro Sand Pro 5040 Bunker Rake (A59228)
2016 Toro Sand Pro...
2016 Toro Sand Pro 5040 Bunker Rake (A59228)
2016 Toro Sand Pro...
2007 DELTA GOOSENECK TRAILER (A58214)
2007 DELTA...
Caterpillar D5G LGP (A53317)
Caterpillar D5G...
2025 JMR 36in Bucket Mini Skid Steer Attachment (A59228)
2025 JMR 36in...
2025 GPS Trailers (A56859)
2025 GPS Trailers...
 
Top