OK - wanted to give an update on the install. All done now and very pleased with the final result.
In general (very general!) it is pretty straightforward. But I do have a few nits to pick.
First, I don't understand WR Long's distribution model. I first called them to order. They only work through dealers and suggested I call Everything Attachments. So that's what I did and who I ordered from. Surprisingly, the shipment came directly from WR Long. And, I was told to contact WR Long with any questions. I understand distribution models. The company who I work for is a distributor. Been with them 30 years. But, we either handle the shipping or it is shipped white label. And, we handle all customer interaction. I'd bet the unit would be several hundred dollars less if not for the EA "involvement".
Second, the kit wasn't a complete, ready to install kit - which, if you think about it, was what I was paying for.
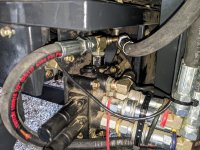
On the plus side, I spoke several times with Josh at WR Long and he could not have been more helpful. Unfortunately, if I understand correctly, they don't have enough volume to justify stocking the exact hydraulic adaptors/connectors that are needed for the Branson 3725/BL25r install. Their workaround was to remove the power beyond hose and replace it completely. Two problems with that. When I got under the tractor, that hose is routed very snugly indeed. I would have had to disassemble at least the seat assembly to get access to it. In addition, the hose they supplied to replace the existing one was only 36 inches long - far too short. The much simpler solution would be to take off the existing power beyond hose from the loader valve assembly and connect a short length of hose to join it to the WR Long third function valve kit. When I explained my reasoning to Josh, he was supportive but did not have the adaptor needed to connect to the existing hose. For the record, that adaptor is a 9337-08-08 | 1/2" JIC Male x 1/2" JIS 30° Male
9337-�8-�8 | 1/2" JIC Male x 1/2" JIS 3�deg Male: DiscountHydraulicHose.com. I ended up driving into town to pick up that fitting at my local hydraulic shop. Josh, to his credit, was more than happy to send me, at no charge, an additional hose with the correct fittings to use that adaptor. I measured the needed length and came up with 16 inches. For the record, while that length worked, it did require some fiddling and an extra 6 inches would have been welcome. You will need a 1 1/6 inch open-ended wrench to get the existing power beyond fitting off the loader valve. There just isn't room for an adjustable wrench in there.
So, for the install. I did not dismount the loader valve from the tractor. Not sure that would make it much easier though. The kit did come with a double-sided page of instructions. Some photos would have been nice in addition to the printed instructions but not completely necessary.
In short, the power beyond is disconnected from the loader valve. That hose is extended to the third function valve to a marked port. A 3 foot (a little too long but better too long than too short) hose then connects from a second port on the 3rd function valve back to where the original power beyond hose went into the loader valve. That port on the loader valve has a 90 degree fitting on it. I turned the fitting to face outwards instead of inwards. I had to do that as the power beyond extension hose would only route one way which put it in the way of that fitting. A slightly longer extension hose would help with that.
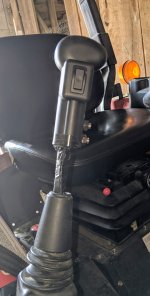
Believe it or not, beyond the hydro fittings/hoses issues, getting the existing joystick control "knob" off was almost the hardest part. In a typical Branson way, the existing knob was somewhat overbuilt and definitely not built to come off. The knob is some sort of soft plastic/rubber encased in a harder surface material. It was molded onto a threaded rod. The threading is only there to supply some grip to the molded rubber. On top of that, they drilled and tapped through the width of the control stick to put in a bolt (it goes roughly fore and aft on the control rod). This is just to give the knob some additional support and structure. I tried cutting from the top down with an angle grinder with a cut off wheel first. The speed of the grinder melted the rubber material, made a mess, started smoking and clogged/dragged down the RPMs of the grinder. No good. Tried a hacksaw next. Made a little headway but not much. Last, I tried a crosscut handsaw (meant for wood). This cut the best but still clogged quickly. I think maybe a reciprocating Sawzall or possibly and oscillating saw would work but you'll need to be aware of the bolt when cutting down. Once I peeled some of the rubber away and could get a look at what I was working with, I got my narrowest wood chisel and went straight down. This worked the best but honestly, it was just a lot of prying and pulling to get pieces off but it did finally come cleanly apart and left a clean threaded rod.
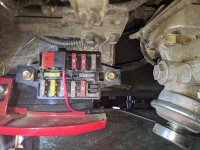
The replacement knob they supply seems solid enough but is hard plastic instead of the nice, softer "rubber" feel of the original. It fit with no issue. It has a three-position switch in the knob. The kit has two electric wires pre-installed in the valve body. One is a three-wire that goes to the control knob. I ran it under the tractor and up through the housing for the control stick, through the rubber boot and up to the knob. Wrapped the exposed control stick with electrical tape and I'll see how that looks and lasts. The second wire is a hot wire for power. The valve kit mounts on the right side of the loader mount and the Branson fuse box is adjacent to it just inside the engine hood so that seemed the best place to get power. I used a fuse tap I got at Tractor Supply and used the turn signal fuse.
Littelfuse Holder Mini Add-A-Circuit 16AWG Card at Tractor Supply Co.
WR Long supplied a 10 amp inline fuse holder but it was cleaner to use the add a circuit. I did have to wire tie the fuse block cover as the added bulk of the add a circuit kept the cover from securely latching.
The valve unit comes with a mounting plate and bolts to the loader mount by removing the bolt holding the wire loop hose retainer. The original bolt can be re-used as it is just long enough for both the mounting block and the wire hose holder. One note is that the valve block mounts at an angle pointed towards the rear so as to clear a bump-out on the loader mount.
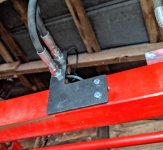
The hoses leading to the front of the loader were generously long and the male/female ag couplers come mounted in a bracket. This bracket is pre-drilled accurately to use the two bolts holding the protective cover over the solid hoses on the loader torsion bar. But, again, nitpicking, the existing bolts weren't long enough with the added thickness of the mounting block so another trip to the hardware store was needed.
From there it is just a matter of tidying up the hoses and wires with zip ties, etc.
Overall, a very solid piece of engineering and worked correctly as soon as I got everything installed. So no complaints there. I do think the "kit' nature needs some attention by WR Long however. Proper hoses and lengths, fittings and bolts shouldn't be that hard. I'm glad I went with them though. After installing one, I would be more inclined to source the different parts and save some money but having the kit for a first time install, along with phone help, made it very doable as a first-time project.


