We already use heated buckets in the winter and they work very well. Even last winter when we had several nights with temps near 0.
That is exactly what I was thinking of doing except using PVC or Poly instead of a hose - although using a good garden hose might be easier. In the winter we drag the hose out, fills the buckets and then drain the hose. Using the "inverted U" setup would eliminate a lot of the work.

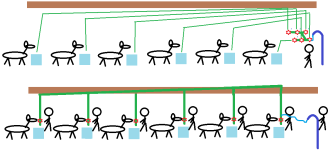
first diagram = central manifold (bunch of tees and valves with a frost free hydrant), each location has its own pipe ran to it.
--it is assumed, there is a bucket near to the hydrant, and that would be the last one to be filled up in winter. so you can drain the lines after shutting off hydrant.
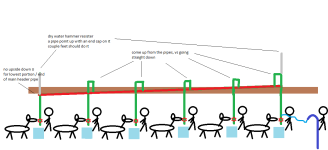
second diagram. single main pipe ran up in the rafters, and a drop leg to each bucket. with a valve near each bucket.
--the hose between hydrant and first bucket, may be iffy, if it is not hear the hydrant, and need for one more valve to be put into mix. so you can open valve and let water drain out of things once hydrant is shut off.
==================
1/2" inside diameter is more than plenty, you might get away with 3/8" inside diameter hose and/or pipe. but might advise the last couple feet of what ever goes into the bucket, be 3/4" this is more of an attempt to slow down the water, as it comes out. so it is not like a power washer, and spraying water all over the place.
a single handle 1/4 turn valve to fully open, more likely see them labeled as "gas valves" might be easier to deal with, vs the multi turn handle gate valves. the 1/4 turn and open valves may be a couple bucks more. but so much easier to use, more so if you have gloves on.
if ya looking at long runs, pvc pipe or a hard pipe might be better suggested if hanging from rafters and like. the stuff is less likely to "bend" or "sag" creating a low spot, were water would collect and freeze.
==================
big issue you are going to encounter "surging" lots of air in the pipe runs, and this is going to cause some water hammering. "you can fill and hear the pipes bounce around some" while ya filling up the buckets at each location. along with when ya open/close a valve.
a smaller inside diameter pipe, will help with the surging/water hammer effect, but will take a little longer to actually fill a bucket with water.
--pvc pipe with all the fittings will more likely be more prone to breaking / cracking due to the surging / water hammer.
--even black poly pipe you will get surging and water hammering like effect, but the hose may hold up, but the fittings will take the beating, just like pvc pipe.

diy water hammer resister = just a piece of pipe sticking straight up with a end cap on it. this pipe is suppose to have air in it, and it will automatically get air in it. i honestly don't know how long, but if you have a 1 to 2 feet of length you can deal with it. make it 2 feet, it should be more than plenty.
coming up from the main pipe, lets air escape upwards, allowing water to fully go through pipe vs having little air pockets here and there.
to large of inside diameter of a pipe / hose in above diagram can be a bad thing. 3/8" most likely suggested, 1/2" maybe ok, 3/4" ya most likely asking for trouble, 1" ya never clear the air out, by the time ya fill up the buckets at each location.
===============
with anything above, or other, make sure you add extra bracing for the pipes, the plastic pipe hangers vs metal would be suggested, "less sharp corners" and considering amount of water surging / water hammering going on. the plastic might let things give and take some vs cutting into a pipe and puncturing it, or causing apipe to burst.
--were ever there is a fitting, is were the most abuse will happen. so get a pipe hanger around them.
--make sure the pipe hangers are snug on the pipe, (pipe not seating there loose), but also not so tight ya end up cracking pipe due to over tightening the hanger.
===============
above is rough thoughts. give/take from what you will. 100's ways to go about it.


