Welding without distortion

   / Welding without distortion #1  

Maine_Polack

Gold Member
Joined
Nov 2, 2004
Messages
358
Location
Central Maine
Tractor
Mahindra 6500 4WD
What might be some procedures for insuring that things stay true while welding?

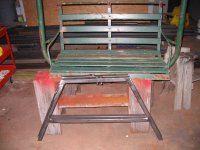
A couple of problems I ran into follow.

On the attached picture...I had the side arms connected, front and back. I tacked on the cross pcs. (light color), as shown. Then I took the whole thing off the tractor to finish welding etc. When I put it back on the tractor, One of the side arms was 1/4" or so off. I could not connect it until I expanded the mounting hole with a file.
 

Attachments

  • 760749-100_2250 smaller.jpg
    760749-100_2250 smaller.jpg
    69.2 KB · Views: 1,683
   / Welding without distortion #2  
In this specific case, I would say that more tack-welds were needed. (If you absolutely couldn't weld it while still in place)
 
   / Welding without distortion #3  
Heat is your biggest enemy. Heat from welding, grinding and sandblasting will cause steel to warp. Spread the heat around by welding a little here then a little bit in another place. Clamping on a welding table will also help.

For my latest shop project, I just finished a set of matching chair legs for an old ski lift chair shaped in an inverted U with the legs and cross braces at 22.5 degrees (see attached picture). When all welding and grinding was completed I was only off about 1/16" but I went the extra step to clamp the legs to my welding table and weld joints opposite each other keeping the heat spread out.
 

Attachments

  • 760762-IMG_0127a.jpg
    760762-IMG_0127a.jpg
    93.1 KB · Views: 1,104
   / Welding without distortion
  • Thread Starter
#4  
Another problem was welding the expanded metal onto the frame for the Hood protection.

The frame fit perfect before welding the expanded onto it. However aftter welding it "bowed" quite a bit (about an 1 1/2" in middle), end to end. It didn't even come close to fitting correctly. I didn't think that I could stretchhh it back to the intended shape, but I tried.

I shimmed up all four corners 1/4" - 3/8", put a board across the middle, and parked my car with one front tire on the board. I increased the shims each day for four days, and kept the car on it. Lo and behold, it did stretch back to it's indended shape, as shown in pic.
 

Attachments

  • 760765-100_2181smaller.jpg
    760765-100_2181smaller.jpg
    73.6 KB · Views: 1,167
   / Welding without distortion #5  
As suggested, tack it up more and clamping. Also try not to heat it up to much by welding everything one on side then doing the other. More tacking, spacing the welds and clamping can help this.

For example when building my 4x8 platform from .125 2x2 covered with expanded metal. Nothing was clamped just laid out and tacked up. Then put a bead in one corner then do another one vs welding the entire corner piece and then moving to the next one. Everything stayed flat as a board. Then when welding the expanded metal, tack up the corners then every 6" or so. Then go back and weld in between all the gaps as needed.

I've learned the hardway about metal warping in the past.
 
   / Welding without distortion #6  
Use bigger steel. I have found it much harder to heat warp 1/2" plate than 1/8" plate. I stick weld and so I end up using lots of heat and the little steel projects are much more prone to this.

The worst for me is when trying to weld a ladder type frame for a brushguard or wrought iron railing. You cut all the rungs and then as you weld them on you realize that the rails are coming together from the shrinkage of the welds.

I worked at a shipyard for awhile and helped weld the big full size sheets of 1" plate together. We're talking 8x40 foot sheets or something huge. It was as big as a semi could move. We used a submerged arc machine on one side of the butt weld and then flip it over with the over head crain for the backside. Those huge sheets would warp like heck when that long weld would shrink. Lots of big weights held the sheets flat for the second weld and then all was good.

More tacks, less heat, and restrain your work. Keep this shrinkage issue in mind as you lay the pieces out when you consider where to start welding.
 
   / Welding without distortion #7  
When things get hot, they expand, when they cool, they shrink. You are laying down molten metal during the weld process. This metal fills a gap(fillet) and bonds/fuses with the adjoining metal and as it cools it shrinks. If you put two pieces of box tube together in the shape of a "T" and weld only one side, the other side will develop a gap and your "T" will be lopsided. The way to avoid this is to plan your welded joints so they have opposing welds where possible. It is also necessary to alternate your welds. Such as with the "T" described above, you tack all 4 sides then weld a little on alternating sides untill the process is complete. IF you weld only one side, you can sometimes put in enough force to pop the tack weld on the opposite side. Think of it like torqueing a cylinder head or wheel into place. IF you tighten down all the way on one side, the head or wheel will warp. Alternate the welds and spread out the shrinkage force. In cases where you are welding on one side only such as affixing a series of tabs to one side of a piece of thin wall tube to attach rake tines to, you can just run additional weld beads on the opposite side of the tube to keep the tube from warping.

As mentioned, using thicker metal will help to mitigate this as it is harder to warp. This works to some extent but the forces applied are the same and using heavier metal can just shift the problem from warping the structural elements to deforming the entire structure. Weight is a limiting factor, especially up high on an already top heavy tractor. so you want it strong enough to do the job but as light as possible.
 
   / Welding without distortion #8  
I ran in to the same thing doing my FOPS and hood guard. The hood guard looked like a teeter totter when I was done, I put it in a press and straightened it back out. If you have a T where two tubes come together there isn't too much you can do other than bend it back.
 

Attachments

  • 760882-Mad Max Kioti.JPG
    760882-Mad Max Kioti.JPG
    60.7 KB · Views: 738
   / Welding without distortion #9  
Yeh, same here with my brush forks ... many T-joints. Had to heat every joint and add a strongback to get the curl out of it ... it's always something /forums/images/graemlins/wink.gif
 

Attachments

  • 760904-DSCN1858.jpg
    760904-DSCN1858.jpg
    76.8 KB · Views: 691
   / Welding without distortion #10  
</font><font color="blue" class="small">( Think of it like torqueing a cylinder head or wheel into place. IF you tighten down all the way on one side, the head or wheel will warp. Alternate the welds and spread out the shrinkage force. )</font>

Bingo. Well put.

Another good technique is to hurry and flip your work and weld the other side before it cools. You sort of catch it before it shrinks.

I use the "tack and back" method on longer seams. Make a series of tacks spaced out an inch or 2 apart and weld 1/2" or so on each alternately. Tedious, but works good on light stuff.
 

Tractor & Equipment Auctions

2018 Ford Transit 250 Cargo Van (A51692)
2018 Ford Transit...
2025 New/Unused LandHonor Massage Chair Sofa (A51573)
2025 New/Unused...
2023 UNVERFERTH 432 (A53084)
2023 UNVERFERTH...
2018 KENWORTH T680 TANDEM AXLE SLEEPER (A52576)
2018 KENWORTH T680...
2015 DODGE RAM 1500 CREW CAB TRUCK (A51406)
2015 DODGE RAM...
2010 Ford Edge SE SUV (A51694)
2010 Ford Edge SE...
 
Top