What a digger

   / What a digger #1  

Gittyup

Elite Member
Joined
Oct 4, 2007
Messages
3,159
Location
Mid Atlantic
Tractor
Kioti CK25 Shuttle Shift, loaded tires, JD X739
Put my CK to work today. What a digger!

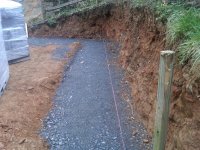
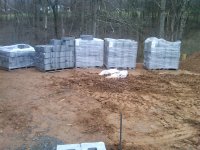
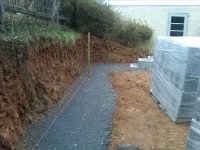
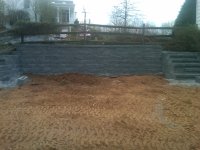
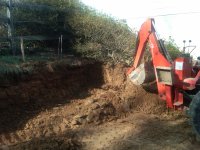
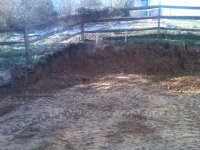
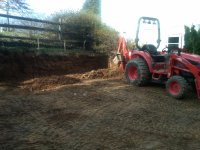
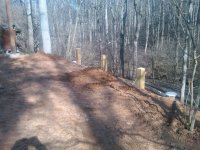
Building 2 retaining walls at the same time. Removed dirt from one wall and used it to fill another. The fill-in wall is made from 3 rows of utility poles laided horizontally accross 6x6 posts. Cheap wall, but I think it will serve well for its intended purpose. It's 32 feet long. Can't see the poles in the photos. They are buried. Upper wall, where I have it cut out will be stone (cornerstone brand) with a set of steps built in. Hard to tell it from the photos, but it's over 4' tall.

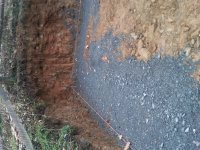
The CK made the work easy. Dragging the poles into place. Digging out the bank. Backfilling. Then backdragging. When finished, the whole thing will get 6" of crusher run over geotex. Will post more photos as I progress.
 

Attachments

  • IMG00016-20100319-1631 (10).jpg
    IMG00016-20100319-1631 (10).jpg
    777.4 KB · Views: 508
  • IMG00017-20100319-1632.jpg
    IMG00017-20100319-1632.jpg
    832.4 KB · Views: 371
  • IMG00018-20100319-1632 (12).jpg
    IMG00018-20100319-1632 (12).jpg
    673.4 KB · Views: 446
  • IMG00019-20100319-1632.jpg
    IMG00019-20100319-1632.jpg
    906.2 KB · Views: 397
   / What a digger #2  
Nice work so far. Are you just eyeballing the dimensions or are there some calculations involved? I have a retaining wall to build too (unfortunately where my tractor cannot get access).
 
   / What a digger #3  
Great Pics!

The backhoe on my little CK20 never ceases to amaze me! :thumbsup:
 
   / What a digger #4  
Nice. Looks like fun seat time too.

How wide is your BH bucket?
 
   / What a digger
  • Thread Starter
#5  
My bucket is 18" wide. Yes, I got plenty of seat time this weekend.

I have no set dimensions. The space will be defined by the wall, not visa versa. The only critical part is the steps, which will go in on the right side. I'll start at the barn and work from right to left, through the steps, which will be beside the azalea bushes. When I get to the left "end" the perpendicular wall location will be dictated by where the long wall ends. I don't have a good way to cut and have laid it out to minimize cutting. The perpendicular actually is not perp., but rather tapers out to maximize the parking area that will in front of the wall.

The blocks I'm using are 8 x 18 x 12 deep. There will be 6 courses across the long wall, which means the steps will start 6 feet in front of the wall (1foot rise (including 4" caps) to one foot run. I've never built with this type stone before, much less putting steps into one. I think I have it right. The nice thing about these stone is if you screw up, you just take them down and start over. I will be very meticulous as I work through the steps to make sure they are right and will try-stack several courses to make sure.

I have the pads laid now in wide trenches. The pads are 8" deep crusher run, tamped in and leveled in both dimensions. The 18" bucket came in handy digging the 3' x 1' deep trench with a 5' x 1' trench for the steps. All together there is 46 running feet of trench.

The fence at the top of the wall will get a gate added, and a railing will be built on the top of the wall down the steps. The blocks are hollow, which works well for placing railing posts into and concreting into place.

It's now ready to start laying the stones. I will post some more photos soon.

Any advice or suggestions that could help?
 
   / What a digger #6  
I built a wall last summer with same size blocks. I'm just glad my wife has a strong back as those suckers weigh over 80 lbs each. LOL. I actually had a friend build a "grabber" which I connected to my backhoe and used it as a crane to pick up the blocks and set them in place (approx). Hint: Have the blocks delivered as close to your work as possible. A pallet can weigh over 3000 lbs. The blocks I used had a pin system which made the alignment easy though some needed a little work on the end edges for better fit.

By far, the most important parts are (1) getting your base firm and level and (2) take lots of time getting the first row level and square front to back and side to side. Then the rest will be just a matter of the heavy lifting. Also, back fill as you go. Even after doing the above, I had one area in the middle which settled about an inch with all the record setting rain we had last year, oh well. Enjoy!

Edit: My wall was 75 ft long and 5 blocks high.
 
   / What a digger #7  
Looks like you have things under control. Just a few tidbits most of which you probably know.

Make sure your base is compacted with a vibratory compactor and not a tamper(jumping jack). Jumping jacks are for compacting clay soils.

Make sure you have good drainage. I used the 4" socked drain pipes with small slits. I made a "burrito" around the drain pipe using landscape fabric and washed 57's. Along the base I ran an "exit" every 30 feet or so under the wall. As soon as the pipe passes under the wall I switched to pipe with no slits/no sock.

I buried one course completely on both side with compacted crusher run. My drain pipe burrito sits on top of this compacted base.

http://superxtune.com/public/IMG_4449sm.JPG

This is about 3 or 4 courses in:

http://superxtune.com/public/IMG_4462sm.JPG

Notice the washed gravel up against the wall with compacted crusher run further in.

Not sure what brand block you are using but I used Versa-lok square footers. I used and old worn pin punch to clean out the pin groves in the already placed block. I also cut a 12" piece of 1/2" steel rod to hammer in the pins.

I used Mirifi 3XT geogrid for tiebacks. Do not bury the grid with large rocks as the grid can be damaged.

Forget about gloves. I went through a couple of pair and it seems like I ended up damaging my hands more with gloves since you tend to feel protected. Without them I was much more careful.

Completed wall:

http://superxtune.com/public/IMG_4563sm.jpg


Tim


My bucket is 18" wide. Yes, I got plenty of seat time this weekend.

I have no set dimensions. The space will be defined by the wall, not visa versa. The only critical part is the steps, which will go in on the right side. I'll start at the barn and work from right to left, through the steps, which will be beside the azalea bushes. When I get to the left "end" the perpendicular wall location will be dictated by where the long wall ends. I don't have a good way to cut and have laid it out to minimize cutting. The perpendicular actually is not perp., but rather tapers out to maximize the parking area that will in front of the wall.

The blocks I'm using are 8 x 18 x 12 deep. There will be 6 courses across the long wall, which means the steps will start 6 feet in front of the wall (1foot rise (including 4" caps) to one foot run. I've never built with this type stone before, much less putting steps into one. I think I have it right. The nice thing about these stone is if you screw up, you just take them down and start over. I will be very meticulous as I work through the steps to make sure they are right and will try-stack several courses to make sure.

I have the pads laid now in wide trenches. The pads are 8" deep crusher run, tamped in and leveled in both dimensions. The 18" bucket came in handy digging the 3' x 1' deep trench with a 5' x 1' trench for the steps. All together there is 46 running feet of trench.

The fence at the top of the wall will get a gate added, and a railing will be built on the top of the wall down the steps. The blocks are hollow, which works well for placing railing posts into and concreting into place.

It's now ready to start laying the stones. I will post some more photos soon.

Any advice or suggestions that could help?
 
Last edited:
   / What a digger #8  
The first course of block should be beneath grade to keep the wall from kicking out. If you've ever seen the HGTV show: Holmes on Homes he did a complete tearout of a wall that was done wrong from start to finish and then he tore it out and redid it right. It is a LOT of work to do to get it right the first time, and the right materials used in the proper sequence.
I did a wall with a contractor who insisted the pins went in the opposite of what I told him should be the case. It fell down after several years of threatening to do so. I had it rebuilt by another guy and it has been standing for over ten years now. I have a lot of clay soil which is great for a pond and lousy drainage for a retaining hollow block wall. Even putting the wall on a slight tilt toward the back of the wall can work, especially in areas where frost heaves tend to be a problem. The second time my wall was done it was built with a rearward lean on purpose and it has worked out well. Top caps must be glued together with construction adhesive and to the block below to hold things together as stated already above. I also suggest watering down the blocks and stone that will be for drainage as you assemble the wall. This helps to compact and settle stone dust and to fill any voids.
 
   / What a digger #9  
The pin system in the blocks I used allowed two options. Straight up vertical or 1" offset which allows the wall to "lean" back into the ground. I used the latter as it is supposed to be stronger. And yes, the first course should be under ground which allows for more backhoe work. :)
 
   / What a digger
  • Thread Starter
#10  
Thanks guys. I understand that the first course should be underground. The block I'm using has locking keys built-in that create a natural 5/8" setback per row.

I'm using a manual tamper. Is that good enough or do I need to rent a vibratory? The stone will be in place for probably a week before I start laying and it's raining now with more called for before I lay. I plan to re-tamp and level just before I lay the block.
 
 
Top