what are the four holes for in the bottom of the TO-30 differential case?

   / what are the four holes for in the bottom of the TO-30 differential case? #81  
Now go buy you a MAPP GAS cylinder for your propane head and you'll be good to go. If you ever have to repair your draft spring assembly you will need it again to heat up some pieces for disassembly as well. -kid
 
   / what are the four holes for in the bottom of the TO-30 differential case? #82  
Seems no matter how many thousands of dollars we invest in tools it almost always boils down to a hammer and chisel, or in this case center punch.

Would have been interesting to try heating it either with ox/acetylene or by putting a bead of weld around it as well. Get it near cherry red and she would come off there quick enough.

Now you'll need to get the new one good and warm so she slips on without needing a press to do it. Would suggest getting a brass drift, or even better manufacturing a few soft drifts from phenolic, to help seat it against the collar.

If you had a welder I was going to recommend welding two nuts to the collar and using a dent puller used for body work. I've modified one to use for this purpose in the past and it works well, with a little heat.

Glood to hear your through that phase of the repair.
 
Last edited:
   / what are the four holes for in the bottom of the TO-30 differential case?
  • Thread Starter
#83  
Mike - yup, simple tools and lots of scrap 2x4s and plywood always seem to come in handy. Being a material hoarder has its benefits in that I often have random stuff sitting around that I can use for specialized purposes if I need it - and can find it...

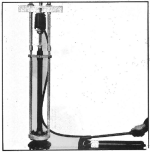
No love so far trying to pull the bearing + bearing retainer casting. Started out with two 3/8-16 threaded rods going through the casting (the stud holes are 7/16-20, so the 3/8 just passes through) and the other ends through a "chicken footprint" puller head from my slide hammer set (which I took the excuse to buy while working on my boat's lower unit):

rear_axle_casting_pull_first_attempt.jpg

Cranked on the center screw and the puller wanted to lean one direction, so I switched over to this other head I had from a steering wheel puller kit that had three of the slots 120 degrees from each other and tried it with three equally spaced threaded rods through the casting. The puller head stayed flat, but nothing was budging down at the casting/bearing despite cranking on the screw with a 2' breaker bar and a long piece of strut channel acting as a de-rotation bar.

Looking back at the service manual, they showed a setup similar to what I was doing, but using a hydraulic ram instead of a screw puller:

rear_axle_casting_pull_service_manual.png

After toying with the idea of trying to find a skinny bottle jack that might fit in there, I just decided to order a hydraulic ram kit and low profile ram. Went with the Harbor Freight 10-ton series - hopefully it's decent enough for my occasional tinker use. I'm sure I'll find other applications for it once I have it.

Will probably start powdercoating some of the brake components that I've got off while I wait for that stuff to arrive (pedal arm, actuating rod, backing plate, etc.). Speaking of the backing plate, are new felt seals available for those? Would need to remove the old one before I blast and coat that backing plate.
 
   / what are the four holes for in the bottom of the TO-30 differential case? #84  
You must have seen how a press works? You could now get almost any mechanical shop with a press to put the entire assembly in one and press off the retainer and bearing in one shot?!

Here's but one example:12 Ton Hydraulic Shop Press - Amazon.com
 
   / what are the four holes for in the bottom of the TO-30 differential case? #85  
G'day dbots.
Interesting saga lots of Different Ideas the end result was ,You got the retaining collar of ! Now the bearing!!.

The easiest way to remove the collar IS ,drill a pilot hole into the collar ,Parrallel with the axle you can not go to deep, Increase the size of the hole till you can go no farther ,you will find that if the pilot hole was to close to the axle as you increase the size of drill and it contacts the axle you will find ,the axle being hardened will deflect the drill, this done a good chisel and a copper hammer ,a good hit on the weakest part of the collar and the retaining ring WILL FALL OF.

Keeping the old bearing clean should not be an issue as you WILL BE REPLACING IT with the NEW SEALS !!

To Remove the axle hub assembly make or have made a steel flange using the axle Trumpet housing flange AND the bearing housing for measurements, the flange should be 25 to 30 mm thick and say four hundred MM diameter ,slide it over the bearing housing and use the original hardware to secure the FLANGE to the housing, put the complete thing axle ,hub etc into a press and gently push the axle through the bearing housing, put a block of wood on the floor below the axle or have a willing helper hold onto the axle to avoid damaging it on the way out, i use this method daily and I have never had an axle that would not cooperate .

By using a Puller OR a hollow hydraulic ram YOU WILL BEND the bearing housing hub ,I have had more than one come into my shop asking the question, can you succesfully STRAIGHTEN cast iron???????
NO.

Assemble so:

When everything is cleaned up paying particular attention to the bore of the hub where the bearing fits making sure there is no burrs or areas that will stop the bearing going on ALL THE WAY.

First the Bearing Cup ,I find it easier if you put it in the freezer overnight or in your case put it outside on the verandah, when you are ready to go gently heat the bearing housing concentrating the heat around the area where the bearing will fit not to hot about 180//230 degrees C just below Blue, using Brake fluid coat the OUTSIDE of the bearing cup and install into the housing and don,t laugh make sure it is the correct way up (thin part up ),all the way in.
Next the seal, coat the OUTSIDE of the seal with Permatex NON HARDENING compound and using a FLAT plate 1/2 inch thick at least and large enough to cover the seal area PRESS THE SEAL in ALL THE WAY be careful not to distort or damage the seal business area, fill the void area behind the seal with a good quality bearing grease this will ensure the seal is kept lubricated.

Next the shaft, again pay particular attention to the areas around the shaft seal AND where the bearing cone will rest use fine wet and dry emery paper to give the surface a nice smooth shine lubricate the shaft sealing area with a little bit of grease, and install the shaft into the housing carefully .put the shaft and housing outside overnight and put the bearing into mums oven for 1 hour at 200 degrees c
Make sure the axle etc is ready to receive the hot bearing ,a little lubricant ,brake fluid on the shaft , have a piece of pipe at the ready to knock the bearing home if required , if all is good the bearing will drop all the way down ,when it is in this position give it a light tap with the pipe just to make sure it has seated properly.

Next The retaining collar, heat it up with "the kids" propane torch nice and gently a nice SOFT heat is what you want ,to much oxygen will crystalize the surface and it will not do the collar any good so gently does it, not sure about the temperature but I heat them up till just before red hot ,till you can just see the red appear ,everything ready and double checked install the collar,use pliers and try not to drop it till it is nearly there,this way it wont get a ding on it, again using the piece of pipe and as it is cooling down gently TAP IT A COUPLE OF TIMES JUST TO MAKE SURE IT IS SNUGGED UP.
LET IT COOL ON IT,S OWN do not use water.

Install the assembly:
The axle bearings being tapered rollers need to be preloaded that is the bearings require that there is a constant compressive force applied ,this ensures that ,one the axle assemblies run true and that the machine will carry the weight of a load tthe fact that the two axles contact each other allows you to adjust the preload by adding removing shims behind the hub gasket ,you may have found the remains of the shims when you removed the axle assembly ,
If there were no shims The best way is to buy say six bearing housing to trumpet housing gaskets OR if you can get them an assortment of shims when you buy the new bearings and seals.
Assemble the axle and temporarily install say three gaskets that is install the one new gasket PLUS two or three extra tighten the flange bolts to spec and try to push the axle hub in and out you are trying to establish End float within the axle assembly,when you have end float ,set up a dial indicator which will accuratly measure the end float example there is say 25 thousandths end float that is with the shaft FULLY IN to FULLY OUT you want to remove between 29 to 32 Thousandths this will give the bearing a preload of between four and eight thousandths of an inch which is the final operating preload.
Just a note , when you have established your preload and you remove the axle assembly to adjust ,COAT BOTH SIDES of every gasket surface then reassemble.
That is the axle seal bearing part done.

I have got to go we have a bush fire in the area got to make sure the bulldozer is good to go and the firefighting unit is full.
Will come back to your brake issue later.
Happy days.
Hutch.
P.S.
Check out the fire on google earth ,Stoneville Mundaring Sawyers valley Western Australia we are in Gidgiegannup Springs.
 
   / what are the four holes for in the bottom of the TO-30 differential case? #86  
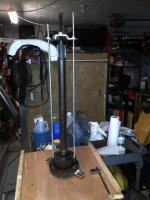
dbotos, looks like an interesting setup you had there. I can remember trying to pull a spacer off the axle of a C130 used to keep the inner bearing riding on the axle race, wish I had something like that to pull it. Can't use heat unfortunately with the chrome races on strut axles.

Safe to assume you know a little about metallurgy from your work and the fact that you have your own mill so I won't get into the relevance of how far to heat and how fast to cool the metals you're working with on assembly (not nearly as important on removal) but do remember that when using some of the lubricants suggested that some contain some pretty nasty stuff. You don't have to see them smoke when applied to hot surfaces to know they are "boiling off" some pretty nasty chemicals, mask up!
 
   / what are the four holes for in the bottom of the TO-30 differential case?
  • Thread Starter
#87  
Coyote machine - I've got a 20-ton shop press like that in the garage. Flange on the axle shaft won't fit through the C-channels of the table. I could support it above the table, but that would require a semi-elaborate fixture to hold everything and get in between the axle shaft flange and the bearing retainer casting.

shona - I was going to see what condition the bearings were in before deciding whether or not to replace them. Cone was marked "Bower 3795 USA". Bower is now part of NTN. Will check P/N and dims on the cup when I get that out too. Might not be too expensive and now would be the time to replace while I've got it all apart. I think you're right about using a thick flange to mount to the bearing retainer casting - it would suck to pull real hard on the flange of the bearing retainer casting and crack off part of it or distort it. That tool in the picture from the service manual looks like it has a decently thick flange on it. Our waterjet is going to be operational later this month at work, so maybe I'll make one on that. I will have to come back to your post when I get ready to re-install things - sounds like you've done this a time or two before. ;)

Mike - yup, trying to be careful with heating stuff so I don't warp or change the properties of anything critical like the bearings or shaft. My 3M respirator gets put on for anything stinky (I have one for general purpose with pre-filters and organic vapor cartridges, another with pancake filters to fit under my welding hood, and third that hooks up to my supplied air system).
 
   / what are the four holes for in the bottom of the TO-30 differential case?
  • Thread Starter
#88  
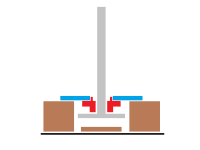
shona - something like this? Axle shaft is gray, bearing retainer casting is red, that flange you were talking about is blue, and the brown pieces are wood.

axle_shaft_pressing.png
 
   / what are the four holes for in the bottom of the TO-30 differential case? #89  
G'Day dbotos.
That ,s the idea .
Happy Days.
Hutch.
 
   / what are the four holes for in the bottom of the TO-30 differential case? #90  
shona - something like this? Axle shaft is gray, bearing retainer casting is red, that flange you were talking about is blue, and the brown pieces are wood.

View attachment 354843

I would put the blue under the red and press down on the axle shaft. This should press the shaft down, and the red bearing retainer up off the shaft's bearing 'seat'. Does that make sense to you?
 

Tractor & Equipment Auctions

2020 FABRIQUE H9618TRTV-100 18FT ENCLOSED TRAILER (A51222)
2020 FABRIQUE...
2011 Chevrolet Traverse SUV (A50324)
2011 Chevrolet...
2022 BARFORD TR8048 MOBILE SCREEN (A51242)
2022 BARFORD...
2011 New Holland B95B Cab MFWD Loader Backhoe (A52128)
2011 New Holland...
2022 CATERPILLAR CS44B SMOOTH DRUM ROLLER (A51242)
2022 CATERPILLAR...
2014 Gillig G27B102N4 31+56 Low Floor Passenger Bus (A50323)
2014 Gillig...
 
Top