There are many good threads on wiring worklights and switches, but I had trouble settling on a light bracket design. I wanted something small since each bracket would be supporting just a single light. I also wanted a design that was inexpensive, could be moved easily without marring the tractor's finish, and would not need drilling or welding on the ROPS. I took a stroll through my local TSC and came up with a plan. A pair of these brackets can be made and installed in less than an hour, not counting the drying time for paint. They can be mounted on the top or sides of the ROP, with the lights to either the top, bottom, inside, or outside. They cost me less than $10 to make a pair, which saved me $50 - $110 compared to a pair of the brackets my dealer sells.
I bought the following at TSC, enough to make a pair of brackets:
2-Square U-bolts, 2" x 5" x 5/16"
2-U-Bolt Plates, 2" x 5/16"
2-Corner Braces (L-brackets), 5" x 1"
1 foot of 5/16" poly tubing
4 extra 5/16" nuts and lock washers.
I cut the L-brackets (7/8" off one end and 2 7/8" off the other end) and the U-bolts (1" of threads cut off each end) to get rid of the extra metal. I re-drilled the existing hole that was left in the short leg of the L-bracket to match the bolt size from my lights (3/8" in my case). On the long leg of the bracket I measured 2 3/8" on center from the hole closest to the bend and drilled a 3/8" hole for the U-bolt (3/8" rather than 5/16" to make it easier to mount). Holes in these brackets come 'off center' so I drilled this new hole in line with the pre-drilled hole to keep the bracket plum when mounted. I rounded the sharp edges with a file and painted the parts black to blend in with the ROP.
I cut 4 pieces of poly tube 3" long, and 2 that were 2". After the paint was dry on the metal, I used warm water and dish soap to help slide the 2" pieces of tube on the U-bolts, around the bend and onto the 2" section. Then add a 3" piece on each long side. You could use heat-shrink tubing rather than the poly tube I used. Cut 2 pieces of thin rubber, slightly larger than the U-bolt plates. I used an old computer mouse pad for this. Punch a hole in each end of the rubber pieces to line up with the U-bolt ends (2 3/8" on center).
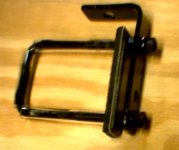
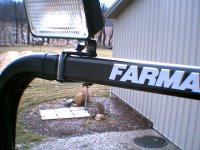
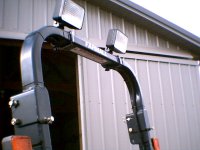
Slide the U-bolt onto the ROP, from the front to the back. Slip the rubber cushion over the bolt ends, and then add the U-bolt plate and a nut on each bolt end. Snug it up with a wrench. Slide the long leg of the modified L-bracket over the bolt ends, with the short leg over the top of the ROP pointing towards the front of the tractor. Add lock washers and nuts, then tighten. The bolt from the light is mounted on the top short leg through the hole you re-drilled.
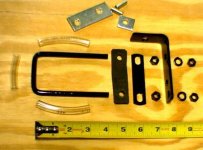
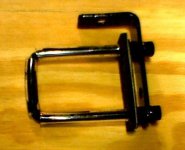
In the pictures below, you can see the pieces laid out in order and then assembled. The metal and bolt ends that were cut off are along the top of one picture and are not painted.
I used the U-bolt plates rather than just the L-brackets to tighten it to the ROP. I liked the idea of snugging up the U-bolt with the added padding of the tubing and rubber, to just the right tension, and still allowing the L-bracket to be tightened hard against the first nuts so they won稚 vibrate loose. The U-bolt plates, tubing, and rubber cushion could be skipped to make an easy bracket as well.
My ROP is 2" x 3". You could make this work for a 2" x 2" ROP by cutting an extra inch off the bolts, or by buying shorter bolts.
I bought the following at TSC, enough to make a pair of brackets:
2-Square U-bolts, 2" x 5" x 5/16"
2-U-Bolt Plates, 2" x 5/16"
2-Corner Braces (L-brackets), 5" x 1"
1 foot of 5/16" poly tubing
4 extra 5/16" nuts and lock washers.
I cut the L-brackets (7/8" off one end and 2 7/8" off the other end) and the U-bolts (1" of threads cut off each end) to get rid of the extra metal. I re-drilled the existing hole that was left in the short leg of the L-bracket to match the bolt size from my lights (3/8" in my case). On the long leg of the bracket I measured 2 3/8" on center from the hole closest to the bend and drilled a 3/8" hole for the U-bolt (3/8" rather than 5/16" to make it easier to mount). Holes in these brackets come 'off center' so I drilled this new hole in line with the pre-drilled hole to keep the bracket plum when mounted. I rounded the sharp edges with a file and painted the parts black to blend in with the ROP.
I cut 4 pieces of poly tube 3" long, and 2 that were 2". After the paint was dry on the metal, I used warm water and dish soap to help slide the 2" pieces of tube on the U-bolts, around the bend and onto the 2" section. Then add a 3" piece on each long side. You could use heat-shrink tubing rather than the poly tube I used. Cut 2 pieces of thin rubber, slightly larger than the U-bolt plates. I used an old computer mouse pad for this. Punch a hole in each end of the rubber pieces to line up with the U-bolt ends (2 3/8" on center).
Slide the U-bolt onto the ROP, from the front to the back. Slip the rubber cushion over the bolt ends, and then add the U-bolt plate and a nut on each bolt end. Snug it up with a wrench. Slide the long leg of the modified L-bracket over the bolt ends, with the short leg over the top of the ROP pointing towards the front of the tractor. Add lock washers and nuts, then tighten. The bolt from the light is mounted on the top short leg through the hole you re-drilled.
In the pictures below, you can see the pieces laid out in order and then assembled. The metal and bolt ends that were cut off are along the top of one picture and are not painted.
I used the U-bolt plates rather than just the L-brackets to tighten it to the ROP. I liked the idea of snugging up the U-bolt with the added padding of the tubing and rubber, to just the right tension, and still allowing the L-bracket to be tightened hard against the first nuts so they won稚 vibrate loose. The U-bolt plates, tubing, and rubber cushion could be skipped to make an easy bracket as well.
My ROP is 2" x 3". You could make this work for a 2" x 2" ROP by cutting an extra inch off the bolts, or by buying shorter bolts.