Zero Turn Deck Repair

   / Zero Turn Deck Repair #1  

BukitCase

Elite Member
Joined
Feb 17, 2012
Messages
2,749
Location
Albany OR
Tractor
Case 580B, Long 460, Allis-Chalmers 160
Found out ya can't really mow 3" limbs sticking out of burn piles with a cheapy stamped steel deck :confused: - Bought a Cub RZT50 a few years ago, mowing time went from 2 days to 2 HOURS - the Cub was the only under $3k machine with a Kawasaki, and I'd had good service from the little JD with a smaller Kawasaki.

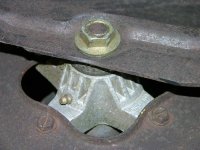
Fast forward to last week - ran over a limb end hidden in the grass, heard scary noises, stopped and found one blade and spindle laying UNDER the deck, spindle housing broken, etc - next few posts show the repair/beef-up. Hopefully it'll work better than the 13 ga. stamped steel deck by itself :rolleyes:

Pics, hopefully in order - apparently the pic uploader is STILL broken - chose 10, uploaded, only got the LAST one. Started over and uploaded EACH pic as chosen, so the first one SHOULD be the last one. Oh well...

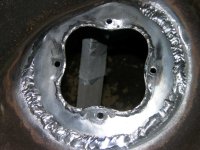
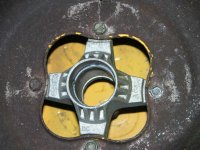
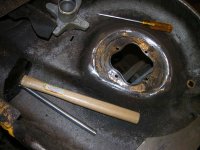
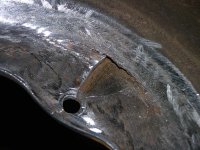
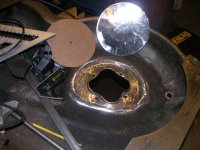
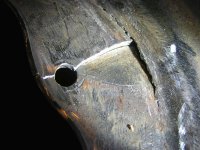
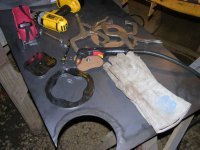
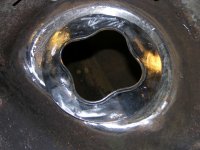
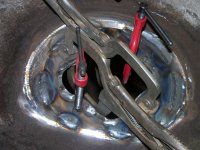
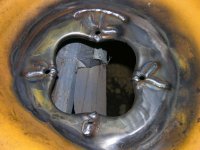
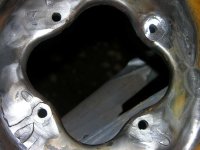
Pic 2 - broken - Pic 3 - cleaned up - Pic 4 - Worst hole - Pic 5 - 1/8 masonite plaz pattern - Pic 6 - Worst hole closeup - Pic 7 - 3/16" thick reinforcement ring - Pic 8 - fit check - Pic 9 - Clamped @ all 4 bolt holes, tacked in place - Pic 10 - Top site, cracks welded - Pic 1 - Top side, pads leveled, holes cleared.

More to come... Steve
 

Attachments

  • DSCN1631.JPG
    DSCN1631.JPG
    127.3 KB · Views: 436
  • DSCN1636.JPG
    DSCN1636.JPG
    128.8 KB · Views: 526
  • DSCN1639.JPG
    DSCN1639.JPG
    126.8 KB · Views: 298
  • DSCN1640.JPG
    DSCN1640.JPG
    121.6 KB · Views: 313
  • DSCN1644.JPG
    DSCN1644.JPG
    127.4 KB · Views: 250
  • DSCN1645.JPG
    DSCN1645.JPG
    110.3 KB · Views: 374
  • DSCN1647.JPG
    DSCN1647.JPG
    117.9 KB · Views: 258
  • DSCN1649.JPG
    DSCN1649.JPG
    123.9 KB · Views: 896
  • DSCN1651.JPG
    DSCN1651.JPG
    115.4 KB · Views: 459
  • DSCN1653.JPG
    DSCN1653.JPG
    107.9 KB · Views: 385
   / Zero Turn Deck Repair
  • Thread Starter
#2  
Pic 1 - Bottom, pads leveled for bolt heads - Pic 2 - Middle spindle, almost as it SHOULD be :rolleyes: - Pic 3 - Painted, curing @ about 130 degrees (two 250 watt IR lamps), ready for new spindle (due in a couple days)

I didn't want the plaz pattern to move til it was all cut out, and needed it centered so all the bolt holes, etc, would fit - so I used the center made with the compass on the masonite and the drilled hole in center of the steel circle, bolted them together and spaced the pattern off the steel with washers - then I clamped ONE of the corners down to the bench (pattern, washer and circle) so the bolted center and the clamp locked things in place.

Cut 3/4 of the inner part, then re-clamped the opposite corner and finished the cut.

Once the reinforcement was tacked and partially welded I used a transfer punch to mark where new holes in the reinforcement went, and drilled them out to 5/16" (the bolt size) in 3 steps. Used an old housing with bad shaft to check, and all 4 bolts fit perfect.

I'm saving the pattern, will most likely be doing this 2 more times :rolleyes:

Wouldn't mind a brand new Skag or Dixie chopper, but too many other things have higher priority for now... Steve
 

Attachments

  • DSCN1654.JPG
    DSCN1654.JPG
    122.7 KB · Views: 436
  • DSCN1655.JPG
    DSCN1655.JPG
    124.3 KB · Views: 232
  • DSCN1658.JPG
    DSCN1658.JPG
    86.2 KB · Views: 224
   / Zero Turn Deck Repair
  • Thread Starter
#3  
Oh, all welds done with MM252 - heavier ones using settings for .035 wire/ 12 gauge - crack repairs in 13 ga. done set for 18 ga. (17 volts/150 IPM) - Started all crack welds AT THE HOLE to keep the heat down/avoid blowouts. On multiple cracks/same hole, I let it cool first (same reasons)

Using lower settings lets me be more accurate with placement without burn through - staying in front of the puddle got good fusion without having so much to grind down.

Pads need to be level with each other on the side the spindle mounts to, other side only needs to be flat for bolt heads... Steve
 
   / Zero Turn Deck Repair #4  
Now it is probably stronger than new. Glad you have the skills to repair , I'm sure they think their new decks are worth a lot.
 
   / Zero Turn Deck Repair
  • Thread Starter
#5  
Not as bad as a welded one, but factory wants $534 and I found a couple on fleabay for $400 - in both cases, that's a BARE deck - if it isn't welded on, it's not included.

Like a lot of my projects, the other two should take half as long and look better :laughing:

The $erious ZTR's use welded decks about the thickness of my patch, and cast iron spindle housings with about 40% thicker spindles. The other side of THAT coin is that one of their spindles ready to bolt on and run costs more than the factory BARE deck for mine.

You're right, it's a good feeling knowing that my "pooch ain't necessarily screwed" when something breaks :thumbsup:...Steve
 
   / Zero Turn Deck Repair #6  
Nice work.

I know what you mean on being able to repair. I am still running 2 old cheapo riding mowers (Murray at my place) and (MTD at the MIL place ) that I have welded the decks up on. I did not get as fancy as you did with the repairs. I sorta used my wire feeder as a 3-d printer to remake the missing metal as the damaged areas were is complex curve areas but had to be fixed cause they held the deck support hangers. It was easier to do the 3-d printer thing than to fab a patch due to the complex curves. Even used flux core to do it. It would have been much easier with gas (mig) mode.

These mowers have mowed for years after my welding but otherwise would have been in the junkpile long ago. New decks cost more than a new chepo mower and these are simple throw away units anyways - certainly not worth buying a new deck for them. That all said, the MTD rider has been in use every year since 1994 and the Murray rider every year since 1998. The Murray has covered acres of rough terrain. Gonna have to splurge for new belts for it this year. It is till running the original belts.

All in all not too bad of service for the cheapo units that they are. While they are not ZTR's they are riders and have cut a lot of grass for very little $.
 
   / Zero Turn Deck Repair
  • Thread Starter
#7  
Thanks for the compliment - I've used the "3d printer" mode on a few things myself - with mig and C25 gas it's hard to tell you did it that way. Almost zero spatter. Before I got the mig, there were quite a few more things that got tossed rather than embarrass myself by blowing holes in 'em with the old stick machine. Even tried some 1/16" rod, helped a little but not much.

Now I'm so addicted to mig I built a "porta-shed" out of 2" square tube and fiberglass - it's 12' x 20', 9'-11' ceiling and wind/weatherproof. It collapses to 12x12 for travel. I made a couple receiver mount attachments for the loader on my hoe, and I can drive inside, pick up the building and drive away :D

Now I can weld mig, tig or stick anywhere I can reach 240 volts with an 80 foot power cord. Makes it nice cause my present shop isn't big enough to get a tractor or the TLB inside, and most of my repairs are (hopefully) during bad weather... Steve
 
   / Zero Turn Deck Repair #8  
Yep! Nicely done. Thanks for the pics! I guess it really happened.
 
   / Zero Turn Deck Repair #9  
Very good job! Much better than buying new. I like to see repairs on equipment that sets it up for many more years of use.
 
   / Zero Turn Deck Repair
  • Thread Starter
#10  
Thanks guys, I was pleasantly surprised at how well it went - not much room for error the way those spindles mount.

Speaking of which, the new spindle assembly is supposed to be here Tuesday, if so it'll be ready to go Tuesday nite - it's supposed to be dry Wed and Thu, hopefully things'll be dry enough Thu. afternoon to mow. In the last 24 hours it's put down 1-1/2" of rain, so ground's pretty well soaked :(

Couple days of sun and (hopefully) a bit of a breeze, and I should get the approx. 2 acres I keep mowed done in a little over an hour.

What's causing my headache?? Oh, right - been "knocking on wood" :laughing:...Steve
 
 
Top