Rebuilding harragator "spike harrow" project

/ Rebuilding harragator "spike harrow" project #1  

sixdogs

Super Star Member
Joined
Dec 8, 2007
Messages
15,729
Location
Ohio
Tractor
Kubota M7040, Kubota MX5100, Deere 790 TLB, Farmall Super C
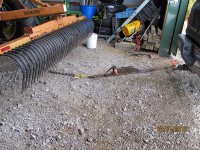
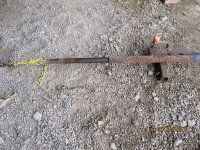
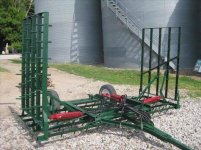
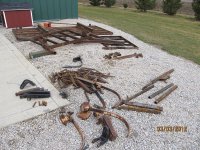
Cabin fever and kind of a slow time of year so I started to rebuld a set of harrows I bought. After taking some photos for myself I thought maybe I should post it here in hopes someone had an interest. It's not a difficult project but rewarding since I need the item when I'm done and it is an easy job. It will probably take six weeks to finish because I need warm weather to paint outside. These are usually called "harragators" but sometimes drag or spike harrows. I found this at an auction and didn't pay much since it wasn't worth much but it is very rebuildable and maybe worth $850 when done. This is an Unverferth (brand) and considered well-engineered and properly built. Made 1983 and I bought from original owner.
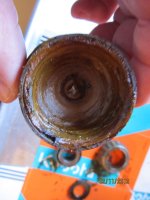
It was semi-frozen in the mud when I picked it up it had maybe 500 lbs of mud frozen to it, making it hard to load. It sayed semi-frozen and the mud just flaked off when I got it home. I left it in the rain for a day and then started disassembly. As with all of this stuff, it's always worse than you think and buyer's remorse only natural. Oh, well.

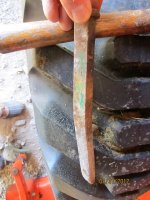
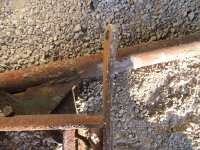
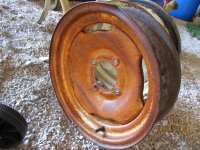
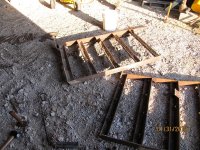
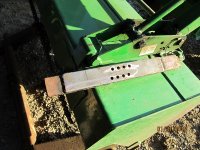
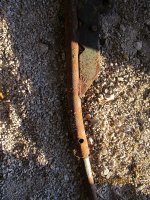
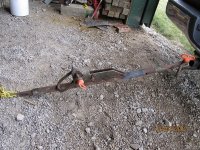
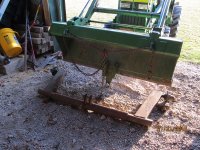
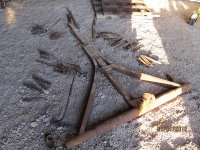
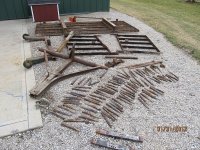
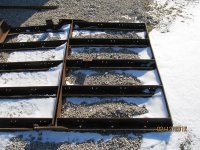
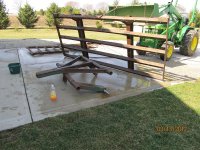
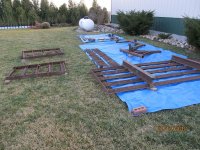
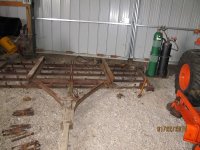
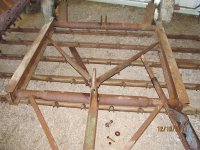
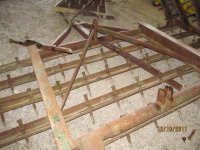
These first photos are in the barn after I unloaded it and stared to dissemble. Turns out many of the spikes were bent and would need to be straightened. Also, it was twisted here and there but nothing too bad. More on that after I post these pictures. Here's in the barn....
 

Attachments

  • 001.JPG
    001.JPG
    213.8 KB · Views: 822
  • 003.JPG
    003.JPG
    229.5 KB · Views: 802
  • 005.JPG
    005.JPG
    322.9 KB · Views: 1,148
Last edited:
/ Rebuilding harragator "spike harrow" project
  • Thread Starter
#2  
My first dilemma was the bent spikes and the need to straighten them. Here's a photo of a mildly bent spike but most were way worse than this. The solution was to heat the spike at the bend with an oxy/acy torch and then hammer it straight. Maybe 50 out of 100 but it went quick since I am still enthusiastic because this will look great when done.

The other photos show the bent "ears" on the side extensions and the racking of them plus a small bend in the wheel. I'm mildly thinking maybe I shouldn't have bought this turkey. ..
 

Attachments

  • 020.JPG
    020.JPG
    199.9 KB · Views: 520
  • 019.JPG
    019.JPG
    311.7 KB · Views: 471
  • 013.JPG
    013.JPG
    235.1 KB · Views: 486
  • 018.JPG
    018.JPG
    326.6 KB · Views: 502
Last edited:
/ Rebuilding harragator "spike harrow" project
  • Thread Starter
#3  
Moving right along, and feeling better, there are sliding arms that allow the harrow to flex to a degree and stay level from side to side. It has arms with adjustable holes that you insert a pin and it limits travel of the arm. I'm not exactly sure how this works but the arms with the holes where the pin goes were all screwed up and torn so I made a replica pattern in steel, drilled some holes and slab welded to the sides. Here's a photo leaning on the bucket of my JD790..

Another big problem is the tubular piece shown in the next photo. A solid round bar of steel slides inside another tubular bar and needs to be straightened. This allows the wheeks to pivot to raise the spikes and frame for transport Trouble is, the round tubular bar was bent with the solid bar extended so how do I bend the tubular bar so the solid bar will still slide in?

I'm thinking oxy/acy, a big hammer and hoping I get lucky. I figured to heat the tubing red hot, bend it and lightly hammer the solid bar in a liitle at a time to sort-of die sink it in. Did I mention I had a big hammer since that's where I went wrong. It worked 98% of the way and then the solid tube got stuck inside the round hollow tube and wouldn't budge. Now what?

That's in the next post..
 

Attachments

  • 008.JPG
    008.JPG
    228.1 KB · Views: 538
  • 014.JPG
    014.JPG
    359.8 KB · Views: 464
Last edited:
/ Rebuilding harragator "spike harrow" project
  • Thread Starter
#4  
What a dummy I was to overpound the solid bar into the tubular bar and now I am shucks out of luck and I knew better going in. Why, oh why did I use the big hammer? Normally, you can press things together with no problem but pulling them apart with nothing to grip to is another matter.

I didn't want to embarras myself with a Rube Goldberg thing but I had no choice. I figured to hook one end (no easy task) to my JD790 and the other to the pickup and that should do it. No dice as I easily pulled the 790 forward. When the outer tubing cooled it shrunk tighter so I needed to re-heat under tension. In two photos you see the item hooked to my 8000 lb JD5520 on one end and the pickup on the other end. Told wife to idle in neutral and then put in drive when I say so with no gas added. "Do I really have to?', she asked. "It's in the marriage vows", I said, "you can look it up later".

It took 15 minutes of heat and a wife itching to hit the gas, but that puppy finally let go. Note to self, don't do that again but I think I said that once before. It was really stuck hard. Here's a photo of it apart and I am really glad that disaster had a happy ending.
 

Attachments

  • 011.JPG
    011.JPG
    339.4 KB · Views: 477
  • 010 (2).JPG
    010 (2).JPG
    360.4 KB · Views: 550
  • 012.JPG
    012.JPG
    388.3 KB · Views: 442
Last edited:
/ Rebuilding harragator "spike harrow" project
  • Thread Starter
#5  
Then I started to drag the stuff out ino the yard. There is rust, yes but also some flaky paint and stuff, plus dirt that the rain and maybe snow will wash off in the rain and or maybe snow. It could still snow, right? . My JD790 is a TLB and the bucket lifts less weight than without a backhoe but it lifted everything with no problem. Here is lifting the rear frame/hubs and the front end in wait.

Also, the wheels are serviceable but I have no idea what size tire to use since too small will gouge the road and too big will not clear the ground when in the lift position. I have some 24 inch diameter tires and wheels on a cultivator--see photo--that I will try before I put a tire combo together later on. I'm feeling better now, maybe even optimistic.
 

Attachments

  • 007.JPG
    007.JPG
    290.1 KB · Views: 460
  • 010.JPG
    010.JPG
    318.6 KB · Views: 498
  • 022.JPG
    022.JPG
    275.5 KB · Views: 559
Last edited:
/ Rebuilding harragator "spike harrow" project
  • Thread Starter
#6  
OK, I got everything outside and spread out--see impressive photo-- so the weather can work it's magic and loosen any scale. Then I will come along with a scrub brush, some Joy dishwahing detergent and scrub it up. I'll prime the top first, then flip and prime the bottom. Then I'll paint the bottom and flip over to finish paint the top. I'll paint things apart and then assemble. The primer I use is Rusteoluem Rusty Metal Primer and I really thin it to maybe 50-50 with acetone. This allows the primer to flow into all the nooks and crannies and give a better finsih. I mean, it's not going in a museum but I want it to look farm-quality perfect.

The darker green paint color is not easily available--but Oliver Green is close--so do I go with a lesser quality alkyd enamel from a TSC that will fade or do I go with the lighter shaded but higher quakity acrylic enamel in JD Green that I already have? Probably Oliver Green since I have two new Unverferth decals coming in and it would look better to not cheat on the wrong color paint, even though I want to.

I can't find a good picture of what one of these looks like. Most are way bigger-- and smaller 16 ft (10' center and 3' wings) ones like mine are hard to find. That's why I wanted this one and why it's probably worth the effort to rebuild it.

The plan is to pull this with the wings up on fairly firm and level lawn-prep ground iwth my Kubota L4300DT with ag tires. If the spikes are left long in the ground on level ground I'll bet I can even pull it with the wings down. I can easily pull a 13 ft slighty different harrow now so I think--er hope--so. We'll see.

Here's an internet photo of one with big wings but you can get an idea of the item. There won't be much happening now until I can get a warmer couple days with no wind so I'll post again then. Thank you and I hope this helps with cabin fever.
 

Attachments

  • harragator.jpg
    harragator.jpg
    53.2 KB · Views: 742
  • 026.JPG
    026.JPG
    283.7 KB · Views: 674
Last edited:
/ Rebuilding harragator "spike harrow" project #7  
Outstanding restoration job there!!! Looks great! When you do that sort of stuff, it just puts a big grin on your face when you're driving the tractor with that implement behind you working like it did 20-30-40 years ago.
 
/ Rebuilding harragator "spike harrow" project #8  
Beautiful Job!! You must have been married in a different church than my wife and me. Our vows did not include the covenants that yours covered :laughing: Best of luck with it :thumbsup:
 
/ Rebuilding harragator "spike harrow" project #9  
Good find, good job and when its done you'll apprecitate it. My Drag harrow needs to be redone. Its on the long list. Not as fancy as yours. 2 section drag type, but it does the job.
 
/ Rebuilding harragator "spike harrow" project
  • Thread Starter
#10  
Uh oh...
I was looking over the photos I took and noticed what appeared to be a bent piece I didn't see. Yup, I missed it...see photo.
The side wing on one side must have beed wacked by some obstruction and it bent both the inner and outer flat stock on the edge. It's worse than it looks and is 3/8" steel-- not something that would be easy for me to bend with one torch. Two torches would really be needed since it would need to be heated in four spots and then bent back.
So I took it to a welding shop I know and left it. Sure wish I could do it myseft but stuff happens sometimes. I wish it wouldn't since it will add to the cost but that's what happened. Don't know how I miised it.
 

Attachments

  • 001.JPG
    001.JPG
    551.6 KB · Views: 489
/ Rebuilding harragator "spike harrow" project
  • Thread Starter
#11  
Took the hubs off to take at the wheel bearings today and I already knew what to expect. The large bearings look terrible, have some sort of grit in them and are burned up. See photo.
The bearings had half dark grease and half light grease so I figured someone re-greased the bearings some time ago and didn't bother to clean all the old grease out. They just slathered some new on top of the old and it didn't work. Not sure what the grease in the cup is--see photo--but it looks like milk chocolate. Good thing bearings are cheap these days. Bearings and grease seals all around is less than $27 so I will likely do all even though the front ones look OK.
 

Attachments

  • 007.JPG
    007.JPG
    227.6 KB · Views: 274
  • 006.JPG
    006.JPG
    203.5 KB · Views: 272
  • 005.JPG
    005.JPG
    207.5 KB · Views: 250
/ Rebuilding harragator "spike harrow" project #12  
A little labor ... a few parts... fine results and alot less than a new one. Good job ... can't wait to see it finished.
 
/ Rebuilding harragator "spike harrow" project #13  
Excellent job. It's great to see old iron restored to original condition :thumbsup:
 
/ Rebuilding harragator "spike harrow" project
  • Thread Starter
#14  
Picked up the twisted side piece from the welding shop and they did a good job. Here's the "before" photo I posted earlier with the bends circled and the "after" photo is the piece straightened out. I'll need to tweak it a little at assembly time but it will work just fine. Waiting for warmer weather now.
 

Attachments

  • 1111.JPG
    1111.JPG
    551.6 KB · Views: 264
  • 001.JPG
    001.JPG
    264 KB · Views: 312
/ Rebuilding harragator "spike harrow" project #15  
Impressive work, I am glad you posted up pics. Enjoy seeing old implements being referbished and learning from others projects. Whats that white stuff on the ground?:D
 
/ Rebuilding harragator "spike harrow" project
  • Thread Starter
#16  
New decals came in today.
 

Attachments

  • 012.JPG
    012.JPG
    129.9 KB · Views: 219
/ Rebuilding harragator "spike harrow" project
  • Thread Starter
#17  
Also some replacement parts. All the "V" bolts, a few spikes and the wheel bearings.
For the cheap price I expected made in China or worse and I got made in Japan.
 

Attachments

  • 009.JPG
    009.JPG
    277.8 KB · Views: 261
  • 014.JPG
    014.JPG
    145.4 KB · Views: 260
/ Rebuilding harragator "spike harrow" project #18  
Very nice job!:thumbsup: Now I want to rebuild an old farm implement. :laughing:
 
/ Rebuilding harragator "spike harrow" project
  • Thread Starter
#19  
Picked up the paint and some new bolts yesterday. I wish I could buy the durable acrylic enamel rather than the alkyd enamel I got but that's the way it is. The alkyd is not nearly as durable and will dull and chalk in time. Oh well. I bought a gallon on sale for $24 rather than two quarts for $13 each so I'll save two quarts in new quart cans for something else. I do need to paint my oxy/acy cart and some picnic table frames.
Once it's maybe 65 and sunny for a day or so--soon--paint is going on. Rebuilds like this are easy, can be useful or profitable if you care and save old junk from the recycler. Some of the small parts in one photo are from a separate proect. New paint will look great.
 

Attachments

  • 001.JPG
    001.JPG
    191.7 KB · Views: 221
  • 004.JPG
    004.JPG
    320.1 KB · Views: 245
/ Rebuilding harragator "spike harrow" project
  • Thread Starter
#20  
Great weather on tap so I scrubbed the pieces with a stiff brush and dishwashing soap to get any residual grit. You would be surprised how well that works and how much time is saved. Air dried and rearraned so I can prime tomorrow if the wind is OK. I thin Rustoleum Rusty Metal primer with acetone and spray the best I can.
Prime things right side up, flip and prime bottom, then paint bottom and flip right side up to top side paint. I might touch up a little after assembly.
Also packed the new wheel bearings and installed. Trying to finish before we get a cold or damp snap.
 

Attachments

  • 001.JPG
    001.JPG
    278.2 KB · Views: 253
  • 010.JPG
    010.JPG
    293.8 KB · Views: 262
 

Marketplace Items

2014 VOLVO EW210D MOBILE EXCAVATOR (A60429)
2014 VOLVO EW210D...
CASE IH 120A FARMALL TRACTOR (A60430)
CASE IH 120A...
Volvo L45H (A61306)
Volvo L45H (A61306)
Ford 8210 (A60462)
Ford 8210 (A60462)
International S1900 (A61306)
International...
UNUSED RAYTREE RMRB72-72" HYD POWER RAKE BUCKET (A60432)
UNUSED RAYTREE...
 
Top