Creating a home for my Hot Tub

   / Creating a home for my Hot Tub
  • Thread Starter
#31  
Rob,

Here's an old picture of my getting the buggy loaded at United Rentals. The mix comes out the little conveyor belt dry, with water added as it enters the mixer. I don't know how long it takes to be properly mixed, but in the 15 minute drive to my place, it's mixed and ready to go.

Eddie
 

Attachments

  • Cement buggy getting loaded.jpg
    Cement buggy getting loaded.jpg
    54.2 KB · Views: 398
   / Creating a home for my Hot Tub #32  
Thanks Eddie,
I didn't know the rental yards provided concrete too. That is really good to know.
You see I don't get out much.:)
 
   / Creating a home for my Hot Tub
  • Thread Starter
#33  
Rob,

With what you're creating at your place, I'd question your sanity for not being there!!!!

Just remember that the one yard buggies only make sense for small pours. They are labor and time sensitive that when you combine the greater price per yard, don't even come close to what a full sized cement truck will cost for 4 to 5 yard pours or larger.

Eddie
 
   / Creating a home for my Hot Tub #34  
In more remote area's, you can get the mix on site trucks. They carry gravel, cement, water etc in hoppers. That way you get freshly mixed mud.

If your mud is in the truck for an hour, it's already setting up, even with something like these trailers or full on concrete trucks. If you're an hour away, you really have to think about mixing on site. I have buddies who are concrete contractors; they have turned back concrete trucks becuase the mud was mixed past an hour.

The price is high up here too, for 1 yard buggies vs by the truck... I think it is in the $130 range for a 1 yard buggy. Some places charge more for the mixer-type buggies too...

EddieWalker said:
Just remember that the one yard buggies only make sense for small pours. They are labor and time sensitive that when you combine the greater price per yard, don't even come close to what a full sized cement truck will cost for 4 to 5 yard pours or larger.
Eddie
 
   / Creating a home for my Hot Tub #35  
Holy smokes Eddie, the hitch on that buggy looks a little bent. Do these buggies dump straight into a fixed chute or is there an extendable rotatable chute like on the big trucks? Do you find yourself shuffling the trailer around to try and place the mud pretty much where it belongs?
 
   / Creating a home for my Hot Tub
  • Thread Starter
#36  
The trailer has some funky hitch on it that is made up of several pices of steel that all tie together. I guess it's something to do with distributing the weight, but don't know for sure.

The entire bucket tilts up and the rotation can be changed. In one direction, the paddles on the inside keep the mix at the bottom of the tank, but in the opostite direction, the paddles force the mud out. There is also a hydraulic cylinder that lifts the front end, so the mud can come out the back.

I've always driven slower when pulling these buggies, but have never noticed any sort of sway or movement from them. They are heavey and you have to have a 3/4 ton to rent one, but otherwise, it's pretty basic.

I back up as close as I can get to dump it. There is some splashing, but that's just part of the fun. I've also had to wheelbarrow it to where I need it too. It's all just a matter of what you need, where you need it and how much time do you have. There's no time limit on the buggy, so if you want to spend hours hauling mud in a whellbarrow, you can. The big concrete companies will charge extra for going too slow, so this is also an advantage to doing it this way.

Eddie
 
   / Creating a home for my Hot Tub
  • Thread Starter
#37  
My helper and I got some work done on the hot tub gazebo yesterday.

We started out by framing up the back wall. It's standard framing with studs on 16in centers and double top plates. One thing that I did different was to leave a rest for the headers that will tie into the wall on either side. With three inches on the top plates, I cut another four inches off the framing studs. To get the width right, I also put half inch plywood between the cut studs.

Eddie
 

Attachments

  • Peyton nailing.jpg
    Peyton nailing.jpg
    52.4 KB · Views: 360
  • Peyton tightening bolts.jpg
    Peyton tightening bolts.jpg
    57.9 KB · Views: 302
  • Back wall standing.jpg
    Back wall standing.jpg
    71.9 KB · Views: 355
   / Creating a home for my Hot Tub
  • Thread Starter
#38  
I've been collecting cedar logs for a few years now. When I clear an area and come across a cedar, I take it down, limb it and cut it to 8ft, 6in. Then I stack them and let them sit.

Yesterday, I picked out five logs from the top of the stack that were easy to get to. I cut them to 90 1/4 inches long and loaded them into my FEL for hauling.

Then I put them into place and started building the headers. First was to put down the PT 2x4 on the flat and screw them into the tops of the cedar posts. Once that was done, I installed a 2x6 on edge above the flat PT 2x4. This took the sag out of the flat PT 2x4 and gave me allot of strength. Next I put in half inch plywood and then a PT 2x6 on the outside. It's all screwed together with ICQ 3 inch wood screws.

The outside corners of the header are mitered to look nice.

The posts are centered on the sides and the front has a 7ft 6in clear, open space to fit the hot tub through. It's 6ft, 4in wide. then the doorway is around 34 inches. I'm building the screen door, so the size isn't an issue. I'll build it to fit.

Today I'm going to build knee walls for the sides. They will be 30 inches tall so I will have lateral support on the posts. They will be bolted to the concrete and provide the posts with an anchor to the foundation. Right now, the posts are just standing there on there own with some small support from the headers.

Eddie
 

Attachments

  • Cedar logs in my FEL.jpg
    Cedar logs in my FEL.jpg
    56.9 KB · Views: 324
  • Me working on the header.jpg
    Me working on the header.jpg
    73.6 KB · Views: 313
  • Header tied into back wall.jpg
    Header tied into back wall.jpg
    74.8 KB · Views: 289
  • Header and posts cut to fit.jpg
    Header and posts cut to fit.jpg
    83.7 KB · Views: 290
  • Posts and Header in place.jpg
    Posts and Header in place.jpg
    71.9 KB · Views: 353
   / Creating a home for my Hot Tub #39  
Very nice, Lots of character, I like that.

You mentioned a screen door, so the whole thing will screened in? Is that to keep out bugs and critters?
 
   / Creating a home for my Hot Tub
  • Thread Starter
#40  
Thanks Hitek. Yes, it will be screened in to keep out the bugs. We have all sorts of bugs here, some sting, others build nests and the rest are just annoying. We also have birds that build nests in about twenty minutes, or at least it seems that way. hahaha But the main reason we're putting screen up is that's what Steph wants. :D :rolleyes: :p

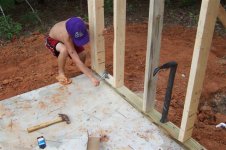
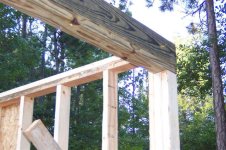
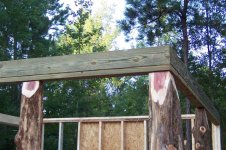
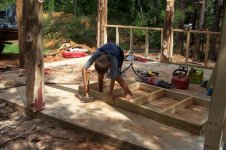
I built the walls yesterday. The logs had to be shaved flat so I could attach the studs to them. I used my small chainsaw to do this. Then I trimmed off some of the limbs closer to the log to make it smoother and easier to sand. After awhile, I got tire of using the chainsaw, so I switched to my sawzall. I like that better for shaping and making the logs pretty. More control with finer cuts.

The walls are bolted down on either side of the logs to tie them into the foundation. The studs on the sides of the logs have about a dozen three inch screws in them to be sure nothing goes anywhere. I even added another block of wood to the bottom of the framing to increase my surface area to hold the logs in place.

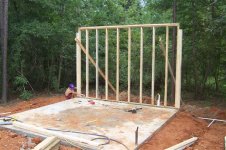
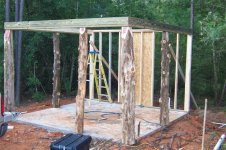
Then I sheethed them in OSB to make them rigid and provide a solid base for the Hardi Siding.

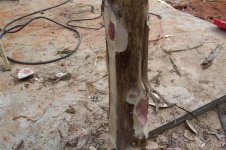
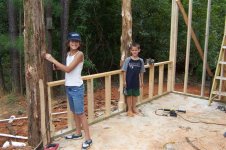
The kids love peeling the bark off the cedar logs. It's kind of relaxing for me, but for them, it's a game to see who can get the biggest piece, or the longest one. Later on, I'll sand them down and stain them. I have some extra pieces that I'm going to do some tests on to see what stain I like the best. I have some other cedar posts that I want to stain, so the time is right to make this decision. Anybody know some good quality, outdoor stain brands? I'm thinking Cabots???

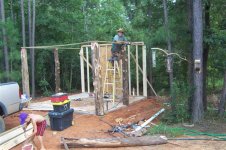
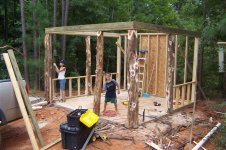
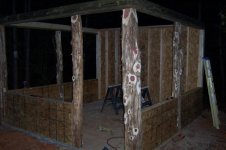
The last picture is a little dark, but you can see what it looks like. Next weekend I'll start on the roof. I build the front wall so it's removable so I can put in the hot tub. I'm also concerned that in the next decade, we might want to upgrade or replace it. I don't know if we will, but having the ability to do this makes sense to me.

Eddie
 

Attachments

  • Hot Tub 031 (Small).jpg
    Hot Tub 031 (Small).jpg
    68.9 KB · Views: 337
  • Hot Tub 034 (Small).jpg
    Hot Tub 034 (Small).jpg
    65.5 KB · Views: 282
  • Hot Tub 035 (Small).jpg
    Hot Tub 035 (Small).jpg
    69.6 KB · Views: 271
  • Hot Tub 036 (Small).jpg
    Hot Tub 036 (Small).jpg
    76.5 KB · Views: 315
  • Hot Tub 037 (Small).jpg
    Hot Tub 037 (Small).jpg
    39.6 KB · Views: 350
 
Top