Creating a home for my Hot Tub

   / Creating a home for my Hot Tub
  • Thread Starter
#51  
I'm a general contactor, so I work when I have a job. Most of my jobs are pretty short, and only take a few days or weeks. That means I usualy get quite a few days to do things on the land between jobs.

Today was the last day on a house I've been building over the summer. I'm off next week, and will start on a climbing wall for a client the following week.

Eddie
 
   / Creating a home for my Hot Tub #52  
EddieWalker said:
I'm a general contactor, so I work when I have a job. Most of my jobs are pretty short, and only take a few days or weeks. That means I usualy get quite a few days to do things on the land between jobs.

Eddie

Sounds like a nice balance Eddie.
 
   / Creating a home for my Hot Tub
  • Thread Starter
#53  
I spent a few hours working on it again last night. I'm playing around with some ideas I have for some gazebo's I'm going to build on my place, and this is sort of my experirment.

I've never done this, but want to have two roof lines. I devided it in half and raised the top section 3 1/2 inches by puting a 2x4 on edge on the 2x6 rafters.

I also bought some cast iron corner brackets from King Metals in a oakleaf pattern for my posts. I cut and sanded the top of the post to get it square with the header above it. My daughter and I also sanded the post smooth. This was her frist time using a belt sander, and she really enjoyed it. Later that evening, she kept telling Steph about it!!!!!!!!!

We stained it with Minwax stain in Early American color.

Eddie
 

Attachments

  • Raised Roof.jpg
    Raised Roof.jpg
    40.8 KB · Views: 504
  • Brackets on top of posts.jpg
    Brackets on top of posts.jpg
    67.1 KB · Views: 380
   / Creating a home for my Hot Tub #54  
Eddie,
The 2 roof lines look great. I'll bet it's great idea for cooling and venting especially for like a hot garage or barn. I wish I would have thought of that for my solar power shed.
It sure adds character and good looks to your hot tub structure.
 
   / Creating a home for my Hot Tub
  • Thread Starter
#55  
Rob,

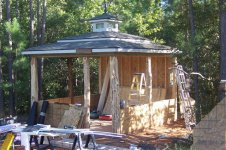
Thanks, but the second roof line is just for looks. The roof and ceiling will be sealed up without any airways through it. The venting is for the space above the hot tub that will trap warm air and moisture.

My solution to venting that was to use 4in by 16in soffit vents from Lowes. I'll paint them to match the soffit and you'll never notice them.

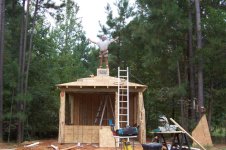
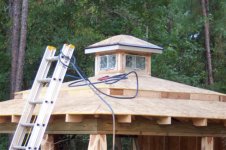
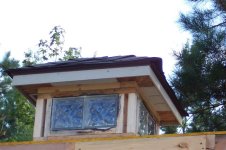
Like usual, I didn't get nearly as much done as I wanted to yesterday, but I did cross the hurdle of the complicated stuff. That stupid litte roof on my cupola with it's vents just about broke my brain trying to figure out a simple way to do it. It finally came to me, but only at the last minute while holding pieces of wood on my table with the dimensions drawn on it.

I cut a peice of OSB to cover the top that went out 4 1/2 inches past the sides to create the soffits. Then I cut the vents holes and opened up the middle to let air through. I framed up four 2/4's from the cornes to attach the decking and left the rest open. This gave me a wide open path for air flow with minimal lumber and plenty of strength.

My next concern was painting the inside of my cupola. It's a very tight fit to get my arm past the beams that the ceiling fan will attach to. So I painted the inside of it and the bottom of the roof for the cupola before putting it together.

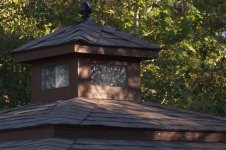
Then I put in my glass blocks. I've never worked with glass blocks before, so I was kind of relying on the instructions on how to do it. After reading them a few times, and looking over the materials at Lowes, I decided to not use anthing buy clear silicone. My reasoning is that they are just here to keep water out and bugs out, but let light through. I framed them in with 2x4's, so strenght isn't an issue, just the seal. The silicone is clear, so I put several tubes into the 8 glass blocks to be sure it will be permanent.

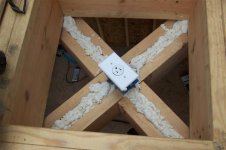
On top of my exposed beams that will mount the fan to, I put in a single outlet. It's out of site from below, but still accesable to plug in and remove an LED night light that I bought at Home Depot for around $8. It will come on automaticaly when it's dark out and turn off when it's light out. It's very low voltage, so the energy use in almost non existant. It will give me a small amount of light that should be visable through the glass blocks, and maybe even a little bit of light into the bottom area too. I don't know yet how well this will work, but it's a big part of my overal scheme of things, so I'm hoping for the best. hahaha

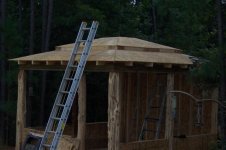
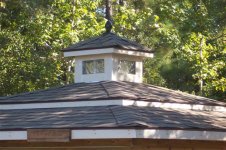
Today I'm gonna put on the soffits, facia and trim boards. Then flashing, paper and start on the shingles. If all goes well, I'll be water tight before dark tonight.

Eddie
 

Attachments

  • Inside view of outlet for the nightlight.jpg
    Inside view of outlet for the nightlight.jpg
    38.2 KB · Views: 437
  • Me standing on top.jpg
    Me standing on top.jpg
    67.3 KB · Views: 349
  • Roof all framed and decked.jpg
    Roof all framed and decked.jpg
    56 KB · Views: 652
   / Creating a home for my Hot Tub
  • Thread Starter
#56  
I'm just about done with the roof. It's all shingled, trimed and caulked. I'll let the caulk dry overnight mostly because I just don't feel like painting it tonight. hahaha

The finial was something that I spent allot of time looking for. I was originally going to put a weather vane on top, but changed my mind once I got started. I really don't have a good reason why, it's just not what I wanted anymore.

I looked at all sorts of things to top off the peak before backing off the wild and rediculous ideas that I kept coming up with. The finial is for a 4x4 post from King Metals. At $8, it's a pretty good deal. To mount it, I asked the guys at Tyler Steel if they had any scrap in the 7 to 8 inch range. They had one piece of 1/2 inch that was 8x8 inches. The best part is they gave it to me!!!

I welded on some tabs to hold the finial in place and glued it on with about a quarter tube of silicone. The base plate is screwd onto the peak with three inche number 8 wood screws.

The piece of wood on the facia board is just temporary to protect my flashing and shingles from my ladder. When I paint the cupola and trim, I'll be totally done with the roof and I can take the board off the facia. I'll seal up the hole and paint it to match.

Eddie
 

Attachments

  • Finial and base plate.jpg
    Finial and base plate.jpg
    52.9 KB · Views: 373
  • Shingles  are on!!!.jpg
    Shingles are on!!!.jpg
    84.7 KB · Views: 314
  • Cupola with finial.jpg
    Cupola with finial.jpg
    78.4 KB · Views: 370
   / Creating a home for my Hot Tub #58  
Looks great Eddie! Is the copula vented?

Wayne
 
   / Creating a home for my Hot Tub
  • Thread Starter
#59  
Sorry, I forgot to post a picture of how I vented it.

This was one of those aspects of this that had me scratching my head for a very long time. I decided to use standard 4in by 16in soffit vents. As you can see in the picture, I made the soffit wide enough to fit them in there and no more.

Today I'm going to paint the soffits, vents and trim a dark brown to match the hot tub. It's the same exact paint.

Eddie
 

Attachments

  • View of vents on the Cupola.jpg
    View of vents on the Cupola.jpg
    50.3 KB · Views: 379
   / Creating a home for my Hot Tub
  • Thread Starter
#60  
I painted the trim and cupola on the roof yesterday and spent the day thinking about it. We both really like the color for the trim, but are not happy with the cupola. It didn't turn out like we thought it would, and now we want to try a new color.

The problem is we don't want it to JUMP out at you, but to be a subtle feature to the gazebo. We're also using this project as an experiment for some other gazebo's we plan on building around our land, and some details of this will go into our cabins.

Our house is tan with dark brown trim. We're thinking of painting the cupola tan, but have also thought of cream and either an olive drab type of green, or a very deep, dark green.

Any suggestions?

Eddie
 

Attachments

  • Cupola painted dark brown..jpg
    Cupola painted dark brown..jpg
    60 KB · Views: 970
 
Top