Buying Advice GCK60-BX Conversion to BX25

   / GCK60-BX Conversion to BX25 #1  

BX25 in DE

New member
Joined
Nov 7, 2011
Messages
16
Tractor
Kubota BX25
I recently purchased a new Kubota BX25 and retained my Kubota Grass Catcher GCK60-BX because my local dealer told me it would fit on my new BX25, previously I had the grass catcher mounted on my BX23 and it worked perfectly. Can anyone tell me if there is a way to retro-fit the GCK60-BX to a Kubota BX25? I understand the new grass catcher model number is GCK60-23BX AND that Kubota makes two conversion kits but these kits are designed for the newer grass catcher and not the older model GCK60-BX like I have. Any help would be greatly appreciated.

If I cannot retro-fit my grass catcher it will be for sale so email me if your interested in purchasing one that was used twice, looks like it is brand new, is SUPER clean, and works perfectly. I purchased the unit from the original owner who never used it and wow does this thing suck up the grass!

PLEASE HELP
 
   / GCK60-BX Conversion to BX25 #2  
I have that catcher for my BX23.

2 places attach to the 3PH lower links, and 1 place attaches to where the upper 3PH link mounts. So if you have a 3PH BX25 (and links and stuff) you should be OK there. (Tighten left link chain first to level.)

Then there is the drive - again, if you have 3PH PTO drive it should attach.

So that's the tractor part - it carries and drives the catcher!

The rest attaches, technically, to the mower - the mower boot. If you have a boot, and the boot is the same size as the hose you may need to just adjust the length a bit. I can't imagine they designed different size (diameter) hose systems. You may need to order a boot for your particular mower, from the more modern catcher book.
 
   / GCK60-BX Conversion to BX25
  • Thread Starter
#3  
Tshep,
Thank you for the information BUT the 3 point hitch arms are different lengths for the BX23 (shorter) than the BX25 (longer). Trust me when I say I've know it won't fit on the BX25. I've tried, measured, & because the lower arms of the 3 point hitch on the BX25 are longer, that changes the overall angle of the catcher's mounting. Even if I added a piece to the upper arm of the BX25's 3 point hitch the drive shaft will end up being too short for the catcher because the mounting arms push it too far back or rearward on the tractor.
Last night I had a thought about the possibility of using a 3 point hitch arm assembly from a BX23. Assuming of course if the lower arms will actully fit/mount up to my BX25. I'm going to call a friend today who bought my BX23 and see if I can borrow the lower 2 arms of his 3 point hitch to see if they will align/fit. I'm doubting this will work but I'm running out of options.
 
   / GCK60-BX Conversion to BX25 #4  
Let us know what you come up with the BX23 arms. I kept that same bagger from my BX1500 when I sold that tractor as my dealer also told me it should fit my BX25 with no problem. I am not sure if the arms from the BX25 are longer that the BX23 but I think I read on this forum somewhere that on the BX 50 and 60 series tractors the mounting location for the lower arms is higher to make the hitch a full cat 1. Therefore this throws the geometry for mounting the old style bagger way off.

I haven't done anything with mine yet but move it around the garage which is a PITA and takes up space. I contemplated making a bracket to bolt to the bagger that fits in the backhoe cradle but just haven't had any time. Either way let us know how you make out with the arms.
 
   / GCK60-BX Conversion to BX25
  • Thread Starter
#5  
Well the plot thickens as they say. I laid my BX25's lower 3 point hitch arms side-by-side the BX23 versus the BX25 and there is not one bit of difference between the center plate that goes between the lower arms, the linkage between that plate that connects to the lower arms both are the same, AND the lower arms themselves are identical in shape, size, length, width, thickness, bends, etc. The pieces are identical between the 2 tractors. So tomorrow I'm going to connect the BX25 lower arms and attempt to attach the old grass catcher to determine exactly why the dealers are telling me it will not fit. So far everything a dealer has told me is a lie. The latest crap that the BX25 lower 3 point hitch arms are longer is total bull!! I saw for myself today there is not one bit of difference. I did have the parts guy print out the parts manual for the newer GCK60-23BX and we priced a minimum of 3 pieces that I would/could possibly need/use to retrofit my GCK60-BX to the BX25. Sit down - we are talking nearly $700 just to start!!!!
I am thinking that I will end up removing the mounting plate itself from my BX23 grass catcher and then retrofit it with new steel. I read somewhere that if the grass catcher's lower links can be mounted in the lower hooks for the backhoe on the BX25 then the drive shaft will be fairly well aligned and it too should be long enough if mounted in that fashion. Problem is the width of the current mount on the GCK60-BX is considerably wider than the narrorer width of the lower cradle that holds the bottom of the backhoe mount on the BX25. This is where the redesign will need to come into play.
I also read that the new grass catcher for the BX25 is actually belt driven and it is not a solid drive shaft between the 2 differentials as in the older GCK60-BX grass catcher. All the more reason to try and make this work. I understand why the designed was changed, it is all about Kubota staying afloat and making as much $ as they can. If their product wasn't so darn good I'd probably have gone to a green machine by now. . . .
For now any help would be appreciated all I can say for now is stay tuned. . .
 
   / GCK60-BX Conversion to BX25
  • Thread Starter
#6  
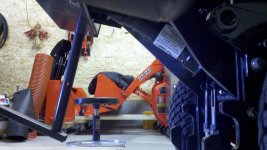
Well where to begin . . . The RCK60-BX DOES indeed mount on the 3 point hitch of the BX25 WITHOUT ANY ADDITIONAL STEEL. The dealers are clearly not the sharpest tools in the shed . . . Having put this thing on my BX23 I will say however that it was much easier to mount on that unit than on the BX25. The geometry is different between the 2 BX models and it mounts higher off of the ground when on the BX25 than it did when mounted on the BX23. First trick to getting it to mount is buy or borrow a motor cycle jack. You will need it. I used a floor jack and it is not the best because as the GC is jacked up to align the top center link it must be tilted forward to insert the last pin. Mine actually slipped off of my jack and contacted the rear of my BX25 breaking one of my tail light lenses - yep you probably heard me cussing when that happened!

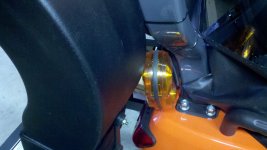
To mount the thing the first time, you will need to rotate your yellow rear mounted turn signals so that the larger round part of the light is down towards the ground and the small one is up. This is exactly the opposite of what Kubota has done when they installed them. The reason for this "adjustment" is because the blower shoot on the right side is so close it will actually hit the light if you don't rotate it 180 degrees. Just losen the nut and turn your light (I turned both so that they match and I honestly think they look better this way). Doing so will allow about 1/4" clearance between the GC shoot & the light once the GC is installed.

Mount the bottom arms on the tractor but DO NOT fasten the turn buckles to the lower arms. Just install the plate with the turnbuckles attched to it (only) to maintain or serve as a spacer between the 2 lower arms. Postion the GC behind the BX25 and align/secure the two lower arms - this is the easy part, very simple but get ready here comes the next and most difficult part of the operation - the top link alignment. GET THAT MOTORCYCLE JACK READY. It would be best to have a second pair of hands the first time you do this to prevent any cursing or broken tail lights. . . . Position the jack just under the RIGHT lower link so that you are jacking up the GC and not the lower link arm. This postion will be about mid-way on the GC from the left &/or right side. Jack slowly and that second pair of hands needs to be careful so that the jack operator doesn't sever any fingers. It will become obvious once you start jacking that the more you jack you will need to tilt the GC forward to align the top center link. IT WILL ALIGN TRUST ME. Once you get that 3rd pin in, the drive shaft is next. Do yourself a big favor and remove your GC's bags. This makes aligning that shaft a breeze if the bags are off, you can just reach right through that area of the GC and hook up the shaft. Install the drive shafts on one another and then the quick coupling on the rear PTO can be secured lastly. Don't forget to attach the turnbuckles to the lower arms and then level things up. REMEMBER, LOWER ARMS, NO TURNBUCKLES, TOP LINK, DRIVE SHAFT, & THEN TIGHTEN YOUR TURNBUCKLES.

I will have to update this one last time. Here is why - when I engaged my rear PTO the GC sheared the PTO shear pin/bolt on the GC drive shaft. I heard it but didn't know what it was at first. There was enough of the bolt still engaged that the GC shafts all continued to rotate. I eventually brought the RPMs up to 3300 and everything did seem like it was working as it should. When I turned off the tractor and walked around to the rear of the BX25, I noticed the shear pin/bolt on the ground and knew immediately what the noise was previously. The next 3 hours were spent trying to remove the rest of the sheared pin/bolt. The drive shaft coupler had turned ever so slightly on the GC shaft which prevented me from being able to drive out the rest of the broken shear pin/bolt. Getting the two shaft pieces realigned so that I could drive out the remaining damaged shear pin/bolt was a royal pain in the butt. Once that was done I called it a night and will need to invest in some new shear pins/bolts at my local dealer - I have gotten to really love my dealer -NOT!!! Plus I need to buy a new right rear tail light lens too - GET THAT MOTORCYCLE JACK, it will save you having to buy a tail light lense and it is much safer than a floor jack. The GC rear PTO drive shaft on the BX25 does have quite an angle to it when mounted. This might be why my shear pin/bolt snapped, I don't know for sure just yet, I'll try it again when I can locate some shear pins/bolts and update this then. The drive shaft angle didn't appear to be so great as to limit or prevent any movement. Hope this helps . . .
 
   / GCK60-BX Conversion to BX25 #7  
If possible could you post a picture or two of what it looks like mounted. I may have to give this a try in the next two days that I am off.
 
   / GCK60-BX Conversion to BX25
  • Thread Starter
#8  
I'd love to post some pics but I've got them on my phone and can't seem to get them to my PC so that I can post - tomorrow I'll use my camera and post some pics. The drive shaft to the GC looks like it is almost at a 45 degree angle - it might just be too much of an angle, I'm just not sure. Read the GC's owners manual and the bolt that goes through the drive shaft coupler on the GC isn't listed as a shear pin/bolt. It is listed as a standard 1/4" x 20 x 1.25" long standard bolt with a locking nut. I want to check with my local Kubota parts folks prior to putting in a regular 1/4" bolt where I really think a shear pin/bolt should go. I'll do the pics tomorrow.
 
   / GCK60-BX Conversion to BX25
  • Thread Starter
#9  
Just got 2 of the pics from my phone to my PC
 

Attachments

  • Drive shaft 45 degree angle.jpg
    Drive shaft 45 degree angle.jpg
    477.1 KB · Views: 1,753
  • Right light touching GC shoot.jpg
    Right light touching GC shoot.jpg
    499.9 KB · Views: 1,028
   / GCK60-BX Conversion to BX25
  • Thread Starter
#10  
Okay this is the last pic I have for tonight. This one shows the little bit of clearance that you will gain if you turn the right yellow light upside down.
 

Attachments

  • Right Light turned upside down for spacing.jpg
    Right Light turned upside down for spacing.jpg
    502 KB · Views: 1,063
 
Top