My first attempt at brazing for hydraulic hard-lines

   / My first attempt at brazing for hydraulic hard-lines
  • Thread Starter
#11  
you are a brave man! I am not sure if I could do that! :eek:

So what are you plan on making ?

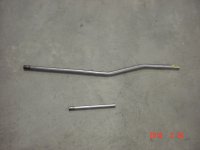
I need to relocate my three rear remotes and power beyond, and there is no room for hoses.

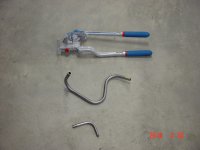
#1 and #3 may work. The face on all look good. I think they all would hold. Keeping the shoulder where the nut seats clean is important so everything sits flat. I have had better luck using silver solder and Sta-silv flux. Clean your parts very well and put flux on the parts and your solder wire. Heat the assembley a dull red and touch the solder wire to the joint and it will suck around just like soldering copper pipe. Being good at copper pipe helps a lot. I think using a small A/O torch works best because it has a cleaner flame.

Dan

I'm good at soldering copper pipe, so I have hopes I can teach myself brazing too.

Here is another option I used on my log splitter. These are 1/2" stainless but you can get them in steel as well. I think they are rated up to 3000 psi and can be found at Parker. They are compression fittings.

Dan

I'll go through my Parker 4300 catalog again, and look at their compression fittings. Thanks for the tip.
 
   / My first attempt at brazing for hydraulic hard-lines
  • Thread Starter
#12  
I have a tip or two for you. Clean everything shiny bright on both pieces to be brazed using coarse emery cloth. Flux coat the female and male pieces then fit together. Use your torch to equally heat each piece,to about 800 F depending on your solder but dont overheat, If flux turns black, it probably got too hot. Dont wrap the solder around the joint,as you describe above. As you are heating, touch a piece of solder to the piece, when it is hot enough it will "take " to the joint. Make sure the pipe and fitting are equally heated ALL the way around, then using your torch and solder, run a bead all the way around. The torch flame can be used to pull the solder into the joint. The solder will run toward the heat, so keep you feather from the flame neutral and concentrate the tip about equal distance between top and bottom of the socket and dont get it too hot. When properly heated, you will have full joint penetration and still have little bead of silver solder on the top lip if the socket. There should be evidence of solder in the inside of the joint but not run thru or lumps inside. The temperature has to be hot enough for the solder to flow, but not so hot that it runs like water. If you see little pin hole porosity in the silver solder, you got it too hot and the flux vaporized

Gary:

Thanks for the tips. The biggest hassle I had was flipping the torch from side to side to evenly heat the parts. I need a dual tip nozzle or an induction heater; but the induction heater is toooooooo expensive. Also taking the goggles off to see what I was doing made life easier as the silver alloy brazing filler melted at a colder temp than I could judge when wearing the goggles. Only the last four 1/2" ones were done sans goggles. I used emery cloth on the tube; but I'll need to find a way to get into the sleeve as copper fitting brushes used by plumbers are too big. I did you a delinted pipe cleaner to get flux on the inside of the sleeve.

The braze ring went inside the sleeve between the tube end and the sleeve's inside face per Parker's instructions. I would have posted them; but the file size exceeded TBN's limit for PDF files.

Can't comment on the brazing. Can you pressure test a few?

On the tubing bender hand held ones are readily available. I have one with the three sizes on you mentioned. The handles are too short or I'm not very strong for it to handle steel tubing.:(

I've also got a longer handle 3/8 bender of industrial quality. It works very nicely. :thumbsup:

Unfortunately I have no real way to test them; so when I make the real deal, that's when the testing will be done.

No comment on what you've done other then to say that I admire your ambition and ingenuity.

I had a hard line crack on my dozer for the blade. I don't know how much pressure is in those lines, but I would think it's considerable. It's a Case 1550 that is similar in size to a D6.

My thought was that it's broke, and to replace it. My dad knew that my neighbor used to be a welder, and brought it over to him to see what he thought. He got out his oxy/acc torch and used a coat hanger to weld it back together. That was while I was digging my big pond and running it 7 days a week, all day long. I probably have 1,000 hours on that weld, and it's still holding strong.

Good luck and keep us updated on how it works out for you,
Eddie

Now using a coat hanger as filler rod takes skill to use and make a weld last.


Thanks for the links, I'll review them after reading tractor **** tonight. I did watch some YouTube videos on brazing, which helped a lot.

MJNCAD, aren't you a welder by trade? or maybe I am thinking of someone else.

Either way, do you have access to tig? You could chase around those with Silicone bronze and a Tig pretty quick and neat I would think.

Alan:

You must be thinking of someone else, I was a CADD Dweeb by trade for 24-years. Unfortunately I have no access to a TIG; but I'd love to try one out.


Thanks to everyone for the encouragement. I'll take a look at Fleabay and Craigslist for a bender, and if I come up empty, I'll probably get this one. Irvan-Smith, Inc. : Imperial Triple Head Tube Bender [IST-370-FH] - $49.95

I'm concerned about the die-cast aluminum; but Irvan-Smith was real responsive and sent me the vague instructions in PDF format and even called the manufacturer asking if I could use them on steel lines. According to the manufacturer, I should be able too; but that was vague also.
 
   / My first attempt at brazing for hydraulic hard-lines #13  
One word of caution on compression fittings. Follow the recommended torque spec for seating them. I have seen lines crushed by people with size 52 coats and #2 hat...

Depending on the size of tubing and wall thickness the tube can be crushed and ruined very easily. Yes I have done this....

Best of luck

Roy
 
   / My first attempt at brazing for hydraulic hard-lines #14  
Nice job for your first time!:thumbsup:
 
   / My first attempt at brazing for hydraulic hard-lines #15  
The two threads have been merged together because they are duplicates. I left a re-direct in the hydraulics forum to point to here.
 
   / My first attempt at brazing for hydraulic hard-lines #16  
Follow the recommended torque spec for seating them.

Some use the number of turns from a finger tight connection.:D
 
   / My first attempt at brazing for hydraulic hard-lines
  • Thread Starter
#17  
One word of caution on compression fittings. Follow the recommended torque spec for seating them. I have seen lines crushed by people with size 52 coats and #2 hat...

Depending on the size of tubing and wall thickness the tube can be crushed and ruined very easily. Yes I have done this....

Best of luck

Roy

I'm a great believer in using a torque wrench whenever possible.

Nice job for your first time!:thumbsup:

Thanks!

The two threads have been merged together because they are duplicates. I left a re-direct in the hydraulics forum to point to here.

Thanks, I posted twice due to the crossover between welding and hydraulics.
 
   / My first attempt at brazing for hydraulic hard-lines #18  
i braze useing my cutting torch goggles.

just spent some time brazeing up some rust holes in a chicken water'r

it certainly is a challenge on thin wall rusty metal
 
   / My first attempt at brazing for hydraulic hard-lines
  • Thread Starter
#19  
I got my tubing bender the other day, and gave it a try on the scrap 3/8" and 1/2" tubing I had. 3/8" bent easily holding the bender in my hand, while 1/2" required me putting the bender in a vise. I used a light coating of Lubriplate grease on the movable 'form die' while the stationary die was left unlubricated per the instructions (who says men don't read instructions).

I didn't make any attempts at precision angles or lengths; I just wanted to see if I could bend the stuff.

Now I need to finish fabricating the new remote mounting bracket before I order tubing and braze sleeves or compression fittings per another poster's suggestion.
 

Attachments

  • DSC03786.JPG
    DSC03786.JPG
    858.6 KB · Views: 223
  • DSC03794.JPG
    DSC03794.JPG
    877 KB · Views: 336
   / My first attempt at brazing for hydraulic hard-lines #20  
Slip some pipes over the bender handles for a little more leverage. It will make it easier to control the bend and not over bend.:thumbsup:

http://www.swagelok.com/FittingInstallVideo.htm

A short video showing how another type of compression fitting is tightened.
 
Last edited:
 
Top