How to attach ripper teeth

   / How to attach ripper teeth #1  

JoelD

Veteran Member
Joined
Jan 27, 2005
Messages
2,343
Location
Windham, NH and York, ME
Tractor
Kioti LK3054xs TLB, 2004
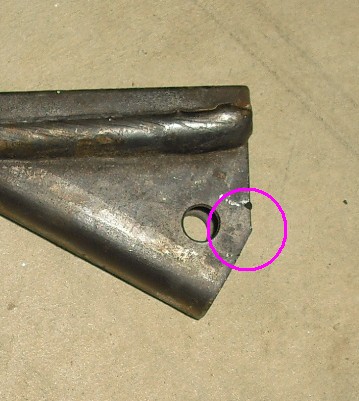
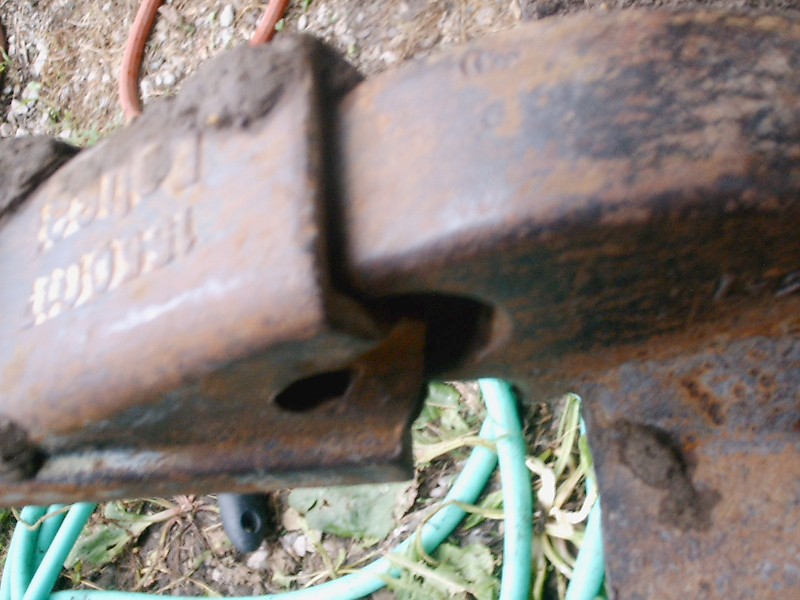
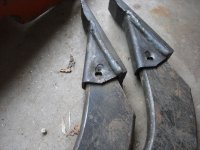
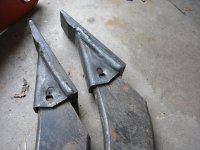
HI all, I've got replacement teeth for my box blade rippers, as the originals either broke or ripped off. The originals were crimp on and the replacement look to be pegged on. How should I go about attaching the new teeth?

Thank you,
Joel
 

Attachments

  • CIMG0222.JPG
    CIMG0222.JPG
    925.8 KB · Views: 1,189
  • CIMG0223.JPG
    CIMG0223.JPG
    983.6 KB · Views: 1,212
   / How to attach ripper teeth #2  
They just crimp on also the hole is just to make it simpler to peen them in if the saftey police don't catch you take a ball peen hammer put the round part in the hole and smack it with a bigger hammer that is how we have always done it
 
   / How to attach ripper teeth #3  
I think I would double check and make sure I had gotten the correct ones or not ;)

Troy
 
   / How to attach ripper teeth #4  
How should I go about attaching the new teeth?

Joel, I have bought dozens of those kind of teeth from AgriSupply. Some
are made in China, some are from India. I weld them on to the shanks for
box scrapers and my custom-made shanks. For the BBs, the crimped-on
teeth often come off and get lost. I do not weld all the way around, just
each side behind the crimp hole. That way, if the tooth breaks, there
are only two cuts to be made with your grinder to remove the old tooth.
 
   / How to attach ripper teeth #5  
tooth.jpg


1) place tooth over shank
2) place "tail" (part circled) over dimple of shank
3) take torch heat that corner up till its cherry red
4) place round end of ball peen hammer over cherry tail
5) beat the hammer end of the ball peen with a 2-3lb sledge (note this is not a sissy job, this is a reach back and beat the ever living pi$$ out of it job)

it helps to have a helper hold the ball peen hammer so you can hold the torch in one hand and swing the sledge in the other.

you will NOT be able to dimple the tail of the tooth without heating it up first!

success looks like

tooth_pin.jpg
 
   / How to attach ripper teeth
  • Thread Starter
#6  
Thank you very much guys, I am really glad I posted prior to drilling.

I used my shop press (one of the most usefull presents the boss has given me, other than the mini-boss of course) and I used a strong bolt, put the shank and tooth into the press, squashed with the bolt and dimpled it in perfectly, I think it should hold find.

dfk, if one should come off (I've got two more spares) I'll use the welding idea, I had thought of that, but was hesitant until now I know someone else has done it with success.

I did have to cut one of the old one off as I could not uncrimp without destroying more than my junk screwdrivers. I don't know what I'd do without my cutting wheel.

I've repaired both and thank you all for the advice, I saw the hole in the tooth and I imediately thought I'd have to drill through the shank, thinking, man that would really weaken the shank.

Thanks again,
Joel
 
   / How to attach ripper teeth
  • Thread Starter
#7  
tooth.jpg


1) place tooth over shank
2) place "tail" (part circled) over dimple of shank
3) take torch heat that corner up till its cherry red
4) place round end of ball peen hammer over cherry tail
5) beat the hammer end of the ball peen with a 2-3lb sledge (note this is not a sissy job, this is a reach back and beat the ever living pi$$ out of it job)

it helps to have a helper hold the ball peen hammer so you can hold the torch in one hand and swing the sledge in the other.

you will NOT be able to dimple the tail of the tooth without heating it up first!

success looks like

tooth_pin.jpg
\

Thank you very much for the detailed instructions!!!

I'll try to post the finished product.

Joel
 
   / How to attach ripper teeth
  • Thread Starter
#8  
Here they are fixed.

Joel
 

Attachments

  • CIMG0224.JPG
    CIMG0224.JPG
    962.9 KB · Views: 1,080
  • CIMG0225.JPG
    CIMG0225.JPG
    912.7 KB · Views: 775
  • CIMG0226.JPG
    CIMG0226.JPG
    962.3 KB · Views: 1,061
  • CIMG0227.JPG
    CIMG0227.JPG
    969.2 KB · Views: 1,358
   / How to attach ripper teeth #9  
looks good, now we need action shots
 
   / How to attach ripper teeth #10  
I had advice to use a ball peen hammer and a heavy hand hammer to set the dimples. No luck, could not get them tight so...I used the ball peen hammer and my HYDRAULIC press. WOW! I do recommend using a press. Perhaps you know a shop that has one
Ed Lancaster
 
   / How to attach ripper teeth #11  
I use a press too. Too bad this is a 3 1/2 year old thread I could have let him know he went through a lot of trouble to put those teeth on upside down.
 
Last edited:
   / How to attach ripper teeth #13  
Joel

Your new teeth have holes, well if the shank has matching holes, try what I do on my JD510 backhoe. JD uses steel/rubber sandwich pins that never stay in. My fix was to buy grade 8 bolts, drive it through the holes, then weld the head to the tooth. To remove a tooth, torch off the bolt head, hammer and punch the bolt out, beat the tooth off of the shank.

My dad's bachhoe used the dimple method where he'd heat the dimple area of the tooth cherry red, then put the round end of the ball peen hammer against it, and beat that hammer with a larger hammer. Usually one whack per dimple did the job. To get them off he had a chisel with the sharp end ground flat. He'd heat the dimples cherry read, then using the special chisel and hammer beat the tooth off the shank. If he was too slow, it meant reheating the tooth dimples.
 
   / How to attach ripper teeth #14  
brain 55

I should have paid more attention to the postings details, yes it is over 3 yrs old, and yes the teeth are on backwards, a very common mistake.
 
   / How to attach ripper teeth #15  
I worked around metal shops in my youth and some iron workers and saw them strike smaller hammers with larger hammers without seeing a failure of either hammer face. It was one of the few times I witnessed those that rarely wear eye protection wearing eye protection. I don't recommend hitting hammer faces together, you never know when a failure will occur when striking two hammer faces together, especially when you are trying to knock the snot out of it. Hammers, especially ball pen and sledge typically have harden steel hammer faces and as a rule I try to use a a brass hammer or a hard plastic encapsulated dead blow hammer or even a piece of mild steel, brass or hard wood between two hardened hammer surfaces to prevent the fracture or splintering off either of the hammer's striking faces. As identified a press is easier to control and safer. I may be wrong with my safety caution and inevitably end up with grinding rock fragmenting and pieces of steel flying at me while heating or hammering but, I am the guy who use to get stuff in his eyes while wearing safety goggles.
 
   / How to attach ripper teeth #16  
I am looking at the teeth and I am thinking
"are they on upside down?"

Thought the Flat hardened steel was to enter the ground and
protect the bend in the shank?

Just thinking
 

Tractor & Equipment Auctions

2023 New Holland CR10.90 Combine - 330 Engine Hours - 251 Separator Hours (A56436)
2023 New Holland...
2019 Allmand Night-Lite V-Series 7 kW S/A Towable Light Tower (A55973)
2019 Allmand...
SKID MOUNTED CONTAINMENT (A58214)
SKID MOUNTED...
2015 Freightliner 122SD T/A Wet Kit Day Cab Truck Tractor (A59230)
2015 Freightliner...
2020 PETERBILT 567 (A58214)
2020 PETERBILT 567...
2001 INTERNATIONAL 4900 WATER TRUCK (A58214)
2001 INTERNATIONAL...
 
Top