Take Down - Put back up.

   / Take Down - Put back up. #1  

ldabe

Gold Member
Joined
Apr 6, 2006
Messages
354
Location
SE, Michigan
Tractor
PT-422 2002 Robin eng.
I was wondering (before I start this project pretty soon) if anyone has ever "taken down" a pole barn?

I know many have put them up, but I am about to embark on taking one down, transporting and then reassembling.

It is 30' X 40' (about 14' at the eaves).

It has a 24' X 24' pole barn attached to the back of the 30' X 40'.

It is about a year old, and the price was to good to pass up!

The larger building has a 10' X 12' (approx.) roll up door in the front, and one service door on the side.

The smaller has a sliding 10' X 10' (approx.) door, and one service door.

I was just wondering if anyone had any suggestions to make this project go quickly and smoothly? (Yes, I could contract it out, but I am afraid they would not be as careful as I will be.)

Also the metal siding is nailed (with rubber washers) not screwed.

The roof is shingle, but no big deal, the current owner is providing a dumpster.

I will try and post some pics soon.

Thanks for any and all suggestions, comments, tips, or anedotes.
 
Last edited:
   / Take Down - Put back up. #2  
I was wondering (before I start this project pretty soon) if anyone has ever "taken down" a pole barn?


It is about a year old, and the price was to good to pass up!


Also the metal siding is nailed (with rubber washers) not screwed.

Sounds like a good idea because of this.
But, for me, that would be a game stopper. Too much opportunity for major damage to the metal and me.
 
   / Take Down - Put back up. #3  
I was involved in a similar project one time. If the price was right the doors, trusses and purlins are worth the effort. We tried to save the tin but if I did it again I would just replace it. Too many holes, dents and time to make the salvage effort worth it. We just cut the main post at ground level to be used for something else. It is a lot of work.

MarkV
 
   / Take Down - Put back up. #4  
I was wondering (before I start this project pretty soon) if anyone has ever "taken down" a pole barn?

I know many have put them up, but I am about to embark on taking one down, transporting and then reassembling.

It is 30' X 40' (about 14' at the eaves).

It has a 24' X 24' pole barn attached to the back of the 30' X 40'.

It is about a year old, and the price was to good to pass up!

The larger building has a 10' X 12' (approx.) roll up door in the front, and one service door on the side.

The smaller has a sliding 10' X 10' (approx.) door, and one service door.

I was just wondering if anyone had any suggestions to make this project go quickly and smoothly? (Yes, I could contract it out, but I am afraid they would not be as careful as I will be.)

Also the metal siding is nailed (with rubber washers) not screwed.

The roof is shingle, but no big deal, the current owner is providing a dumpster.

I will try and post some pics soon.

Thanks for any and all suggestions, comments, tips, or anedotes.

Yes . Our 40x60 morton building was built as a Karate school about 20 miles from here . It was completlly disassembled in Reverse of how it was put up & Each & every piece was marked so it could go up Exactlly the same way , This also included Rolling up the insulation & putting it in large plastic bags . This one was assembled with screws & very well built . The Nails will make it much more dificult to take apart but Posablle .

It took around a week to tear it apart with 3 working full time . Once it arived here & unloaded in seperate stacks . Another 4 days , Denailing everything & stacking it back up in seperate piles in the proper order for reasembly .

We had the ground leveled & compacted ready to go & all of the post holes dug ready for it , so the Frame work went fairlly smooth . The Poles were set & just tamped & Braced . The 2x6 runners were then put up & also everything was braced from the inside . Then We rapped the entire Building with the dupont mosture barrier .

Once that was done & everything was Squared the Outside wall sheet metal went up , With one end Open enough to get a tractor inside to Put up the trusses .

Everything has to be as Perfect as posable so all of the exsisting screw holes in the metal could be used . The windows , Walkin & overhead doors were left till last & framed in from the inside . The originall buildin Had only 3 windows & one walk in door . So We had some metal left over from adding another walk in door & the overhead . Nothing was wasted & only had to buy 6 additional sheets to finish it up .

We Then put the truses up & braced them as We went along & started putting up the perlins . Once all that was done We closed in the other end .

Then Raised the roof sheeting up from the outside of the building with the tractor with forks on it & started putting it up in Reverse of how it came down .

Once that was all done , We poured as much as the concrete through the Walkin & overhead doors . With a small tractor inside to Move the concrete around to wear the shoot Couldn,t get to . & poured in 3 Seperate sections. once cured the tractor was moved onto the section that was poured for helping get to other areas as needed .

We did This in the dead of winter, Fought snow, ice , mud & high winds out in an open feild . In perfect weather We might have aproached it differently .

Very few screw holes were missed & all in all it went Pretty smooth . Its not perfect But Good enough for Us . The only people involved Were My FIL & 2 great farmer friends & the wife & I .

My father in law & the 2 friends took apart the bulding & delivered it, From there the Wife & I Denailed & restacked everything . Her Dad & I did the whole Framing & sheet metal work . The 4 of Us did the trusses , perlins & roof sheeting & concrete work .

Once the shell was Completed I finished all the Eves, windows , trim & doors Includin 2 interior walls . & the Wife & I finished the inside of one end for a small apartment game room type thing .

Sorry for all the caps I get carryed away. The whole thing took about 2 months from tear down to the finished Structure . Not for the faint of heart . but Much cheeper then new . Hope this helps & sorry for the book :eek: .

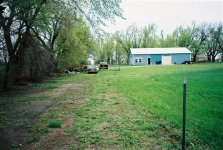
Hers a pic about a year after it was finished . Bob
 

Attachments

  • Picture OLD 193.jpg
    Picture OLD 193.jpg
    76.1 KB · Views: 369
   / Take Down - Put back up.
  • Thread Starter
#5  
Cowboy 357,
Thanks for the encouragement! And I appreciate the "detail" in your post. Beside the pic you posted, do you have any from start to finish or in between?

Also, do you have any tips on what not to do, or what you would or wouldn't do over again?

Thanks again.

Oh! And how did you transport it (with what, and all at once)? And could you explain how you went about "mark"-ing every piece, and did you bundle (for the move) a certain way?
 
Last edited:
   / Take Down - Put back up. #6  
Cowboy 357,
Thanks for the encouragement! And I appreciate the "detail" in your post. Beside the pic you posted, do you have any from start to finish or in between?

Also, do you have any tips on what not to do, or what you would or wouldn't do over again?

Thanks again.

Oh! And how did you transport it (with what, and all at once)? And could you explain how you went about "mark"-ing every piece, and did you bundle (for the move) a certain way?

I do have more Photos , But my scanner is broke. & the puter crashed where I lost the ones I had downloaded , But I,ll see what I can come up with .

Everything Was Marked as it was takin down with a Marker . Like Northeast corner . Roof, Sides . However the best way was . On the inside of the metal Using Arrows to point to top, bottom or whatever .

The wood , Side 2x6,s , Perlins & such Were not as Important As They Were Basiclly the same . The Posts & trusses However We did mark & tried to Use as a starting point accordinglly to how it was taken apart . Mainlly for reference points & directions , If that makes sence .

Everything was hauled on a 24 foot car trailer in several different loads & unloaded in seperate stacks & each stack Was marked as what they were for . Restacked in order of How they needed to go back up .

What We would have done Different , Simple. Dont wait till the dead of Winter :eek: . I Beleive if We would have waited till Spring it would have taken a fraction of the time . Making sure the Screw holes hit the side & top perlins took Quite a bit of time . Having the sheet metal Froze together Only made it more dificult as well as Putting the wet sheetmetal on top , Makes it very slippery & Dangerous .

Also, If You can put the posts in, Get it Framed then pour the concrete . that would make it far easier as well as safer .

I,ll see if I can get some more pics . The main thing is keep track of whats what when its taken down . I Would also sugest using screws to put it back up instead of the nails .

Hope that helps some . Best of luck. Once You do it . It will be a huge accomplishment . It aint easy , just takes some planning Which I,m not real good at. Bob
 
   / Take Down - Put back up.
  • Thread Starter
#7  
Cowboy357,
Sounds like you did a great job, especially looking at the picture.

Marking with "arrows & top, bottom" I had not thought of at this point, so thanks for that info!

Using screws also, is a good idea. I am not sure yet if I am going to try and pull nails out, or use something like a tile snip to just snip the heads off of the nail.

The other things you mention I had run through my head already.

Sounds like if I don't try and rush things, it should go ok.

I will be starting the project within a week, maybe two, the Lord willing and nothing unexpected comes up.

One other question:
Did you lay (stack) the metal sides on top of each other, and if so, did it leave any or many scratches to the metal?

Thank you very much for your input! You have been extremely helpful.

The Lord bless you and yours.
Abe
 
   / Take Down - Put back up. #8  
Depending on the type of nails, they may not come out to easily. In that case just cut between the purlins and the posts with a sawzall. First try to get a flat bar under the purlin though. If they do come then pounding them out from the back and then pulling on the head side will make a neater job.

Typically, the nails with washers holding the siding are going to be threaded. A wide flatbar for window trim work or a drywall knife with a thin layer of rubber on the side against the metal and a cats pawl or some other kind of prying bar may work but saving the tin with minimal damage may prove to time consuming. If you get the nail started and it still pulls hard then just cut it off behind the tin with a sawzall.

Any idea on the posts under the soil? If there was no concrete used, they ought to pop out pretty easily if only in the ground a year. If they have concrete around them and you can still pull them out, concrete and all then once you get them out, take a sledge to the concrete. It will just slow you down and make for some heavy handling. Take pictures, make measurements.

Fourteen foot tin is not too bad to pick up with a forklift but if the roof tin gets long then make a skid with two by fours if you are going to pick it up in a bundle. A stack of long tin can bend pretty easily.
 
   / Take Down - Put back up. #9  
I took down a 50 x 100 with 10' sidewalls in 2002. I welded a 6" piece of 1" pipe to a Stanley WonderBar to pull the aluminum roofing nails. Took off the entire roof in 3 long nights after work. The roof is continuous rib & was rib nailed so the pipe held the bar at rib height and spread the force into the rib valley. I had to sharpen the nail slot to a knife edge to get past the rubber washers. No damaged roofing and a small percentage of broken nails. I made a 12' pole jib for my 580 Case FEL with forks on the end to pick & lower the trusses after removing the perlins. Salvaged over 200 lbs of 16d nails from the perlins. I laid the trusses on a 45' trailer & 28' roof sheets on top as they went their new location 150 miles away.

Since you have a good shingle roof contact a modular house manufacturer in your region. They're expert in moving building sections. With the current building bust they might move & erect your building and salvage more materials for reasonable money. MikeD74T
 
   / Take Down - Put back up. #10  
Cowboy357,
Sounds like you did a great job, especially looking at the picture.

Marking with "arrows & top, bottom" I had not thought of at this point, so thanks for that info!

Using screws also, is a good idea. I am not sure yet if I am going to try and pull nails out, or use something like a tile snip to just snip the heads off of the nail.

The other things you mention I had run through my head already.

Sounds like if I don't try and rush things, it should go ok.

I will be starting the project within a week, maybe two, the Lord willing and nothing unexpected comes up.

One other question:
Did you lay (stack) the metal sides on top of each other, and if so, did it leave any or many scratches to the metal?

Thank you very much for your input! You have been extremely helpful.

The Lord bless you and yours.
Abe

Your welcome Abe , I,m trying to remember best I can as its been 10 years or better since We did this .

Yes We did stack the metal to metal & No real Scratches to Speak of , Just dont slide the metal off , But pick up from both ends . I had also forgot the Truses & Poles were hauled on a much longer farm trailor seperate from everything else .

We did not Pour concrete in the post holes . But before We poured We drilled holes through the Bottoms above the ground level & ran Rebar through them & tied it into the the Rebar & wire in the floor to tie everything together .

One other thing I added Since I Rebuild wrecks from time to time . Is I built a tiedown system in the floor With 6 Large Steel posts around the outside edges in the center of where the shop was going to be & 8 tie downs in the center of those . The tops are at Floor level. & then capped with steel caps that fit flush with the concrete . Then I have 4 pulling post , 4inch steel pipe with flanges in the bottom that slip down into the floor pipes .

Comes in really handy for all types of things for Me . But may not be worth the added trouble for most folks . Just a thought .

I,m still trying to figure out a way to post some more Pics . Looking forward to seeing Your project . Best of luck, Bob
 

Tractor & Equipment Auctions

UNUSED SWICT 84" SKID STEER QUICK ATTACH BUCKET (A50460)
UNUSED SWICT 84"...
UNUSED KIVEL MINI SKID STEER PALLET WORKS MAST (A50460)
UNUSED KIVEL MINI...
2005 CATERPILLAR 420D BACKHOE (A50458)
2005 CATERPILLAR...
2014 JOHN DEERE 450J LGP CRAWLER DOZER (A50458)
2014 JOHN DEERE...
2005 Ford F-550 Bucket Truck, VIN # 1FDAF56P45EB88239 (A48836)
2005 Ford F-550...
UNUSED KJ RATCHET BINDERS & CHAINS (A50460)
UNUSED KJ RATCHET...
 
Top