
TTTTTT
Gold Member
Hi All,
For all the hydraulic experts, I am still a bit of a novice so I welcome any comments on the setup that don't seem right or could lead to problems. At this point everything works as it should and I am happy with the setup.
For the plow mod, I wanted angle control, but this was just an off shoot of installing Quick Disconnects at the front of the tractor on the FEL frame for many other things. I kept it simple with a manual control valve (no electrics). I got a simple single spool open center valve that I put in series with my other hydraulics. My pump supplies my FEL then to the new valve and then continues to my rear remotes and then to the 3pt , then to the reservoir. Just a note for anyone wanting to do it this way, all my existing hydraulics work as normal with only one function being used at one time. No problem as I only have one free arm to operate anyway. I went with 3/8" hose to the to the QD's as 1/2" I did not see necessary for the functions that would be used.
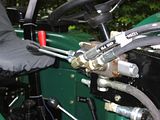
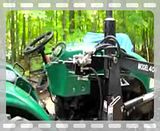
I was able to locate the new control valve beside my existing FEL control valve similar to the way some FEL valves that have a 3rd function (4 in1 bucket) already there.
It was recommended to install a cross over relief valve, especially when operating a plow as any jar if hitting something could potentially blow something hydraulically as the plow cylinders are in a locked state. It basically releases the pressure and dumps it to the other side. I opted to locate it before my QD's (not with the plow) so I could use it for other functions although I can't think of what else would need it on the front end.
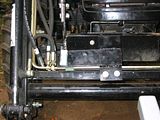
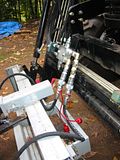
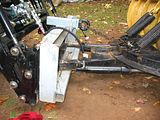
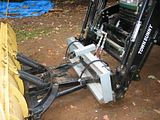
Step one was locating a good safe spot for the QD's and the crossover relief. I put the QD's coming right off the relief valve for convenience but it go anywhere in line. I made a bracket that would be bolted to the FEL cross frame close where the bucket is. I used 1/2" steel. I made the bracket extend high enough to protect it the relief valve at least a little bit.
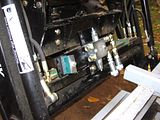
Next was to mount the relief valve, QD's and hoses. I assembled the fittings on the relief valve before attaching it to the bracket, then attached as one unit. I then added the hoses. I added a double hose clamp that is threaded into the bracket.
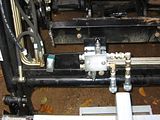
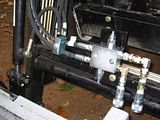
I had tested the hose length prior and was able to use off the shelf 8' long 3/8" hose back to the valve. I hooked it all up and then tested for leaks. A few minor ones that I tightened up.
I then hooked up the plow hoses. I used 3' - 1/4" hoses that I modded up to fit 1/2" NPT male connectors. Before threading them into the plow cylinders I operated the valve to charge them and get any air out right from the valve to the front.
Now the fun stuff!!
If a pic is worth a thousand words, then a video is just plain better and more fun.
Enjoy, Dave
For all the hydraulic experts, I am still a bit of a novice so I welcome any comments on the setup that don't seem right or could lead to problems. At this point everything works as it should and I am happy with the setup.
For the plow mod, I wanted angle control, but this was just an off shoot of installing Quick Disconnects at the front of the tractor on the FEL frame for many other things. I kept it simple with a manual control valve (no electrics). I got a simple single spool open center valve that I put in series with my other hydraulics. My pump supplies my FEL then to the new valve and then continues to my rear remotes and then to the 3pt , then to the reservoir. Just a note for anyone wanting to do it this way, all my existing hydraulics work as normal with only one function being used at one time. No problem as I only have one free arm to operate anyway. I went with 3/8" hose to the to the QD's as 1/2" I did not see necessary for the functions that would be used.
I was able to locate the new control valve beside my existing FEL control valve similar to the way some FEL valves that have a 3rd function (4 in1 bucket) already there.

It was recommended to install a cross over relief valve, especially when operating a plow as any jar if hitting something could potentially blow something hydraulically as the plow cylinders are in a locked state. It basically releases the pressure and dumps it to the other side. I opted to locate it before my QD's (not with the plow) so I could use it for other functions although I can't think of what else would need it on the front end.
Step one was locating a good safe spot for the QD's and the crossover relief. I put the QD's coming right off the relief valve for convenience but it go anywhere in line. I made a bracket that would be bolted to the FEL cross frame close where the bucket is. I used 1/2" steel. I made the bracket extend high enough to protect it the relief valve at least a little bit.

Next was to mount the relief valve, QD's and hoses. I assembled the fittings on the relief valve before attaching it to the bracket, then attached as one unit. I then added the hoses. I added a double hose clamp that is threaded into the bracket.


I had tested the hose length prior and was able to use off the shelf 8' long 3/8" hose back to the valve. I hooked it all up and then tested for leaks. A few minor ones that I tightened up.
I then hooked up the plow hoses. I used 3' - 1/4" hoses that I modded up to fit 1/2" NPT male connectors. Before threading them into the plow cylinders I operated the valve to charge them and get any air out right from the valve to the front.


Now the fun stuff!!
If a pic is worth a thousand words, then a video is just plain better and more fun.
Enjoy, Dave
