TuffTorq K46 Repair Guide with Pictures

   / TuffTorq K46 Repair Guide with Pictures #1  

LotsofGreenGrass

Bronze Member
Joined
Nov 30, 2009
Messages
79
Location
Gallatin, TN
Tractor
John Deere L110 and Mahindra 2816 4wd
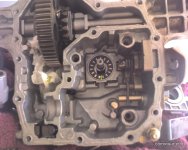
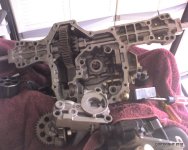
TuffTorq K46 / John Deere L110 Transmission Repair Guide with Pictures

Some K46's last a long time, while others do not. What is the secret? Read on..

The K46 Transmission, found in many models of small lawn and garden tractors, is often cursed at for it lack of durability. This transmission often requires replacement long before the rest of the lawn mower dies. Replacement cost reach 50% or more of the tractors original cost, if the work is done by a smiling JD Tech. Thus the phrase disposable tractor and transmission is often tossed around. Owners are stuck with few options.

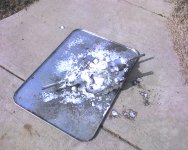
I had noted that my John Deere L110 max. speed was down a bit, and the groans from the rear end had increased. I knew the end was nearing. I found very little information on how to do this rebuild on the net. Most of what I found was pushing for an upgrade to a K66. At over $1000, I felt this is not viable option. After all, I only paid $1495 for the tractor! My feeling is that this tractor is not really designed for what a K66 can do. Something else is likely not going to hold up in the long run, even if the transmission is bullet proof. I decided to rebuild the K46 myself. After all, what's a good weekend project without the Fire Department involved?
: )

My journey began with a discussion with a TuffTorq service tech at the TuffTorq Service Center in TN. Their telephone number is (423) 585-2000. Their web parts address is: https://www.tufftorqservices.com/EnvEElogin/html/login.html. Derrick Dalton was quite helpful. I had heard there was a rebuild kit, but it was over $300. So I asked the question of the Derrick. "What are the parts that are most often replaced when the K46 fails?" He graciously provided this information. My parts totaled $162.95 delivered with tax. Amazingly the parts arrived in 1 day!

Parts List*:

1. Cylinder block (pump) kit
2. Cylinder block (Motor) Kit
3. Filter 105

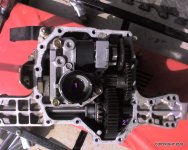
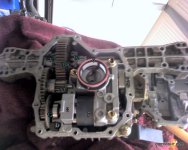
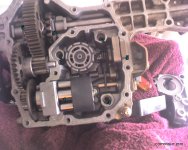
*You will need to go to the TuffTorq site with the bar code tag from your transmission. Apparently there have been many different versions of this unit. Mine was a K46V. Yours may be another iteration. You will see an exploded view of the transmission for your version. Print this out for reference. I found the site challenging to use. No big deal, you can call the Tech and he will do all the work for you. Just have your bar code handy.

Disclaimer:
I am providing this information as a reference ONLY. Any work on a tractor can be dangerous, cause injury or DEATH. You assume your own risk and any and all risks to others if this information and / or pictures is used.

I am going to probably upload the picture individually with the relevant info. for each one. Please be patient.

The photos are Copyrighted. I decided to do this after a previous bad experience with a website stealing my photos from another project. I have no financial interest here.
 
Last edited:
   / TuffTorq K46 Repair Guide with Pictures
  • Thread Starter
#2  
Ok, I will assume you can get the transmission off the tractor. I have some pictures of the removal, if need to be added later to this thread. Safety is key here.

You will need to clean the transmission case well. You don't want dirt getting into your transmission. I used laundry soap and a brush, since it was mostly dirt and grass. Smells good now too! Engine cleaner did not work well.
 

Attachments

  • oe 048.jpg
    oe 048.jpg
    387.9 KB · Views: 46,330
  • oe 039.jpg
    oe 039.jpg
    93.3 KB · Views: 39,233
Last edited:
   / TuffTorq K46 Repair Guide with Pictures
  • Thread Starter
#3  
Now we need to start the internal cleaning process.

Be careful not to turn the transmission over. PARTS WILL FALL OUT. Turn the axle slowly to rotate the gears so they can be cleaned with a rag. Then use a parts cleaner to get the sediment out of the case. Take your time. It will pay off. Make sure you get all of the cleaner out. Otherwise it can ruin the new oil. I stuffed paper towels in to get all the cleaner out. There are lots of nooks and crannies that can hold dirt or cleaner.

Do not remove the three gold top bolts yet.

My K46 had a LOT of dark metal sediment in the filter and in the case.

#1 is the old filter
#2 is the magnet with a lot of metal shavings on it. Clean this with a rag and then toss that rag.
 

Attachments

  • oe 050-1.jpg
    oe 050-1.jpg
    126.3 KB · Views: 57,796
Last edited:
   / TuffTorq K46 Repair Guide with Pictures
  • Thread Starter
#4  
Now remove bolts #1, #2, and #3. GENTLY remove/pry the cover piece with a screw driver. It is a force fit with dowels, so work all sides with the plate with a screw driver. Parts will want to force their way out. Particularly watch for the two spring loaded small valves that contact inner pad at part #9 from the cover you just removed. These will fall out on the floor and you could lose the tiny BBs size balls at that are inside.

Carefully remove any components, keeping the integrated parts together, where possible.

Part #7 is the larger Motor Cylinder Block which you will replace. It has a number of spring loaded pistons, so remove slowly. CAREFUL, there is a tiny rod in the center of the cylinder that slips in and out. It must be a valve or something. Save this part. Also, there is a washer on one end that goes around the shaft. It sticks to the cylinder and could be easily missed. BE SURE TO PUT THIS ON THE NEW PUMP. Part #8 is a wedge that can be taken out and set aside for reuse.

Part #6 is the nice new nylon mesh filter. Much better than the woven old one.

Parts #12 and #13 are U shaped washer that LOVE to fall out.

Parts at #4 are the brake pads. They fall out easily. So take out and put a side. Same issue with the two pads at #9. Part #10 is just the large gear. Mine was in great shape, as was most of the K46.
 

Attachments

  • oe 055.jpg
    oe 055.jpg
    106.5 KB · Views: 55,140
Last edited:
   / TuffTorq K46 Repair Guide with Pictures
  • Thread Starter
#5  
On to the Pump Cylinder Block area.

You can see it in the center of the case. It looks like a smaller version of the Motor Cylinder block. It has a bearing race, which the larger cylinder block does not. It has spring loaded pistons too. Remove carefully and set aside. Clean the newly exposed area like I previously mentioned. Parts at #5 should set aside. Note the orientation of the curved surface on these pads when you re-install these. #2, 3 and 4. are just the holes where the dowels are re-inserted. Oh no! I have two part number 5's in the pciture! Well, 5 and 6 at the upper left corner are just the U shaped washers that CONSTANTLY slip out : ). Where the #1 is in the first picture, I want to draw your attention to the rough piston side walls. This is where the tech says the problem is. The cylinder walls get scored from the pistons and allow the oil to slip through. The hotter the oil, the more the slip, since the oil is thinner at a higher temp.

This is a good time to talk about replacement oil. The recommended replacement oil is SYNTHETIC 5w50. It was interesting to learn that, in order to keep the costs down, the OE oil is standard oil, not synthetic. Apparently MOST people won't pay or appreciate the benefits of Syn oil in the very competitive, cost cutting, Lawn Mower market.

After looking closely at this transmission, I think that Syn oil is a must, particularly in very hot or cold climates. I think you could double the life of the K46 if you change the filter every 50 hours and run synthetic. A new K46 should probably have the oil changed at 10 hours to get metal shavings out from production. It would be nice if the if you could tap a drain in to the bottom plate. If I rebuilt this again, I would drill and tap a drain. It just makes sense. I hear some of the K46's have an external oil tank and drain plug. The ones that don't are the cost cutter version. OK, so I AM CHEAP! lol Had I known....

While cleaning the case, remove the old gasket, being careful not to get these rubber pieces lost inside the case.
 

Attachments

  • oe 054.jpg
    oe 054.jpg
    125.3 KB · Views: 67,335
  • oe 052.jpg
    oe 052.jpg
    112.6 KB · Views: 44,564
  • oe 053.jpg
    oe 053.jpg
    89.3 KB · Views: 38,754
Last edited:
   / TuffTorq K46 Repair Guide with Pictures
  • Thread Starter
#6  
When you install the new cylinders and pistons, prime all of them with synthetic oil.

Take your time on reassembly. It can get a little frustrating, since spring loaded things want to pop out. Careful with the two small valves that contact the pads at #9. Depress these when sliding the plate in. Use a rubber mallet to GENTLY seat the 3 dowels.

The toughest part is re-seating parts #12, 4, 8, 7 and 1, since they function as a unit. It takes some jiggling and moving of parts. Part #8 likes to pop out of place when reinstalling the plate with the 3 gold top bolts. No biggie, just re-seat it.

Reseal the case with RTV. I use Permatex Copper, since it never has leaked on me. Make sure you pay close attention to all of the areas that need sealing. There are a few internal areas that serpentine around the internal components. Let RTV dry over night. Refill case with 5 W50 Synthetic Oil using a small diameter funnel. This can be messy, go slow, since there is no vent and it tends to reflux out of the fill spout. Sorry, I forgot to take a picture of the top of the K46 with the fill plug. Should be pretty obvious though. Remove the dust cap, then remove the plug with Channel Locks.

Reinstall transmission. Don't forget the gold rod that controls the engage / disengage. This rod has to be put in DURING the reinstall. If you forget it, you can't get it in once the K46 is in. Once you get the transmission in, remove the belt guard shown in picture #3 and re-seat the belt. Otherwise, you will smell burning rubber! How do I know? LOL. It is easiest way to re-seat the belt is by griping both sides of the belt with one hand and sliding the guard back on over the pulley.

This is good time to vacuum out the underside of your tractor. If your tractor is like mine was, there is a lot of dead grass in the frame. Put some oil on the steering shaft inside the engine hood and let it creep down to the bearing. This will make steering easier.
 

Attachments

  • oe 051.jpg
    oe 051.jpg
    118.9 KB · Views: 33,959
  • oe 055-1.jpg
    oe 055-1.jpg
    106.5 KB · Views: 42,078
  • oe 035.jpg
    oe 035.jpg
    95.1 KB · Views: 25,100
Last edited:
   / TuffTorq K46 Repair Guide with Pictures
  • Thread Starter
#7  
Last edited:
   / TuffTorq K46 Repair Guide with Pictures #8  
That was quite a nice illustrated write-up and I think it deserves at least one thank you, so..Thank You! :) I don't have a L110 tractor, (mine is an old Ford 100 with a Peerless 4 speed gear tranny) so it's unlikely I will ever need the information, but I can certainly appreciate the work and effort you put into your post. Thanks again.
 
   / TuffTorq K46 Repair Guide with Pictures #9  
LotsofGreenGrass,
I wanted to first say mega thanks! I have been struggling with which decision for my Scotts (John Deere) L2548; Junk the lawn mower, Replace the transmission, or try to nurse it along for another year. The last option worked for the last year basically I dropped the transmission and replaced the fluid. As of today, the mower is a no-go. So, I am going to use your post and see what happens. I am looking forward to spending under $200.00 as opposed to $600+. I'll let you know how it goes...
 
   / TuffTorq K46 Repair Guide with Pictures
  • Thread Starter
#10  
LotsofGreenGrass,
I wanted to first say mega thanks! I have been struggling with which decision for my Scotts (John Deere) L2548; Junk the lawn mower, Replace the transmission, or try to nurse it along for another year. The last option worked for the last year basically I dropped the transmission and replaced the fluid. As of today, the mower is a no-go. So, I am going to use your post and see what happens. I am looking forward to spending under $200.00 as opposed to $600+. I'll let you know how it goes...

How did it go?
:)
 
   / TuffTorq K46 Repair Guide with Pictures #11  
Thanks for the original post. I had the same problem and bought the three recommended parts. When the parts arrived I opened the tranny and found the differental gears were also badly worn and missing parts of teeth. Many metal fragments were in the oil. I ordered the diff gear set for about $25. Put it back together this morning and mowed 1.5 acres. Mine needed the priming procedure which took a few minutes before it happened. It works great and cost under $200 and an afternoon of labor. Thanks for posting which parts to buy.

I've seen a lot of posts saying negative things about this transmission but want to defend it a bit. Parts are readily available and it is quite easy to fix, and the parts guy Derrick Dalton was very helpful. Used as intended, I'm betting it easily lasts 10 seasons.

The manufacturer of the garden tractor combined this tranny with plow mounts and a hitch hole. Some people never or rarely use them, but some of us do. I wouldn't have bought a garden tractor without them. I bought the garden tractor, cart and plow at the same time from a big box store. I love that cart and hauled a lot of dirt, rocks, and broken concrete uphill. As much as the machine could pull. After 4 1/2 years the tranny wore out and cost $200 to fix. That's not bad.
 
   / TuffTorq K46 Repair Guide with Pictures #12  
I have the JD L120 tractor with the K46 transmission. The tractor is about 7 years old with 370 hours total run time. I use it to cut about 1.5 acres of hilly terrain AND I use it in the winter with a snow blade to clear my 600 ft drive way. I have definately beat the **** out of that transmission. Mine, like the others is loosing its grip after about 20 to 30 mins of run time.

I drained and replaced the fluid hoping for the quick fix but I got no improvement. SO, thanks to this awesome post with its detailed instructions I ordered the replacement parts and 4 quarts of 5w-50 from the TuffTorq website. Was under $200 total.

Now hopefully in the next couple of weeks I can get back on here post that the rebuild was a total success! Wish me luck lol...
 
   / TuffTorq K46 Repair Guide with Pictures #13  
Thanks for the post/repair guide ! It has been great for some here already and I expect it to get plenty of use, nothing like a good how-to with pictures. TuffTorq ought to appreciate the post too.
 
   / TuffTorq K46 Repair Guide with Pictures #14  
Wow, what a chore! Of course, Im no seasoned mechanic or anything :) I took it apart and put the new parts in this morning. I got quite a chuckle out of the tiny rod (see paragragh below). I dropped it in the case, thought it was lost, used needle nose pliers to rescue it. Its smaller than a freakin tic tac and the tranny probably wouldnt work without it. I felt like a doctor performing brain surgery :laughing: I caught myself saying "If this thing works when Im done with it - I'll be shocked!!" Yep said that a few times today :D

I also replaced the drive belt while the gasket glue was curing since I had that much out of the way all ready. After It was complete and reassembled, I fired it up, closed my eyes, said a prayer, crossed my fingers and stepped on the go pedal. For brief moment there was no movement, then all of a sudden it lunged forward with reckless abandon!! I ran the heck out of it for about 30 minutes. I climed the steepest hills I could find, even backed it up a few of them, and the transmission seemed not to loose any strength. Yes, Im thinkin we have a bingo :thumbsup:

So Im very happy I took on the challenge. I look at it like I made $400 in 5 hours since a new tranny is $600 and I got less than $200 into the parts.

Part #7 is the larger Motor Cylinder Block which you will replace. It has a number of spring loaded pistons, so remove slowly. CAREFUL, there is a tiny rod in the center of the cylinder that slips in and out. It must be a valve or something. Save this part. Also, there is a washer on one end that goes around the shaft. It sticks to the cylinder and could be easily missed. BE SURE TO PUT THIS ON THE NEW PUMP. Part #8 is a wedge that can be taken out and set aside for reuse
 
Last edited:
   / TuffTorq K46 Repair Guide with Pictures #15  
I have similar problems with a 2003 L120 and the K46 transmission. I decided to try changing the oil first. I did not drop the tranny, but instead pulled the right wheel and have access to the valve on top. I pulled the rubber dust cap and the plug. TuffTorq description of the parts is the vent valve. The fluid level was approximately 2 inches from the top. I drained the oil with a pump and only got 1 qt. out. The oil is charcoal gray in color. I'm pretty sure the suction tube is hitting bottom and I can hear it sucking air and gurgling, indicating all oil has been removed. TuffTorq lists the capacity as 2 qts., is it possible I have lost that much oil in 7 yrs? Also, when I refill how far from the top should the fluid be?
 
   / TuffTorq K46 Repair Guide with Pictures #16  
Excellent post!! :thumbsup: You done way good, Brit! I'd be very surprised if someone doesn't pick this up and send it all over the Net!

Be able to find it on a landscaper site in Europe - next week! :D

AKfish
 
   / TuffTorq K46 Repair Guide with Pictures #17  
It sure would be nice if we had a method of upgrading the current ones to the external filter and extra capacity storage pans also. Maybe someone could see when they talk to Tuff torq if it's even possible ? I'd do some preventive maint to get longer life out of this K46. Even if i've only had it less than a year so far.

Steve
 
   / TuffTorq K46 Repair Guide with Pictures #18  
I have similar problems with a 2003 L120 and the K46 transmission. I decided to try changing the oil first. I did not drop the tranny, but instead pulled the right wheel and have access to the valve on top. I pulled the rubber dust cap and the plug. TuffTorq description of the parts is the vent valve. The fluid level was approximately 2 inches from the top. I drained the oil with a pump and only got 1 qt. out. The oil is charcoal gray in color. I'm pretty sure the suction tube is hitting bottom and I can hear it sucking air and gurgling, indicating all oil has been removed. TuffTorq lists the capacity as 2 qts., is it possible I have lost that much oil in 7 yrs? Also, when I refill how far from the top should the fluid be?

The fluid in mine was like yours with a charcoal gray color and also about 2 inches from the top. Im thinkin you might only be able to get 1 quart out by using the method you described. There are places in the case where the oil would settle and not make it to your tube. You really need to take the tranny off and flip it upside down to completely drain it. I havent seen anyone post that just changing the oil in the tranny had any positive effect.

When I refilled mine I filled it completely. I used approximently 2 and a quarter quarts to fill it. Im guessing that thru temperature changes and expansion it pushes some of the fluid out during use. Mine did drip out the vent on top for a little while until the fluid level got to a "comfortable" level in the case.
 
Last edited:
   / TuffTorq K46 Repair Guide with Pictures #19  
Great thread! Wish I'd seen it before I ventured into my rebuild.

It may benefit some folks to know that the wedge (part #8 on the pic in the 4th post) can be installed 2 ways; the way it appears in the picture, or 180 degrees out. The resulting actions due to an incorrect install will leave you with your forward and reverse foot pedals sending you tractor in the opposite direction. Don't ask me how I know this.

The rebuild and synthetic oil refill were well worth the effort, as my Regent now pulls like an animal.
 
   / TuffTorq K46 Repair Guide with Pictures
  • Thread Starter
#20  
Thanks for the original post. I had the same problem and bought the three recommended parts. When the parts arrived I opened the tranny and found the differental gears were also badly worn and missing parts of teeth. Many metal fragments were in the oil. I ordered the diff gear set for about $25. Put it back together this morning and mowed 1.5 acres. Mine needed the priming procedure which took a few minutes before it happened. It works great and cost under $200 and an afternoon of labor. Thanks for posting which parts to buy.

I've seen a lot of posts saying negative things about this transmission but want to defend it a bit. Parts are readily available and it is quite easy to fix, and the parts guy Derrick Dalton was very helpful. Used as intended, I'm betting it easily lasts 10 seasons.

The manufacturer of the garden tractor combined this tranny with plow mounts and a hitch hole. Some people never or rarely use them, but some of us do. I wouldn't have bought a garden tractor without them. I bought the garden tractor, cart and plow at the same time from a big box store. I love that cart and hauled a lot of dirt, rocks, and broken concrete uphill. As much as the machine could pull. After 4 1/2 years the tranny wore out and cost $200 to fix. That's not bad.

Glad to hear it this helped!
Brit
 

Tractor & Equipment Auctions

ALLMAND NIGHT-LIGHT PRO 4 BULB LIGHT PLANT (A52706)
ALLMAND...
2025 Ford Transit Cargo Van (A56858)
2025 Ford Transit...
29in forks and frame (A59228)
29in forks and...
2012 VOLVO VNL (A55745)
2012 VOLVO VNL...
2015 TROXELL 130BBL STEEL (A58214)
2015 TROXELL...
2020 PRINOTH PANTHER T14R ROTATING CRAWLER DUMPER (A60429)
2020 PRINOTH...
 
Top