Buying and assembling rear remote valve

   / Buying and assembling rear remote valve #1  

BeezFun

Veteran Member
Joined
Jul 1, 2009
Messages
2,480
Location
IL
Tractor
Kubota B2710
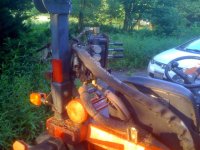
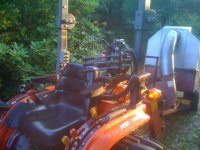
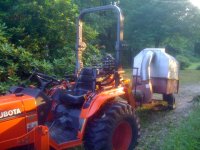
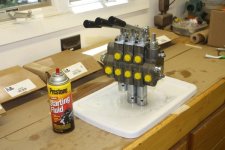
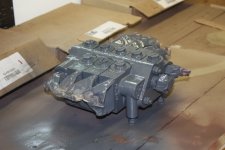
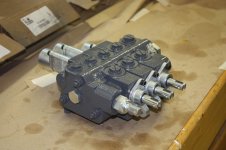
Attached are photos of Prince SV valve I bought to add rear hydraulics to my B2710. Here's what I ordered, it has 3 valves made of these part numbers:
2- SVW1BB1 Dual acting spool, 3 position spring return with detent
1- SVW1DD1 Dual acting spool, 3 position plus detented float

It was $383 with shipping.

It comes shipped with each section individually boxed, there's 4 o-rings between each section and 3 tie rods that compress the whole stack together. Here's some photos of putting it together and painting it. You can see the shipping boxes in the background. Each section is in a plastic bag covered with oil, and the casting is really rough, so I washed it with starting fluid so I could get all the oil out of the little spaces between the castings. Then I masked off the aluminum and finished parts, and primed and painted the unfinished casting gloss gray to match my ROPS. Next step is to build a plywood mounting plate so I can experiment with how to mount it before I make something out of steel.
 

Attachments

  • Tractor Valve Assembled but unpainted.JPG
    Tractor Valve Assembled but unpainted.JPG
    141.9 KB · Views: 309
  • Washing.JPG
    Washing.JPG
    160.2 KB · Views: 239
  • Masked off.JPG
    Masked off.JPG
    140.2 KB · Views: 209
  • StackValve1 003.jpg
    StackValve1 003.jpg
    636.1 KB · Views: 256
   / Buying and assembling rear remote valve #2  
Looks good Beez !

I have a three spool SV (spring returns only) on my B2910 (also painted Kubota gray :thumbsup:)

It's currently mounted (vertically) to the ROPS on my left side ..... but I'm planning to move it over to the right side and further back (and hopefully keep the SUDT drool off the tractor :mur:) ... since it's easier for me to turn to my right when looking back.
 
   / Buying and assembling rear remote valve
  • Thread Starter
#3  
It's currently mounted (vertically) to the ROPS on my left side ..... but I'm planning to move it over to the right side and further back (and hopefully keep the SUDT drool off the tractor :mur:) ... since it's easier for me to turn to my right when looking back.

I was thinking vertical on the right side, but I was concerned it will block my view when I turn around to get a good look at what I just ran over. Didn't think about the drool factor. I'd like to put it off to the side of my right arm, above the 3pt lever, but the tractor runs into a lot of low tree branches, and there's not much room there to mount anything. I've already knocked off a few flashers, they're not cheap but nothing like damaging a valve. So I was going to try mounting it vertically on the inside of the ROPS. I figure I'll keep playing with plywood technology until I get it right.
 
   / Buying and assembling rear remote valve #4  
I was thinking vertical on the right side, but I was concerned it will block my view when I turn around to get a good look at what I just ran over.
Yup - you need to maintain a clear view of what's happenin' in the back ....

Didn't think about the drool factor.
Go have a peek at the valve for your FEL around the QD's ..... if it's anything like mine, you'll get the idea ;)

I'd like to put it off to the side of my right arm, above the 3pt lever, but the tractor runs into a lot of low tree branches, and there's not much room there to mount anything. I've already knocked off a few flashers, they're not cheap but nothing like damaging a valve.
Yeah .... that would be ..... pricey .....

So I was going to try mounting it vertically on the inside of the ROPS.
That's how I have mine mounted - inside the ROPS (but on the left side)

Also I used a piece of 1/4 steel plate as the mounting surface - which is on the outboard side (the valve is inboard of the steel plate) - so it serves as a bit of a protector of sorts ....

I'll see if I can snap a pic later today and stick it up here - you be able to see the positioning .... and the drool issue ;)

I figure I'll keep playing with plywood technology until I get it right.
Good way to go ..... save ya from having to do it over like I'm having to do :D
 
   / Buying and assembling rear remote valve
  • Thread Starter
#6  
I wish my ROPS were angled like yours, keeps things out of the line of sight. I like your bracket, I was planning on using U-bolts to hold the mounting plate to the ROPS, but your way avoids having to worry about the layout of the holes colliding with the valve. I'm most comfortable looking over my right shoulder so I might try mounting on left side, but rswyan was thinking of moving his from left to right. So who knows. I better decide soon, the wife is on me to get the fence posts in so I can't dilly around forever.
 
   / Buying and assembling rear remote valve #7  
that looks just like the process I went through about a year ago with my valve. I think I paid 250 from surplus center, have they gone up that much. the only difference is mine has no float detent, just three plain old valves

I mounted mine on a slightly bent 1/4 plate with another plate on the other side of the rops to act as a u bolt with four bolts holding the whole thing on. mine is on the left and to the inside of the rops and doesn't get in the way too bad.

I will try and get some pics tomorrow and put them up so you can see, mine is on my b7800
 
   / Buying and assembling rear remote valve #8  
Some pics of the mount I welded up for the Prince SV valve I'm using for my rear remotes. It's made out of 1/4" wall 2" square tube and a piece of bar stock (maybe 2 1/2" x 3/8" or 7/16" by roughly 5" or 6")

I drilled out 2 holes in the bar stock to match the two bolts in the ROPS and then picked up a pair of longer Grade 8 bolts (inch, not metric) at TSC that were close in diameter to the originals.

It's been a sturdy mount, but it needs to be on the right, as that's the side I'm more comfortable turning to ...... lower down to avoid blocking my vision ..... and further back to allow easier access for attaching/detaching the lines ....... and to avoid hydraulic drool on the machine (most of the grass that is on the rear below the valve is there because it's stuck to the tractor by hydraulic oil) ....

Not sure if I will keep the vertical orientation or lay it horizontal .....
 

Attachments

  • IMG_1005.jpg
    IMG_1005.jpg
    60.9 KB · Views: 322
  • IMG_1006.jpg
    IMG_1006.jpg
    66.8 KB · Views: 220
  • IMG_1007.jpg
    IMG_1007.jpg
    61.5 KB · Views: 241
  • IMG_1008.jpg
    IMG_1008.jpg
    64.4 KB · Views: 230
   / Buying and assembling rear remote valve
  • Thread Starter
#9  
Some pics of the mount I welded up for the Prince SV valve I'm using for my rear remotes. It's made out of 1/4" wall 2" square tube and a piece of bar stock (maybe 2 1/2" x 3/8" or 7/16" by roughly 5" or 6")

I drilled out 2 holes in the bar stock to match the two bolts in the ROPS and then picked up a pair of longer Grade 8 bolts (inch, not metric) at TSC that were close in diameter to the originals.

It's been a sturdy mount, but it needs to be on the right, as that's the side I'm more comfortable turning to ...... lower down to avoid blocking my vision ..... and further back to allow easier access for attaching/detaching the lines ....... and to avoid hydraulic drool on the machine (most of the grass that is on the rear below the valve is there because it's stuck to the tractor by hydraulic oil) ....

Not sure if I will keep the vertical orientation or lay it horizontal .....

What is the little box mounted on your right ROPS?
 
   / Buying and assembling rear remote valve #10  
What is the little box mounted on your right ROPS?
Good eye :D

It's a plastic, weather-proof project box that I installed three toggle switches (with rubber covers) in - the top switch and bottom switches control the front and rear work lights on the removable light bar that mounts on the ROPS.

The middle switch controls power to an accessory outlet (cigarette light socket) on the back of the tractor that I use to power the 12v electric pump on my boom sprayer.
 

Tractor & Equipment Auctions

Excavator Bucket (A50514)
Excavator Bucket...
2025 Swict 66in Bucket Skid Steer Attachment (A50322)
2025 Swict 66in...
1991 Cleveland Equipment Trailer (A50514)
1991 Cleveland...
Adams 8 Ton Weigh Hopper (A52128)
Adams 8 Ton Weigh...
2010 Ford Edge SE SUV (A51694)
2010 Ford Edge SE...
2023 Jeep Gladiator Sport 4WD SUT (A50324)
2023 Jeep...
 
Top