Thermistor Replacement

   / Thermistor Replacement #1  

jnporcello

New member
Joined
Aug 21, 2010
Messages
19
Location
South of Buffalo, NY
Tractor
John Deere 4600
After doing some searching I was directed here to hopefully find the answer to a problem I was afraid didn't have an easy answer. But it appears that the answer is thermistor. I have all the classic symptoms. I've read tons of threads on the thermistor being the culprit in my case, but there hasn't been too much mention of the best ways to replace it.
What I'd like to know is exactly where the thermistor is located and any tips/tricks anybody has used to replace it. I believe its behind the fuse block -- do I have to take the dash apart to get at that, or is it behind the green panel on the front where the key is? Thanks in advance.
 
   / Thermistor Replacement #2  
It is on the back side of the fuel shut-off relay socket.
 

Attachments

  • Therm1.jpg
    Therm1.jpg
    214.6 KB · Views: 6,531
  • Therm2.jpg
    Therm2.jpg
    132.3 KB · Views: 4,278
   / Thermistor Replacement #3  
jnporcello
:welcome:
You have been directed to a great place, and hope JD755's reply was of help.
I haven't had to change one out yet, but did learn of where it is from TBN members.

Some additional help may be forthcoming from someone who did change theirs out.
 
   / Thermistor Replacement #4  
Yeah, it is behind the fuse/relay block, as stated. I have had my
whole wiring harness out, and it is quite tight behind that area, so it
is hard to get behind the block. Those wire bundles are stiff.
I do have a spare of the LVU10323 thermister, but the part is not
expensive.
 
   / Thermistor Replacement #5  
Makes me wonder if anyone has tried to install the thermistor from the front side of the block?
Bend the wires and insert them into the correct slots before plugging the relay in ? Might have to get behind to clip the old one out.
 
   / Thermistor Replacement
  • Thread Starter
#6  
Wow, great response. I'm on a couple of automotive forums (where I'm a little more knowlegable about my car and can contribute more) and I thought their response was quick -- but its nothing compared to here. By the way, DfKrug, I enjoyed reading your posts about rebuilding your 4300 -- I learned a lot about this machine through your process, but I'm only about 2/3 through it though. Hope all continued well:)

I'll give the thermistor a try sometime this week when I get a minute and let you know how it went. Hopefully I'll be able to post some pics of the job too.

I just put the 4300 through a pretty tough period redoing the 2 acre cleared portion of my lot and finally planting grass and haying it last weekend. Now for some maintenance on the poor girl -- she did great. I put 50 hours on it in the last month for a total of 450. That's probably more than I'll put on in the next year. Moved a lot of dirt with the loader and now getting the creep down on the bucket too, but I'm going to change the fluids, filter, and clean the screen before I get too excited and worry about the cylinders.
 
   / Thermistor Replacement #7  
Makes me wonder if anyone has tried to install the thermistor from the front side of the block?
Bend the wires and insert them into the correct slots before plugging the relay in ? Might have to get behind to clip the old one out.

I suppose if the thermister failed open, you could install a new one in the
front. But if it fails short, then it has to come out, as well as possibly
needing a new fuel cutoff solenoid from overheating it.

Some of the wire bundles holding the fuse bolck in come from the
instrument panel. You might have to relieve some tension by opening
up the dash. That part is not too bad.
 
   / Thermistor Replacement #8  
I just cut mine out and heat shrinked it back on - See attached pictures
 

Attachments

  • IMG_0376.JPG
    IMG_0376.JPG
    272.4 KB · Views: 8,209
  • IMG_0377.JPG
    IMG_0377.JPG
    226.3 KB · Views: 4,644
   / Thermistor Replacement #9  
Long0
Great pic. I didn't realize the block would roll out like that. And it appears the thermistor is easy to get at. Now, do you mean you soldered the wires then put the heat shrink over them? Or didn't solder, but depend on the shrink to hold them in contact? I assume the former. :)

Thanks for the pics.

Now for some more clarity....what is the first warning or symptom that the thermistor is going/gone bad? Does it fail first then the fuel cutoff fails, or the other way around?
I'm thinking "no start" could be one, and "shutdown" could be another.
 
   / Thermistor Replacement
  • Thread Starter
#10  
From what mine does and from what my research on this forum shows is that the easiest way to tell is when starting from cold, engine will roll over and over and over and not start. Acts as though it just isn't getting any fuel, or some safety feature is preventing it from starting. Most often when that's the case, its your thermistor. I haven't seen any threads about it causing a shutdown or anything of that nature. Just turning over without starting.
I'm off to the garage to change out and will let you guys know. Thanks Long0 for the pictures, which is always very helpful.
 
   / Thermistor Replacement #11  
The thermistor is used to provide power to the high current fuel engage solenoid at startup. A separate lower current coil (latch) is used to keep the solenoid engaged during operation. Since the thermistor is failure prone, I would consider using longer wires of sufficient gauge to mount it in a more accessible location. The thermistor is a positive temperature coefficient (PTC) resistor that starts at low resistance and very quickly self heats such that its resistance increases and current flow to the high current solenoid is cut off. By then the low current latch will keep the solenoid engaged. Location of the PTC should not be important other than knowing it will briefly (couple seconds) get very hot.

Just a side note FWIW. PTC's at one time (among many other applications) were commonly used in televisions to provide high current flow to degaussing coils around the CRT at startup. After a couple seconds the current flow decreased to where the degaussing coil was shut off. That operation helped insure a good picture from the CRT.
 
   / Thermistor Replacement
  • Thread Starter
#12  
Well, I brought my camera down to take some pics of thethermistor replacement, but thanks to Long0 and his pics, that's about it and nothing more to show really. It was pretty straight forward.

I removed the plastic case that contains the fuse access door -- there were 2 scres adn 2 bolts. Then I removed the fuse box assembly which is 2 nuts. It came out, but it is pretty tight in there. Mine swung the opposite way of Long0's in his pictures. The thermistor was right there behind the box and quick-tied together with some of the wires. At this point I removed the green cover directly above the fuse box -- where the steering adjustement and ignition are located. This gave me a little more room to move the fuse box. I then cut out the thermistor, put new shrink wrap on the wires and soldered the new one in. Very straight forward.

It has been starting fine so far. I'm not sure if it is my ears or not, but the click of the solonoid seems to be a little louder, but that could just be me. Hopefully this licks the no start problem that has been frustrating as he11 for a few years now. Since it only did it occasionally, and of course always did it when in a hurry.
 
   / Thermistor Replacement #13  
Glad you got it fixed. Fuel solenoid problems have been a regular discussion topic here. Through the years Deere has used different methods to provide that brief solenoid pull-in power ranging from just connecting it to the starter as on my 755, to electronic timer circuits, to the thermistor on yours.

It is possible the click might be a little louder. If the thermistor cold resistance value had degraded (increased) on the old one it may have been providing a lesser voltage for the coil. The new one should be providing full voltage for a firm pull-in and louder click. That could also explain the old one being intermittent with the coil getting marginal and sometimes not enough voltage to pull in.
 
   / Thermistor Replacement #14  
Does the thermistor get so hot that there needs to be concern that when tucking all the wires in behind the block, that it doesn't melt an adjacent wire covering? i.e. leaving it hang out in the open a bit?

jnporcello's explanation (along with other comments and pics in this thread) should be added to the tech manual. :) :)

But great to see it here in TBN with a clear searchable title to the thread. So much info here gets hidden under a thread title that can't be easily found with a search.
 
   / Thermistor Replacement #15  
Does the thermistor get so hot that there needs to be concern that when tucking all the wires in behind the block, that it doesn't melt an adjacent wire covering? i.e. leaving it hang out in the open a bit?

Without knowing the exact electrical characteristics I can't give a 100% answer, but looking at the PTC case I do not believe it would be a problem. I have designed circuits that used a PTC in a controlled feedback to actually keep the device continually hot for controlling a crystal frequency. Those devices had an exposed metallic structure for heat transfer. The plastic case on the devices Deere uses tells me they should not get very hot. The one second or so of heat would not transfer very quickly.
 
   / Thermistor Replacement
  • Thread Starter
#16  
JD has it tucked in there and quick tied to the other wires with no concern if it touching anything, and I didn't see any melting or scoring of adjacent wires.

PS JD755 - I used to have a 755 and traded her for this one. I love the added size and power, but I really loved the build quality and durability of that 755. Zero problems other than maintenance with about 10 years of use. One of my favortite machines ever.
 
   / Thermistor Replacement #17  
JD has it tucked in there and quick tied to the other wires with no concern if it touching anything, and I didn't see any melting or scoring of adjacent wires.

PS JD755 - I used to have a 755 and traded her for this one. I love the added size and power, but I really loved the build quality and durability of that 755. Zero problems other than maintenance with about 10 years of use. One of my favortite machines ever.

I agree about the 755. I bought it new in 1993, and the sum total of repairs, other than dealing with leaky batteries, has been an alternator and just last fall the water pump began weeping some coolant. It seems like every time I learn of a problem here with later model JD tractors, I compare the design with mine and see that I will not have that problem. Like everyone, over the years I sometimes think about a new tractor. But after researching and test driving I always come back to my 755. It still does every thing I need.
 
   / Thermistor Replacement
  • Thread Starter
#18  
Knock on wood. The thermistor replacement seems to have worked. I started it yesterday and I swear that I felt an extra second where it normally wouldn't have started, but it did after the replacement. Thanks for your help guys.
 
   / Thermistor Replacement #19  
Glad to hear it is back in service. Those issues can really be bothersome, but then you have a good feeling when you finally fix them and all is well again.
 
   / Thermistor Replacement #20  
In the for what it's worth department:

I had the fuel shut off solenoid go in my B21. It was a 3-wire (i.e. two coil) solenoid. When there is no power to either coil, a spring pushes a bar out and that cuts off the fuel. The 1st winding is used to pull in the solenoid. It has a very low resistance (.39 ohms in the case of my B21). It was only energized (on the B21) when the starter was cranking. The 2nd coil is a "holding coil". It had a resistance of 11.6 ohms. Once the solenoid is pulled in (via the 1st high current coil) and there is a metal to "coil" contact, it takes substantially less current to hold the solenoid in. So the 2nd coil is on all the time that the tractor is running. On the hold in solenoid, I put the "coil" in quotes because there is really "cut off bar metal" to "the metal that the coil is wrapped around" contact.

Looks like this is what's going on here. So with these designs, the goal is to hit the kick in solenoid for a short period of time when starting, and then have the holding solenoid take over. The holding solenoid is energized whenever the tractor should be running, and cutting power to it is how you shut of the engine on the tractor. Because the kick-in solenoid coil has such a low resistance, it draws a lot of current and therefore generates a lo of heat, so it can't be left on for too long. On my B21 if you crank to long I'm sure the fuel cutoff solenoid gets very hot. As others have mentioned, Deere has tried various methods of controlling how long kick-in solenoid is energized, such as timers, electronics controls, and the PTC (positive temperature coefficient) thermistor that is being discussed in this thread.

I like to think of a PTC as a "plastic fuse". As you pass current through it, it heats up. The conductive plastic inside the PTC reaches a melting point at some temperature. When it melts, the conductivity of the plastic drops and less current can pass through it. Typically, the part finds some happy medium balance point where it draws some current, keeps the plastic liquid, but still limits the current to the outside circuit. While in this state, the part is very hot- up in the 140 to 220 degree F range depending on the part. Once the high load is removed, the part cools down and is conductive again. So a PTC is a self reseting fuse that is full of conductive plastic. Isn't technology a hoot :laughing:! Note that even when PTC fuse has blown, you'll se some current flowing (and if you were to measure it, a bit of voltage such as maybe 2 volts on a 13 volt circuit).

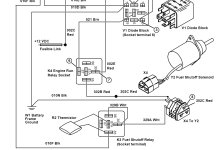
Now in the case of the tractor, we have a PTC fuse that drives the pull in solenoid on the fuel shut of solenoid (which really should be called the "fuel cut-off solenoids"). If that circuit is driven at the same time as the starter solenoid, once the tractor starts and the user releases the key from start/crank to run there is no power and the PTC cools down and is ready to go again on the next start. When you start cranking the pull in solenoid is engaged until the PTC fuse kicks in and drops the current down, and by that time the solenoid is engaged (the metal bar is pulled all the way into the solenoid) and the hold-in coil keeps it in place.

So if this is a brief time, and if the tractor wiring is rated correctly (as in it's 105 degree C wire) then for the brief time the outside of the PTC is hot there should be no problems. It's best if it's not pressing hard on any of the wiring if you can do it. That way if something goes wrong (like the starting relay has it's contacts weld shut), the hot PTC won't cause problems.

I have seen problems with both surface mount (not used here) and leaded (used here) parts in that you are depending on the outside case ("Grey Poupon" yellow in this case) to hold the leads in place while the fuse is in the melted plastic state. So I would avoid excessive stress on the leads by making sure the wires to them are not pulling on the case too much. The picture shown looks great. Note that if the parts shown in the picture are in the "blown and hot" state for a long periods of time they do change color and get a bit darker. Just another clue and piece of data to be used to help diagnose problems.

These parts are used in a huge number of devices these days. You get fuse protection without the pain of a user serviceable fuse. Alarm systems with batteries use them, battery chargers use them, any almost box that feeds power to something uses them.

I hope this long winded explanation helps. Knowledge is power :) (in this case, power to diagnose problems _and_ power from your diesel engine :thumbsup:).

Pete
 

Tractor & Equipment Auctions

2014 Dodge Charger Sedan (A59231)
2014 Dodge Charger...
LIKE NEW 2023 Rhino 84in Reverse Rotation Rotary Tiller (A56438)
LIKE NEW 2023...
Massey Ferguson 4710 (A60462)
Massey Ferguson...
2020 FREIGHTLINER CASCADIA TANDEM AXLE SLEEPER (A59905)
2020 FREIGHTLINER...
500 BBL FRAC TANK (A58214)
500 BBL FRAC TANK...
2013 Frieghtliner with Altec Bucket Model LR760 (A56438)
2013 Frieghtliner...
 
Top