2185 oil use WAY up this year

   / 2185 oil use WAY up this year #41  
Please let us know what you find when you get time to take it apart. I'm putting my money on valve guides worn/broken causing extra oil consumption which caused a ring(s) to stick with the extra carbon.
 
   / 2185 oil use WAY up this year #42  
Ford Tractor - Well I'm glad you're not tearing the carb off to get at the breather reed valve like you planned to do earlier in this thread. While that is a possiblity, it's not likely -- the breather is not a serviceable item.

Who knows, it could be a combination of both sticking rings and bad valve guide.

Regarding the valve guide, it can fail in different ways:
- wear: in which case the hole diameter enlarges out of spec
- crack: stays in the head, but has cracks down the side and also causing the hole diameter to enlarge.
- shatter (partly or wholly): It may shatter on the topside or the entire length (in which case it would fall out completely). The experience I had was with the top half shattering and I think some of the bottom half within the head.

Here's a pic of my 2004 Command head that failed. It illustrates both:
- the valve guide missing (left side which is the intake side) and
- the valve guide in place (right side which is the exhaust).

Depending on the year of the engine, Kohler had a rubbler grommet that sat on top/over the valve guide on the intake side only (circa 2004) and later on the added it to the exhaust side (late 2000s sometime). Not sure what was going in 1998... maybe just the intake or side or may be not at all.
 

Attachments

  • Cylinder head with & without valveguide.JPG
    Cylinder head with & without valveguide.JPG
    90 KB · Views: 183
   / 2185 oil use WAY up this year
  • Thread Starter
#43  
CJ,

That looks ugly! When I took the rocker arm cover off, it looked pristine in there.

Hawkeye,

That's an interesting theory. Will post pics after taking it apart. But, having a heated work area and a need to use the dern machine for now means it will get slipped off until later. Hope you can wait to find out!
 
   / 2185 oil use WAY up this year #44  
CJ,

That looks ugly! When I took the rocker arm cover off, it looked pristine in there.

The clean side of the head (left side) is the side that failed.
The burnt side (that you called ugly) did not fail (that's why the valve guides are still in tact).

If looks are a tell-all indication, then you're clean head has failed (since my clean side failed).

But if I were you, I wouldn't diagnose your engine by the existense of deposits on the topside of a head.
 
   / 2185 oil use WAY up this year #45  
Would it not be likely that the burnt side is the exhaust valve side and that the heat dissipated from the stem as well as the heated exhaust port has caused the discoloration ?
 
   / 2185 oil use WAY up this year #46  
Would it not be likely that the burnt side is the exhaust valve side and that the heat dissipated from the stem as well as the heated exhaust port has caused the discoloration ?

yes.. that would be my thinking too.
 
   / 2185 oil use WAY up this year
  • Thread Starter
#47  
Belated update -- due to procrastination.

I 
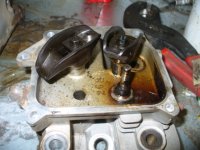
finally got a round to-it and removed & ripped the engine apart.

It was a blown head gasket. Guides were fine as i had hoped. Bores looked good with no top edge wear from the rings. In fact, there was still the final hone marks visible. (350 hours running) Valves and seats were good. The bad side had sucked in so much oil that it was pretty clean. Still stripped down the heads and cleaned them. It was hard to NOT diddle around removing casting flash from the ports. Dang, them habits are hard to suppress.

I did have some self induced trouble. The exhaust pipe was not coming out, so I removed the muffler. Naturally, the 3 studs that hold it in all snapped off.:mad: Then I find out that the part is No Longer Serviced :mad:. Did the old weld a bolt with the the head cut off trick and it's back in place.

There are also 4 bolts that hold the cowl and tin to the head next to the rocker arm covers. All 4 bolts snapped off there too! Grrrr:mad: I got 3 out with the thread in good shape. Have to find some more of those goofy metric fasteners now. (I hate the metric system)

Then I managed to get the lifters pumped up on one side so that when back together and tested compression, it was holding zero on the old 'good side'. Talk about a head scratcher. The side that was bad was good and the side that was good became bad. :confused2: Apparently while hand spinning the engine the oil pressure was enough to pump up the lifters. Then the valves were not allowed to drop and seal. I finally set the crank rotation so the valves were compressed and let it sit there overnight. That allowed the lifters to collapse and the valves to seat. Good to see the diagnostic skills are not totally atrophied.

The infamous Reed Valve was in good shape, but the breather tube was cracked and split in several places. Have a new one coming. Oddly enough, Ebay was the cheapest supplier.

Oh... when I pulled the "good" rocker arm cover (head #1 left side) there was a dowel and clips laying in there. Figured out that it was the pivot for the fuel pump. Only way I could get it back together was to take the fuel pump off . BIG MISTAKE. Stripped the thread in the plastic cover and tore the pump diaphram. CUB only wants to sell the whole rocker arm cover / fuel pump as an assembly for 100 smackers. Ouch. Being a cheap sob, I have a 25 buck electric fuel pump on the way. Should work with 3-7 psi and 14 gpm. Just switched out the plastic wide screws for longer bolts with nuts to hold the oil in and will have to wire the electric FP to the run side of the switch. Ahhhh yes, I must love making work for myself. Again, found the pump on ebay.

Just have to wait for a spare moment to drag that sucker over to the mower and drop it in place. I tell you what, 100# seems to weigh more every year for some odd reason. Stuff like this was sooooo much easier 20 years ago :laughing:.

With our unusually warm weather, I'll have to hurry as the first mowing is probably due in just 6-8 weeks. Well, that is hurrying for a procrastinator....:eek:
 
   / 2185 oil use WAY up this year
  • Thread Starter
#48  
I was able to get the engine in place. The drive shaft bolts are sure "fun" to line up! Glad I have the mirror on a stick to be able to see in there. The ebay sourced electric fuel pump came in and looked pretty good. Got it connected to a switched power line and it moves fuel just like you'd expect it to.

Today was also the day when the engine got cranked over and fired up for the first time (post rebuild). It cranked a short while and sort of wanted to but sort of didn't. Then i pulled the choke out :ashamed: and it started right up!

A bit of a rattle initially as it warmed up (it's 35 degrees) and some smoke off the parts I handled, but it smoothed out pretty quick. The idle is off some, but with the temps being so cold, I don't want to mess with it just yet.

Sadly the battery is on it's last legs. After charging it up, it only holds 11.8v. It's only 6 years old too. Dern cheap things. All in all a pretty good day.
 
   / 2185 oil use WAY up this year
  • Thread Starter
#49  
Quick update.


Have mowed with it for about 10 clock hours and the oil level is staying the same. Happy with that. Before the head gaskets it would use over a quart of engine oil every 1.5 to 2 hours. The battery seems to have come back to life with warmer temperatures too. Also happy with that!


From some reading I've done on the always 100% accurate internet :)laughing:) the older Kohler engines seem to be prone to blowing out head gaskets due to poor head bolts. Hopefully, the kit I used has newer stronger bolts!
 
   / 2185 oil use WAY up this year #50  
My 3235 Kohler Command 25 blew the right head gasket at only 311 hours. I found the new gaskets came with new head bolts. The old bolts were barely snug in some places which is probably why it blew. I found Tractor Supply Corp is a good place to find the metric screws & bolts used. I snapped off a few also and cleaned up the threads with a tap and installed new screws. I torqued down the heads but left all the shrouds off and then ran the engine till hot. I then retorqued them all again & was surprised how much more I was able to tighten them. I would guess that this wasn't done on the assembly line since blown gaskets seem to be quite common.

Bob B.
 

Tractor & Equipment Auctions

19200 (A50324)
19200 (A50324)
2018 CATERPILLAR 289D SKID STEER (A51242)
2018 CATERPILLAR...
2022 KUBOTA SVL75-2 SKID STEER (A51242)
2022 KUBOTA...
80in HD Tooth Bucket with Side Cutters ONE PER LOT (A52128)
80in HD Tooth...
E-Z Trail 680 Head Cart (A50514)
E-Z Trail 680 Head...
J and L Cargo Express Shadowmaster Enclosed Trailer (A52128)
J and L Cargo...
 
Top