PYO Clutch

   / PYO Clutch #52  
Ok. Then this is one of those tractors that was sold without a proper clutch adjustment. Experienced dealers have already discovered the hard way that it's wrong to assume these tractors come from the factory properly adjusted. The honest ones take care of that as part of the dealer-prep process.

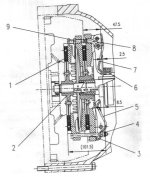
Remember those numbers I gave you are only representative, they're the ones I use when adjusting the 6-finger clutch on my TS354C. But there's more than one type of Chinese 6 finger clutchpack floating around out there, so it's important to use the right spec. Scour your Foton manual to make sure. I've uploaded a diagram of my 6-finger clutchpack so that you can get the 2.5mm and 8.5mm gaps in visual perspective.

If I were there to help you with this without knowing the actual Foton specs, here's how I'd go about it.
a. Use the clutch pull adjustment to move the TOB carrier rearward until #3 is 2.5mm (or whatever your Foton spec is)
b. loosen the jam nut and open the gap with #1 to match #3 (+/- 0.1mm
c. close the gap with #5 to match #3
Note: don't just go around once and think you're done with the main drive fingers. Because this design uses Belleville springs, any adjustment to one finger can affect the other two. You may have to go around several times to tweak them into the 2.5mm (+/- 0.1mm) spec.
d. if step (a) above was done accurately, PTO fingers #2 and #4 should already be at the requisite 8.5mm from the TOB face. If not, adjust fingers (not bearing) as required
e. open the gap with #6 to match #2 and #4
f. verify that 2, 4, and 6 are now all 8.5mm (+/- 0.1mm), tweak as required
g. tighten down all jam nuts

Unfortunately this is a stop-gap procedure. There's absolutely no way to confirm if these adjustments achieved the stack height spec (which should also be in your manual). It's a frustrating and time consuming procedure when attempted through the inspection window. I'm sure that - long before you're done - you'll come to realize why this procedure is best done with the tractor split.

And please understand - that I'm doing this completely by remote control. Given the potential differences between your 6 finger clutch and mine, there'll be no guarantees.

//greg//
 

Attachments

  • 6 finger 2 stage.jpg
    6 finger 2 stage.jpg
    37 KB · Views: 299
Last edited:
   / PYO Clutch
  • Thread Starter
#53  
Thanks Greg,

Sounds right, it probably didn't go through a dealer.

One more question, if I may, when I push the clutch down to the stop, shouldn't the aux fingers make contact? - because they don't.
 
   / PYO Clutch #54  
Well, disregard everything I said about adjusting those fingers. And it would have been real nice to know that up front, cuz it's sounding more and more like someone who didn't know what they were doing was in there with a wrench. If the PTO release fingers don't move, the PTO clutch never even gets disengaged. Ever. The only work around - and it doesn't always work - is to engage/disengage the PTO manually when the engine is not running. I don't actually know where that lever is on the Foton, I'm guessing maybe down behind your right heel.

Your clutchpack is more screwed up than I thought. to the point that I wonder how the tractor even moves at all. I don't see much alternative now to splitting the tractor and doing a full clutchpack alignment, starting with stack height. Note the 101.5mm figure in my clutch pack diagram, that's the stack height for mine. You've got to start all over with the correct stack height. If it's not correct from the git-go, no amount wrenching through the window is going to accurately recreate it.

//greg//
 
   / PYO Clutch
  • Thread Starter
#55  
Thanks Greg,

Yes the PTO disengage lever is on the right side behind the gearbox and disengages by pulling up.

The forward movement of the TOB and it appears much less than one would expect, only a few mm.

Checking the external arm to shaft interface shows slippage which may be the reason for the problem.


Fclutchdepressed.jpg


Fclutcharmrelaxed.jpg
 
   / PYO Clutch #56  
I don't see appreciable slippage in the photos, but perhaps I'm once again not interpreting your terminology correctly.What it sounds like to me is that your somebody fooled with the various adjustments so much, that there's no longer any tolerance between the PTO friction disc and the flywheel face.

When those PTO fingers are cranked down too much, they put too much pressure on the Belleville spring - which in turn "sandwiches" the friction disc with too great a force to be overcome by the pedal. Then the mistake was compounded by cranking the main drive fingers closer to the PTO fingers, and topped off by moving the bearing carrier as well. The whole thing sounds like a BLT that's been stepped on by a big boot.

It goes to stack height. I once again refer you to the diagram of my six finger clutch. To achieve that 101.5mm stack height, you adjust all six fingers in sequence to get there. But if it's screwed up to the point where the stack height is too tall, one or both of the clutches can't engage. There's not enough tension on the Bellevilles. If the stack height is too short, there's too much tension, the clutches won't release. But given the fact that stack height is measured between the main drive finger tips and the pressure plate, you can see why this is an adjustment that can't be accurately performed through the inspection window.

//greg//
 
   / PYO Clutch
  • Thread Starter
#57  
Thanks Greg,

If the problem is internal then I will just live with it.

I had a look at the crank to see if I could pull the pin out and found it was broken to pieces, allowing the slippage I noticed.

Fextclutchcrankandpin.jpg


When I think about it,

the broken shaft pin,
the missing split pin from the pedal end,
the missing stop screw, and
the pedal welded on the wrong way,

then it seems obvious that someone was messing with this, and perhaps welded the pedal the wrong way as a warning not to use it until it is repaired.

Anyway it can't hurt to get a new spring pin to lock the ext lever back in place.
 
   / PYO Clutch #58  
Anyway it can't hurt to get a new spring pin to lock the ext lever back in place.
Yup. and you may as well double-pin the thing while you're at it. If you're not familiar with that, buy two spring pins; #1 with the correct OD for the hole, #2 with the correct OD to install inside #1. Drive the first pin into the hole, drive the second pin through the first pin.

FYI, the clutch fork is likely pinned like that too. Quite a few Jinma 200 series owners suffer breakage of that pin too. Since your main clutch is stated to move the tractor through the gears ok, that suggests yours is still intact. But if/when you split to the tractor to get your PTO clutch working, it would a good idea to put fresh pin(s) in there too (along with new throwout and pilot bearings).

//greg//
 
   / PYO Clutch
  • Thread Starter
#59  
The clutch she is fixed :eek:
 
   / PYO Clutch #60  
Amazing, isn't it, how a fraction of a millimeter of movement at the pivot point of an arm can have so much effect at the other end? Your photo of the arm looked like there was maybe a degree or two of movement on the shaft but that translates to a lot at the end of the arm.

Glad you got it fixed! DId that fix both the main clutch and the PTO clutch?

Rich
 

Tractor & Equipment Auctions

(2) UNUSED Metal Garden Arbor Trellis (A53117)
(2) UNUSED Metal...
2009 Pierce 105ft. Ladder Fire Truck (A53422)
2009 Pierce 105ft...
1990 LOAD KING BELLY DUMP (A53843)
1990 LOAD KING...
1998 National RV Tropi-Cal T/A 35FT Class A Motorhome (A51694)
1998 National RV...
1996 Timpte 46ft Hopper (A53473)
1996 Timpte 46ft...
2016 KBH Fertilizer Tender Trailer - Isuzu Diesel, Hydraulic System, Rear Discharge (A53473)
2016 KBH...
 
Top