Spike-MI
New member
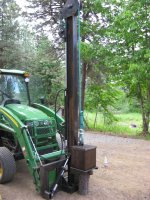
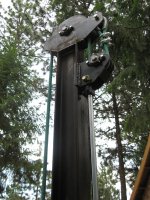
Okay, so I am cheap (and poor). I could not afford to buy a Vector Post Driver. The best price I could come up with was over $5k plus freight, ouch. So, I built one. As you will see by the photos, I modified Vector's loader-mount model. Theirs uses an offset design, which admittedly is better than mine, but very hard on the loader in my opinion. The big advantage of the offset is that you can drive right down the fence line. With my design the pounder is centered on the loader, so you have to square up to each post; you can't just drive down the line.
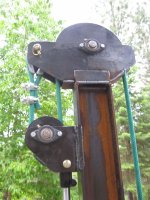
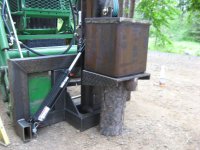
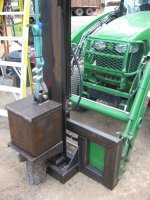
I designed the pounder with a 500lb weight and drop of 6'. The "as built" unit came out with a 530lb weight, and 68" of drop. Close enough. It has a 3/4" AR500 independent post cap that travels independent of the weight on the main mast. I also designed a tilt cylinder to adjust for changes in grade, with the hope I can actually drive the posts somewhat plumb.
By now you are probably wondering why I built one this large. Well, I have a fair amount of cattle fencing to do and I want to use railroad ties. This should easily develop enough force to drive a railroad tie blunt.
So, I am not posting to brag, but because my hyraulic design is not working and I need some expertise from you fellas. The system uses a 2" bore x 36" stoke 2500psi cylinder. It is set up as a single acting cylinder, kind of... The pressure line is used to retract the cylinder, which pulls down on block, which retracts the rope, and raises the weight. Once it reaches the top, I throw my auxillary valve in float and down goes the weight, VERY SLOWLY. It doesn't fall with gravity like I expected. I believe that I failed to consider is the rate at which the hydraulic flow is restricted as it pushed back to my tractor's main reservior. There must be enough restriction that the weight (all 530lbs of it) drops at about the same rate that it raises with the tractor at idle. However, even at that speed you don't want anything between the weight and the post cap plate because it sounds like hitting something with a 500lb sledge hammer. Just FYI I am using my factory front 3rd valve to run the pounder. It is plumbed from the rear of the tractor with 3/8" hard lines, and has 1/4" standard quick couplers on the loader. I ran a 3/8" flex hydraulic line with a 1/4" reducing quick coupler.
So my question to you much more skilled hydraulic TBN-er's is what is the easiest, cheapest fix to make this thing slam down like the Vector guys' post pounders do?
Here is a YouTube link to their mini excavator mount model in action: http://www.youtube.com/watch?v=pWnZvijS5nE&playnext=1&list=PL71AD198E95ECC30B
Look forward to your advice. Spike, now in Idaho not Michigan (but my heart's still there!)