16LA Loader Support Leg

   / 16LA Loader Support Leg #11  
I've added some photos just for discussion. The last photo is probably the most critical for ensuring the leg is not damaged. When you bring the arms down to relieve pressure on the pins for removal, you need to use the front lip of the bucket rather than keep your bucket curled all the way up. Using the front lip down will ensure the leg doesn't get overstressed in this step. Also, if you remove the loader with only the quick attach plate installed, you can extend it all the way out to keep from bending the leg while putting down pressure to pull the pins.

BTW: Ignore the post hole diggers in the photo. I was using them to demonstrate that the loader won't move around in another discussion.
Jim, I used your previously posted step by step 16LA removal tutorial and in conjunction with my 16LA manual, the detachment went smooth. I keep your verbal instructions with photos in my NH file. Why don't you re-post that here again?
I would like to add that anyone doing this with any combination of tractor and loader especially for the first time, GO SLOW and all will be well.
 
   / 16LA Loader Support Leg
  • Thread Starter
#13  
After looking at the photos jinman posted, I think the original leg design should work without a redesign. Where my stand is damaged I can just add some material. Thanks for the photos Jim.
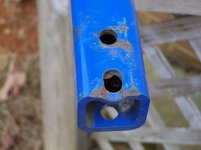
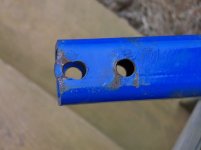
This is the present condition of the leg. I intend on inserting a section of 1 1/4 heavy wall sq. tubing inside, welding it in and drilling new holes. It looks like a press fit. The original tube is a little distorted, so it's kinda hard to tell. I'll keep you posted.

Loader repair 001.jpg

Loader repair 002.jpg

Bill
 
   / 16LA Loader Support Leg #14  
After looking at the photos jinman posted, I think the original leg design should work without a redesign. Where my stand is damaged I can just add some material. Thanks for the photos Jim.
This is the present condition of the leg. I intend on inserting a section of 1 1/4 heavy wall sq. tubing inside, welding it in and drilling new holes. It looks like a press fit. The original tube is a little distorted, so it's kinda hard to tell. I'll keep you posted.

View attachment 245525

View attachment 245526

Bill
Bill,
Looking forward to seeing the photos of your modifications but Pleeeze, shrink your photos down to about 700x525 for the benifit of those of us folks who can only recieve dinosaur dial-up or we will have to wait forever to see your good work.:)
 
   / 16LA Loader Support Leg #15  
Someone put a little bit of stress on that hole!

Yikes

Your fix sounds good. Good luck.

Chris
 
   / 16LA Loader Support Leg
  • Thread Starter
#16  
Bill,
Looking forward to seeing the photos of your modifications but Pleeeze, shrink your photos down to about 700x525 for the benifit of those of us folks who can only recieve dinosaur dial-up or we will have to wait forever to see your good work.:)

Sorry about that.:ashamed: I will try to shrink them, not really sure how, but I'll try.
I don't get along too well with computers. One of those old fart syndrome things, I guess.
Will washing the photos in real hot water, then throwing them in the dryer work?:confused3:
 
   / 16LA Loader Support Leg #17  
Bill, that looks like an accident waiting to happen. You are a wise man to protect yourself and your equipment by fixing that tube or replacing it altogether.:thumbsup:
 
   / 16LA Loader Support Leg
  • Thread Starter
#18  
Well I did my best to shrink the photos. I think they should be OK.
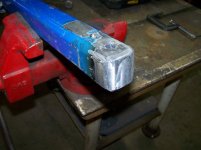
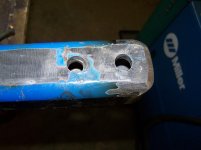
I was able to insert a eight inch piece of square tubing into the support leg. This made the material about twice as thick as it was originally.I also welded a 3/8 inch plate on the open end of the tube as well as welding the ends of the tubes together. The elongated pivot hole was returned to shape by welding then drilling it out to 9/16 to fit the new, larger diameter pivot bolt.The pivot hole attached to the loader arm was also enlarged to fit. Before inserting the inner tube I drilled a 3/8 hole in the outer tube about 6 in. from the end, in order to weld that end in place. A little clean up and some NH blue paint and we should be good to go.
I don't think that this was the best way to support the loader. Two stands, one on each arm, would be better, but I think it should work OK. It is stronger than the original design.
Jinmans' stand looks like it's holding up fine, I think mine should too.

Loader repair 006.JPG

Loader repair 007.JPG

Bill:)
 
   / 16LA Loader Support Leg #19  
Bill, that's probably the way the support should have been made initially so that the end of the tube didn't collapse and warp. However, considering the ears on the loader arm, if the tube didn't flex some, the ears would surely bend, twist, or maybe break. The stand is made for holding a loader and very little side movement or bumping of the loader. I think it's a "good enough" stand even though it could have been better (translated: more expensive). It it were two legs, it would provide better support, but probably nothing is foolproof. Your tractor's previous owner is its main problem.
 
   / 16LA Loader Support Leg #20  
The Bushhog loader on my old Kubota had two legs. I liked that better. They were sturdier than this mount, on a loader 1/2 the size.

But, this same kickstand on the NH 17LA has worked fine; I have had the loader off the TC40D a number of times.

It it were two legs, it would provide better support, but probably nothing is foolproof. Your tractor's previous owner is its main problem.
 

Tractor & Equipment Auctions

UNUSED GREAT BEAR 1.5CY SELF DUMPING HOPPER (A51248)
UNUSED GREAT BEAR...
CATALOG UPDATES LOT IDENTIFIER 5 (A53084)
CATALOG UPDATES...
2008 Ford Escape XLT SUV (A51694)
2008 Ford Escape...
2012 TROXELL COMPANY  130 BBL VACUUM TRAILER (A52472)
2012 TROXELL...
1993 Ford F700 Stakebody Flatbed Truck (A51692)
1993 Ford F700...
2020 FREIGHTLINER CASCADIA 126 TANDEM AXLE SLEEPER TRUCK (A52141)
2020 FREIGHTLINER...
 
Top