Greasing 2320 driveshaft

   / Greasing 2320 driveshaft #1  

Phunge

Silver Member
Joined
Apr 11, 2007
Messages
108
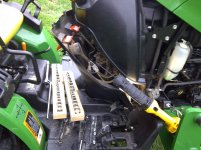
This is the easiest way I have found to grease the dreaded 2320 driveshaft that connects the engine to the transmission.

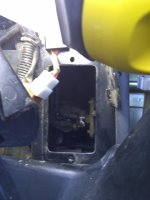
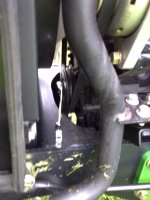
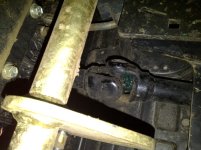
After removing 8 or 10 screws and loosening the throttle bolt, I am able to seperate the top and botton dash components enough that I can move the lower panel out of the way and expose/remove the service hatch on the right hand side. Using a wrench to turn the crank, I was able to get the grease gun onto that nipple. The rear U-Joint is accessible from underneath the tractor.

Anyone found an easier way?
 

Attachments

  • IMG-20110529-00016.jpg
    IMG-20110529-00016.jpg
    155.1 KB · Views: 2,706
  • Hamilton 2-20110529-00018.jpg
    Hamilton 2-20110529-00018.jpg
    591.3 KB · Views: 2,712
  • Hamilton 2-20110529-00019.jpg
    Hamilton 2-20110529-00019.jpg
    776.2 KB · Views: 2,380
  • Hamilton 2-20110529-00020.jpg
    Hamilton 2-20110529-00020.jpg
    152.5 KB · Views: 2,659
   / Greasing 2320 driveshaft #2  
Thanks for posting this for everyone to see. This is one reason why I immediately moved my self up in the chain to the 25/2720's
 
   / Greasing 2320 driveshaft #3  
Plunge, Thanks for posting the pictures and the method you used to grease the u-joint. I purchased a 2320 in December of 2011 and have wanted to check out your method. Yesterday was a nice day so I gained access to and remove the cover plate. I found I could get a grease gun on the zerk using a rubber hose extension. It worked great!
Thanks again for the post.
 
   / Greasing 2320 driveshaft #4  
Hope the grease is in the joint as it looks like it is around the joint. ;)
Appears to be a lot of work to get at that joint so hope all will be fine.
 
   / Greasing 2320 driveshaft
  • Thread Starter
#5  
Hope the grease is in the joint as it looks like it is around the joint. ;)
Appears to be a lot of work to get at that joint so hope all will be fine.

Yeah :) -- first try made a mess, second try got grease in there.
 
   / Greasing 2320 driveshaft #7  
This is the same method I used last year and it worked pretty well. I used a needle tip, and also recommend adding an extra hose to the grease gun. The extra hose works well for greasing almost everything else as well - especially pickup trucks:thumbsup:.
 
   / Greasing 2320 driveshaft #8  
I cut a door in the plastic so I could get to the access plate.
If you do this becareful of the wires on the back of the plastic.
I'll try to attach photo.JD 2320 Driveshaft Access Door1.jpg
 
   / Greasing 2320 driveshaft #9  
I cut a door in the plastic so I could get to the access plate.
If you do this becareful of the wires on the back of the plastic.
I'll try to attach photo.View attachment 258884

Looks good! That will save a lot of time. I may do the same. Did you replace the bolts also?

VP
 
   / Greasing 2320 driveshaft #10  
Thanks Texas42

I might try the same thing. I curse my machine all the time when it comes time to grease. Hopefully this will help :)

Thanks,
BILL
 
   / Greasing 2320 driveshaft
  • Thread Starter
#11  
I was thinking about doing the same, make it much easier to get at it.
 
   / Greasing 2320 driveshaft #12  
Did nothing to the access cover. Bolts are what was there.
Just cut out plastic so I could get to bolts.
Also, bought a grese gun end at Auto Zone that was a little smaller diameter than regular - that also helps
 
   / Greasing 2320 driveshaft #13  
Not to be too redundant here but since I used everyone's advice when greasing this fitting I figured I would post my experience. I only loosened the top and lower dashboard by removing the estimated 9 bolts to gain access to the hidden panel. I tried using the workforce 6 inch push on coupler - quick connect to grease the fitting but found that the 3 inch straight needlepoint coupler - quick connect worked easier for me. The whole ordeal to grease just this one fitting took about 20 minutes. I will say that I had my father helping. The picture, if attached, is of the needlepoint coupler that I used. It was purchased at Tractor Supply. Hope this information is useful to someone else. Thanks guys.
 

Attachments

  • needlepoint.jpg
    needlepoint.jpg
    1.7 KB · Views: 558
   / Greasing 2320 driveshaft #14  
Not to be too redundant here but since I used everyone's advice when greasing this fitting I figured I would post my experience. I only loosened the top and lower dashboard by removing the estimated 9 bolts to gain access to the hidden panel. I tried using the workforce 6 inch push on coupler - quick connect to grease the fitting but found that the 3 inch straight needlepoint coupler - quick connect worked easier for me. The whole ordeal to grease just this one fitting took about 20 minutes. I will say that I had my father helping. The picture, if attached, is of the needlepoint coupler that I used. It was purchased at Tractor Supply. Hope this information is useful to someone else. Thanks guys.

I think that is the same one I used, I had to put a little bend in it though. And yes I think you only have to remove the 10 bolts for the upper and lower plastic housings.

VP
 
   / Greasing 2320 driveshaft #15  
I'm not sure what all the fuss is about. I remove my mower deck, slide under the tractor, sometimes several times after moving the tractor back and forth to align the driveshaft just right, then I reach up with a regular old grease gun from tractor supply and give it a few pumps. If you are physically able to crawl under your tractor this shouldn't take more than 2 minutes after the mower deck is removed.
 
   / Greasing 2320 driveshaft #16  
I'm not sure what all the fuss is about. I remove my mower deck, slide under the tractor, sometimes several times after moving the tractor back and forth to align the driveshaft just right, then I reach up with a regular old grease gun from tractor supply and give it a few pumps. If you are physically able to crawl under your tractor this shouldn't take more than 2 minutes after the mower deck is removed.

if you can get both from below count yourself lucky! On mine the zerk on the front joint is NOT accessible from below. the zerk is on the front side of the cross and doesn't line up with the lower access hole on the bottom. I can't even see the zerk from below.
 
   / Greasing 2320 driveshaft #17  
I cut a door in the plastic so I could get to the access plate.
If you do this becareful of the wires on the back of the plastic.
I'll try to attach photo.View attachment 258884

Well I greased that shaft this past weekend. Here is my observations.

Rear u joint: It is accessible from underneath. You can rotate the shaft by grasping the harmonic balancer at the back of the engine.(turns stiffly but it does turn). Once the drive shaft was lines up so I could see the nipple, I just had to adjust the nipple a bit in the u-joint cross so it would allow the grease gun on. I used a pry bar to line this up. Make sure the grease come out of the four caps. Mine was 268hrs and supper dry.

Front joint: NO NEED TO DRILL ANYTHING(really guys it's a Deere, no hill billy stuff PLEASE!). Remove the throttle level, one bolt, than two more bolt on either side of the upper dash, now its as loose as it needs to be. Remove the 6 or so bolts that hold the lower dash, remove the two cotter pins that hold the cruise control and park brake levers. Voila the lower dash comes right out! Now you can see the famous side access panel, remove it. now you can see the drive shaft again. You can access from the panel if you so choose or go from the center of the floor board(I found this easier). I bet things would be smoother with needle a adapter for the grease gun, I didn't have one.

Extra thoughts: The first time will take an hour or so, but the second time can be done in 15 minutes. The worst part is actually getting the grease gun on the fitting as those u-joints are so small.

Good luck, (not as bad as it sounds but there is a lack of engineering!!)
 
   / Greasing 2320 driveshaft #18  
I finally cut access in the plastic cover. It is so much better this way. John Deere needs to do this and stop torturing its customers.
 
   / Greasing 2320 driveshaft #19  
I followed the pictures and direction given by Plunge and they were a big help. It took longer the first time but after that, it goes quite fast. His advice was head and shoulders above anything I got from John Deere. It would be nice if the designers actually had to perform the maintenance on the machine. I think they would provide access holes and plate that would be easier to use.
 
   / Greasing 2320 driveshaft #20  
i get really angry every time I pull my mower deck! During summer I maybe pull the mower out bi-weekly or so to clean, sharpen and lube. And every time I lube the u-joints on the mower deck drive shaft I think about the engine to tranny shaft that is the same size that I can't get at. And I think about how after about 500 hours on the mower the driveshaft u-joints seem tight and new. Meanwhile the main tractor driveshaft that I neglected for lack of access had u-joint failure at 700 hours. If only I coulda lubed that thing I woulnd't have had to spend all those joyful hours in a heat wave repairing that driveshaft. So now at 750 hours am wishing I could lube it. My 2210 seems different from others, I am sure I've seen a post where someone removed the "service plug" on the left console and was able to see the ujoint? I open that plug and I see the driveshaft, but not the ujoint. I am thinking this is the weekend to remove the console cover and devise a way to create access with a larger service port or something! anything! Meanwhile I cannot even see the rear ujoint from ANY angle on this machine!!! A strategic hole may appear in the rear platform area!!
 

Tractor & Equipment Auctions

2015 VERMEER PD10 PILE DRIVER (A60429)
2015 VERMEER PD10...
2013 ORTEQ ENERGY GN182 GOOSENECK HOSE TRAILER (A58214)
2013 ORTEQ ENERGY...
2015 FREIGHTLINER CASCADIA TANDEM AXLE SLEEPER (A59904)
2015 FREIGHTLINER...
HAMM H11 PADFOOT ROLLER (A58214)
HAMM H11 PADFOOT...
2016 DRAGON SAND CONVEYOR (A58216)
2016 DRAGON SAND...
Brock 48'x16' Flat Bottom Grain Storage Tank (A57148)
Brock 48'x16' Flat...
 
Top