ovrszd
Epic Contributor
- Joined
- May 27, 2006
- Messages
- 33,724
- Location
- Missouri
- Tractor
- Kubota M9540, Ford 3910FWD, Ford 555A, JD2210
I decided to add the PTO conversion to my M9540 so I contacted Messick's and ordered the kit. The cost was $1156 plus sales tax and they shipped it free. Surprisingly, it arrived on a pallet. Didn't think about it being that big.

Here's what you get.

From start, which was driving the tractor up on blocks, to finish which was driving the tractor off the blocks, it took me one hour and twenty minutes. Fifteen minutes of that was spent draining and refilling oil. So the mechanical part of the install was an hour. I check twice and do once so that time could be cut in half by someone better organized than me.
There's nothing technical about this install and no requirement for special tools. A 17mm socket removes all the bolts and nuts holding the case on. 13mm wrench removes and installs the PTO covers. A pair of vise-grips removes and installs the two studs in the tractor housing. A gasket scraper cleans the mounting surface. Tube of silicone sealer for a gasket. Pair of pliers to remove the snap ring and change PTO shafts. Pretty simple. Draining and filling the oil is the worst part to me.
Surprisingly, again, the gear box is assembled. That simplified this install tremendously. I thought I would have to put it all together. The instructions also included directions in assembly of the gear box. They must have figured the average Joe Tractor Owner couldn't figure it out. Inside this assembled gear box are all the mechanisms to allow PTO speed changes simply by swapping the output shafts.


They also included a new drawbar. The instructions say the new longer bar is needed to maintain the proper horizontal distance between the PTO shaft and the hitch pin hole in the drawbar. This is because the new gearbox moves the PTO shaft rearward about two inches.

To begin with the transmission/hydraulic fluid must be drained. This is a PITA because it holds 16 gallons of oil. A real pain to drain into 5 gallon buckets. I backed the rear tires of the tractor up onto 6" blocks and then let the air out of the front tires to tilt the tractor forward as much as possible. I then drained out of the side mounted drain plug. I removed all the oil that would drain out of that plug which was around 12 gallons. In hindsight I think 10 gallons would have been enough to let me remove the rear cover without losing fluid on the floor. After the fluid was drained I removed the PTO shaft cover and then the 8 bolts and 2 stud nuts that hold the rear PTO cover on. I used a small pry bar to break the seal and allow me to pull the cover off. The PTO shaft and propeller shaft come off with the cover.


Once the rear cover is removed you looking into the bowels of the beast, literally. In these pictures you can see the diff lock collar and shifting fork on the left side. When you step on the diff lock pedal you move the collar to the right. The four pins in the collar engage the left side spider gear to the ring gear carrier which essentially makes both wheels spin together. When you release the pedal and force is removed, the collar is pushed back to the unlock position by springs. Anyone who has had a colonoscopy can relate to these pictures....")


Here are some comparisons of the mechanism that's removed and the dual speed mechanism that is installed.


Because the gearbox is thicker due to having two sets of gears, the propeller shaft has to be replaced with the new shorter shaft. They tried to put all of the additional thickness inside the tractor housing that they could. Couldn't move it any farther forward because it would hit the ring gear.

I'm an instruction reading freak. I spent fifteen minutes going over and over the four pages of instructions before I started. This saved me a considerable amount of unnecessary work. For example, the first page of instructions goes thru the process of changing out the pins that hold the lower end of the 3pt lift cylinders. Then the last sentence of that page says "if tractor is equipped with 3pt assist lift cylinders previously, disregard all instructions above". Not sure what that's all about. But the pins DO NOT need to be changed.
The instructions also talk about the two straight pins that are between the tractor case and the PTO gearbox. It says to install those pins into the gearbox case before installation. My pins stayed in the tractor housing and I left them there. The bag of hardware that came with the kit only had one pin so good thing mine were reuseable. There are also two studs, one on each side, about halfway up. The factory studs have to be removed and the new longer studs installed that are provided. So when you are ready to install you have two studs, one on each side, and two pins, one lower left corner and one upper right corner sticking out of the tractor housing. The long studs make the install a lot easier. It's a place to hang the gearbox on without getting against the sealing surface and smearing all the sealer off.
There is no gasket involved in this install. The instructions say to use sylicone sealer which I did. I use the red type. It is heat resistant. Not sure it's needed in this application but it's what I use on everything. I have better luck with it than the blue type. I didn't take any photos of this process but I put a liberally large bead of sealer on the tractor housing, surrounding all the bolt holes and pins.
The gearbox assembly weighs somewhere around 50lbs. As I said above, the studs make this a lot easier. Once on the studs I pushed it against the short pins. I couldn't push the gearbox all the way against the tractor housing because the pins fit the holes so tight. I had to gently use the bolts to draw it all together. I turn of the bolt on one side, then a turn of the bolt on the other side until I had it tight together. Sealer squished out everywhere, which gave me a good feeling knowing I had a tight seal. There are 8 bolts and two studs with nuts holding the gearbox on.
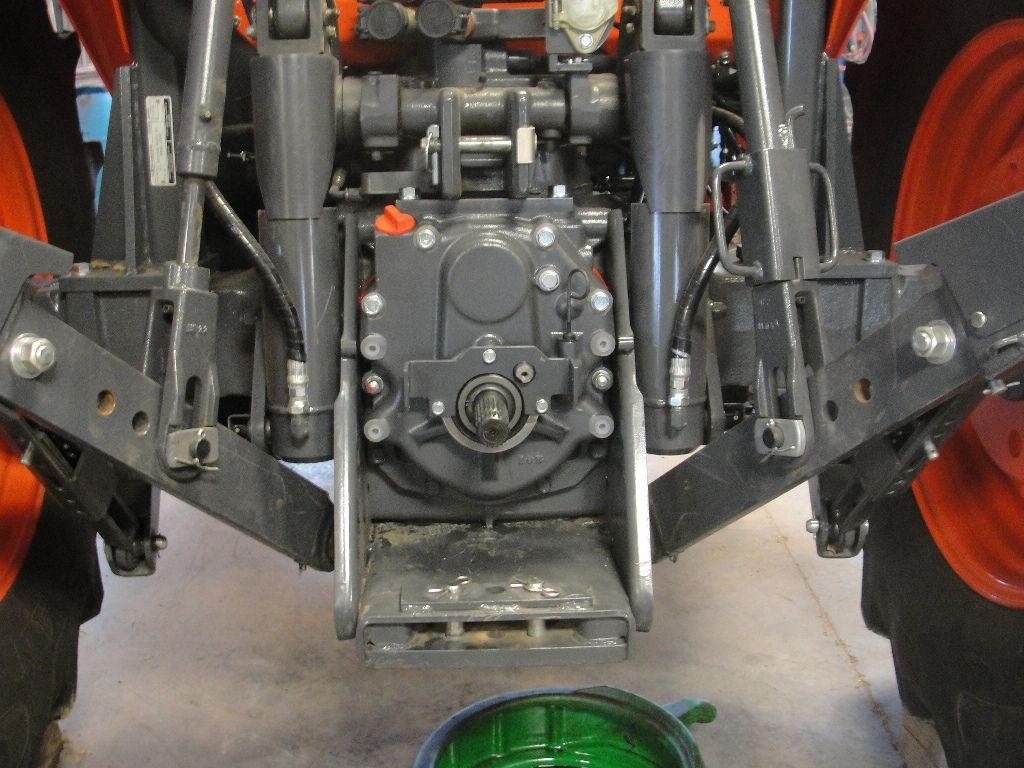
I tried to take a couple photos of the difference in appearance before and after this conversion. You'll notice it moved everything farther rearward. You also have to use a different PTO cover that is provided.


In the end I had some pieces left over from the kit. Basically the lift cylinder pins and their hardware. Plus all the old parts that were removed and/or not reused. When the weather warms a bit I'll hitch up my recently acquired 1000 rpm brush cutter and try it out. :thumbsup:

Here's what you get.
From start, which was driving the tractor up on blocks, to finish which was driving the tractor off the blocks, it took me one hour and twenty minutes. Fifteen minutes of that was spent draining and refilling oil. So the mechanical part of the install was an hour. I check twice and do once so that time could be cut in half by someone better organized than me.
There's nothing technical about this install and no requirement for special tools. A 17mm socket removes all the bolts and nuts holding the case on. 13mm wrench removes and installs the PTO covers. A pair of vise-grips removes and installs the two studs in the tractor housing. A gasket scraper cleans the mounting surface. Tube of silicone sealer for a gasket. Pair of pliers to remove the snap ring and change PTO shafts. Pretty simple. Draining and filling the oil is the worst part to me.
Surprisingly, again, the gear box is assembled. That simplified this install tremendously. I thought I would have to put it all together. The instructions also included directions in assembly of the gear box. They must have figured the average Joe Tractor Owner couldn't figure it out. Inside this assembled gear box are all the mechanisms to allow PTO speed changes simply by swapping the output shafts.
They also included a new drawbar. The instructions say the new longer bar is needed to maintain the proper horizontal distance between the PTO shaft and the hitch pin hole in the drawbar. This is because the new gearbox moves the PTO shaft rearward about two inches.
To begin with the transmission/hydraulic fluid must be drained. This is a PITA because it holds 16 gallons of oil. A real pain to drain into 5 gallon buckets. I backed the rear tires of the tractor up onto 6" blocks and then let the air out of the front tires to tilt the tractor forward as much as possible. I then drained out of the side mounted drain plug. I removed all the oil that would drain out of that plug which was around 12 gallons. In hindsight I think 10 gallons would have been enough to let me remove the rear cover without losing fluid on the floor. After the fluid was drained I removed the PTO shaft cover and then the 8 bolts and 2 stud nuts that hold the rear PTO cover on. I used a small pry bar to break the seal and allow me to pull the cover off. The PTO shaft and propeller shaft come off with the cover.
Once the rear cover is removed you looking into the bowels of the beast, literally. In these pictures you can see the diff lock collar and shifting fork on the left side. When you step on the diff lock pedal you move the collar to the right. The four pins in the collar engage the left side spider gear to the ring gear carrier which essentially makes both wheels spin together. When you release the pedal and force is removed, the collar is pushed back to the unlock position by springs. Anyone who has had a colonoscopy can relate to these pictures....
Here are some comparisons of the mechanism that's removed and the dual speed mechanism that is installed.
Because the gearbox is thicker due to having two sets of gears, the propeller shaft has to be replaced with the new shorter shaft. They tried to put all of the additional thickness inside the tractor housing that they could. Couldn't move it any farther forward because it would hit the ring gear.
I'm an instruction reading freak. I spent fifteen minutes going over and over the four pages of instructions before I started. This saved me a considerable amount of unnecessary work. For example, the first page of instructions goes thru the process of changing out the pins that hold the lower end of the 3pt lift cylinders. Then the last sentence of that page says "if tractor is equipped with 3pt assist lift cylinders previously, disregard all instructions above". Not sure what that's all about. But the pins DO NOT need to be changed.
The instructions also talk about the two straight pins that are between the tractor case and the PTO gearbox. It says to install those pins into the gearbox case before installation. My pins stayed in the tractor housing and I left them there. The bag of hardware that came with the kit only had one pin so good thing mine were reuseable. There are also two studs, one on each side, about halfway up. The factory studs have to be removed and the new longer studs installed that are provided. So when you are ready to install you have two studs, one on each side, and two pins, one lower left corner and one upper right corner sticking out of the tractor housing. The long studs make the install a lot easier. It's a place to hang the gearbox on without getting against the sealing surface and smearing all the sealer off.
There is no gasket involved in this install. The instructions say to use sylicone sealer which I did. I use the red type. It is heat resistant. Not sure it's needed in this application but it's what I use on everything. I have better luck with it than the blue type. I didn't take any photos of this process but I put a liberally large bead of sealer on the tractor housing, surrounding all the bolt holes and pins.
The gearbox assembly weighs somewhere around 50lbs. As I said above, the studs make this a lot easier. Once on the studs I pushed it against the short pins. I couldn't push the gearbox all the way against the tractor housing because the pins fit the holes so tight. I had to gently use the bolts to draw it all together. I turn of the bolt on one side, then a turn of the bolt on the other side until I had it tight together. Sealer squished out everywhere, which gave me a good feeling knowing I had a tight seal. There are 8 bolts and two studs with nuts holding the gearbox on.
I tried to take a couple photos of the difference in appearance before and after this conversion. You'll notice it moved everything farther rearward. You also have to use a different PTO cover that is provided.
In the end I had some pieces left over from the kit. Basically the lift cylinder pins and their hardware. Plus all the old parts that were removed and/or not reused. When the weather warms a bit I'll hitch up my recently acquired 1000 rpm brush cutter and try it out. :thumbsup: