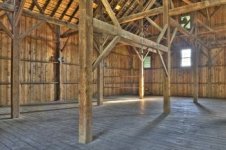
Thanks Terry, very good information. I've got it stabilized now with support from the outside and inside which you can see from the pics which like you said I'll remove as I need to when adding trusses and finishing outside. I'm glad to know that it should stabilize as I go. The 2x6's are a great idea. I have 20 foot 8 inch cedar poles called tier poles from the tobacco barns and also might use those. They are solid and I have over 50 of them. These of course I'd use for the cross members at the corners.
Is there any reason I should use the cross members along the walls as well in addition to just the corners?
And, any reason to sheet the outside with plywood/OSB first for extra strength vs just sheeting with the metal?
I just got a good look at the photo...NICE WORK, young Padawan...I wish I had such a wonderful source of salvaged materials..! Fine wood and history....all in one...
Cross Members - Heavier thickness steel sheeting often does not need this embellishment AND you can put it in AFTER you install the steel, if you feel the wall is not flat enough....
I am not sure how to properly utilize the round stock...but an additional 2x6 nailed perpendicularly to the top of a few equally spaced girts is known as a "strongback"...this will help flatten your walls and provide a bit more resistance to deflection of the steel in high winds...a good idea if you are using shallow rib (the old fashioned corrugated), thin material or salvaged materials for sheeting.
Run a stringline down your wall or just eyeball it and see how far out your girts have warped...a good straight strongback will flatten some pretty messy girts...screw the ends of the strongback to the girt and you can even shim if needed to flatten the run...about 4' between strongbacks is a lot of reinforcement...
Plywood Underlayment - One of the WORST things you can do is lay untreated plywood or OSB under your steel....condensation will invariably form between the materials, and your plywood will rot out in no time at all, leaving the steel unsupported....attach your steel directly to the structure with a good quality neoprene washer screw...be SURE to use the right screw for wood, one sporting an aggressive woodscrew thread...the expense of locating self-tapping wood screws is a waste....most of the folks I see building long-houses like chicken sheds just whack the butt of their screwgun to get things going...
On more demanding work, where a "doily" of scratches from a bad start would have to be touched up with paint, use chalklines to line up the fasteners and make pilot holes for every fastener...I put a point on a 1/8" pin punch and tap it into the steel for a starter hole...even self tappers need at least a dimple to get a start in if you don't want the occasional doily...
Wood Treatments - OH MY...I just read about your untreated oak poles...WELL...treated
IS better....no question there...but salvaged materials are the BEST...
....listen to the old fartz in your area...and count how many tobacco sheds built with such poles are still standing and HOW OLD they are before you get all in a lather...
"Timbor" is a wonderful product, but you wanted to treat the post with that before embedment...HOWEVER...and alternative utilizes one of the main ingredients of Timbor...borates...and good old laundry borax is an excellent source...
Borates are a human and animal safe wood treatment that can be applied at any time, is resistant to insects and microorganisms and is considered relatively neutral environmentally...."google" it...boron in the form of borate salts is quite common...think "Death Valley" and dry lakes here...
Using the biggest stainless steel cauldron you can find, mix the borax (with a wood paddle) into almost boiling water until no more will dissolve...while the mix cools, dig a shallow trench around the soil-line of your test pole to contain the solution....your objective is to slowly saturate the soil around the pole... then pour the borax mix slowly around the pole...several gallons each is required...depending on how porous your soil is, the liquid will saturate "X" amount of dirt as it percolates down....treat one pole and then, after a day of drying time, dig a post hole down the side of your test-pole and see how far you got...repeat as needed...
The borax will remain in the soil for a very long time, and you can even bury some granular product in the ditch you dug at the top if you like...rainwater will perc down thru it and replenish the "treatment" in the top few inches at least...the borax will come out of solution and remain in the soil for as long as you might care to have a pole barn...
The main caveat to the use of this potion is...it kills all vegetation and will continue to do so for DECADES...so be careful of where you put it...
I have used this method to treat existing wood products in sheds fences and houses and use the laundry powder as a chemical "death strip" around the slabs of several houses down here in termite / ant / roach country...no grass will grow along the slab...keeping any termite tunnels easily visible...and no ants have attempted to tunnel thru the treated soil...
The powdered borax also goes into our cabinets, puffed along the corners and edges with an old ketchup bottle...and goes into the wall cavities during repairs or additions...with all the roaches around our neighborhood, the only time we see any of the small German variety is when we bring them in in cardboard or paper grocery packaging...and even the large ones, AKA "palmetto bugs", die within days of entering the house...
For such large building as yours, you may want to get your borax from a commercial laundry supply in drums...purchasing it by-the-box from Wallyworld can get a bit pricey...
Anyway...you are a natural builder, Brother...so like the man said...."Keep Calm and Carry On"...
...I say...
BE CAREFUL OUT THERE...
Terry