Building a stick frame house in the woods in 90 days

   / Building a stick frame house in the woods in 90 days #811  
Pacerron, Thanks for the illistrations, and explanation, you explained this better than I attempted to do.

Dave
 
   / Building a stick frame house in the woods in 90 days #812  
Ron,

Didn't mean to ruffle your feathers but when you have been doing roofing/siding/ trim for 30 years and someone posts that you don't know what part of the roof you are looking at my feathers get ruffled. Lol
Agree with most of your points, disagree with some. Enough said.
Didn't look close enough at pic of sheathing hanging over a bit. Needs to be flush with fascia board for z bend to properly be applied. Good catch.
Jim
Nice build and thread Pete, keep the pics coming.

Jim,
Just a colloquial expression, no malice intended. I ruffled yours with the house end and you ruffled mine with the rake. So we are even:D
We must agree to disagree on these forums. If all I am doing is bloviating my ideas with no counter discussion, I'm not learning anything new.
I agree the builder is doing a good job, for the most part, but trying to meet a deadline and doing 6 houses at the same time, doesn't give him much time to do much more than a quick check every few days as well as trying to keep 6 new owners happy while making a profit.
I am so glad to see support under the deck tying the posts together. It looked like he was just going to bolt a post to 4 floor joists bridging from the house, even in front of some windows. The deck would have been like a bunch of hammocks suspended from two ends between the posts without the beam and have looked horrible that way.

Perhaps wrapping the rim joist, beam, and posts with coil stock would be a good idea to avoid painting or staining. If it were mine, I would build little planter boxes up from the ground at the bottom of the posts, with proper drainage and protection of the post, since Mrs. Clausen loves to garden and has done a great job at her former house. White wrap might stand out too much on the posts, depending on what the plan is for the concrete wall behind them, but a wrap is certainly better than stain or paint.

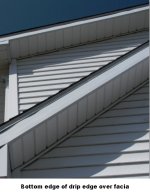
Dave had mentioned the obvious negative contrast on his house between drip edge that shows on facia of a different color. Sometimes that works. What I have been referring to is facia and drip edge of the same color. You really don't see it behind the spouting, but on the ends it does show.
Here is an example of white on white on my house, on this beautiful sunny day, today. I have lots of rakes since the house is T shaped and has dormers. The re-roof was done last fall by a commercial roofer who replaced the 20 year old T drip edge, which was the same, as part of the process of getting it under and or over the new freeze underlayment as it should be. He did use a cutting tool to cut the shingles to length before nailing them on over a starter strip along the edges. He also had a pan brake, which is necessary to form the stepped metal flashing around the chimney.
Pete has been told that a leaf guard will take the place of a drip edge that goes under the roofing. I doubt it, and it may well cause more ice damming than just leaving it the Z way. Only a few years from now will tell.
Enough on the roof. Time to get the grill ready for the first burgers of the year. Prediction is 60 degrees by supper time here.
Have a good day.
Ron
 
   / Building a stick frame house in the woods in 90 days #813  
Looks like you have a great concrete crew, the garage floor and steps look nice. The deck and post arangement came out good.

Looking at the roof, and the frost on the gable overhang, is a good indication, why the ridge vent should be run to the end! This practice, was discused earlier on.

Dave
 
   / Building a stick frame house in the woods in 90 days #814  
Pete,
Reviewed your latest pics. Wow you should go to Atlanta more often! Looks like they poured on the steam while you were gone.:)

A couple quick observations. I don't know what the standard supplied brick mold is these days for the personnel doors? It used to be
crummy pre-primed wood on most of the steel foam core doors that wouldn't hold paint more than a couple years if you were lucky, especially those on a concrete wall, even with flashing behind them. I replaced all of mine a few years ago with "solid core PVC". Had my doubts as to durability, and had to be sure it was the same dimension as the wood brick mold so it would fit between the siding starter strips. It did and has held up well to high traffic, even with metal storm doors on a couple of them.
Just a finishing touch you might want the builders to do now before they finish up the doors and windows in the basement wall in particular.
Number two, if you have the electric meter installed prior to the siding behind it, see if they will give you an extra seal tag so you can seal it for them after removing the cover to get to the mounting screws. They may want to make another trip out, but just a thought.
Ron
 
   / Building a stick frame house in the woods in 90 days #815  
Ron,

The method you show in the picture below has great functionality. They come pre bent in lengths of 10 ft. But in my area the only people that use it are homeowners or contractors that don't have or don't know how to use a brake. Customers want the custom bent fascia trim, in all sorts of colors that the drip edge is not available in, for a cleaner look. In 30 yrs I have used the drip edge method a handful of times when the customer did not have aluminum trim on his fascia boards.

If you look to the left in the pic where the gable meets the soffit return, there are ripples in the drip edge. These are usually caused by the shrinking of the wood fascia boards which in turn ripple the drip edge. With the one piece fascia trim, this cannot occur.


image-1527419363.jpg

The only reason I got involved in this discussion about the drip edge was because it seemed like the OP was being told that the method the contractor was using was wrong. I believe we have beat it to death at this point and Pete can make his own determination. :) Happy Easter to all.
 
   / Building a stick frame house in the woods in 90 days #816  
Ron,
If you look to the left in the pic where the gable meets the soffit return, there are ripples in the drip edge. These are usually caused by the shrinking of the wood fascia boards which in turn ripple the drip edge. With the one piece fascia trim, this cannot occur.
View attachment 310656
I believe we have beat it to death at this point and Pete can make his own determination. :) Happy Easter to all.

Jim,
Your almost to home plate. The drip edge is perfectly straight. What you see rippled is the facia and we have discussed this before as other folks on this thread have the same issue. Where the facia gets to the end where the side of the soffit has to be covered with a flat piece of triangular cut coil to fill in the space the facia has to have the roll under edge removed to complete the run to the facia at 90 deg to it that holds the spouting trough. The same applies using Z facia and you will see it on Pete's house, and I'm sure have done it many times yourself. The facia was put on this house 20 years ago in very cold winter weather, so when it warms the facia gets a little too long between the nailing points and warbles. Your Z facia does the same thing, as reported by other folks.
I think the vinyl facia that Pete showed in boxes at the site might have an advantage over aluminum, but it was not used, at least on the rake ends where Z was substituted.
Ron
 
   / Building a stick frame house in the woods in 90 days #817  
Ron you have had much good input on this build so I was just wondering if you are an architect or builder? Just asking because after being in the trades until retirement I have realized that details and opinions are often based on regional standards and not necessarily universal standards. What works and is standard where I am in Georgia isn't always the best way to do it in Maine's weather conditions. It is just what works here and has stood up to the test of time. That is why I stay out of the build discussions because it so much depends on where you are building. The local guys with regional experience normally have the best answer even if it isn't what we would do here.

By the way, you elect not to say in your profile where you located so it is hard to say if your background meets this regions builds standards.

MarkV
 
   / Building a stick frame house in the woods in 90 days #818  
Pete,

I am sure everyone else here does, but I don't understand how the stairs from the garage meet up with the basement. Is there a severe left at the bottom? Also, is your mom going to have to squeeze between the metal studs to get in/out?

-Stu
 
   / Building a stick frame house in the woods in 90 days #819  
Ok guys time for me to chime in on the rake and fascia issue. First off the last pic posted showing the 2 rakes ends is poorly done and i would never do it that way. I will start with installing water and ice.
1st: When installing water and ice you should let it over hang the drip line by about 2 inches, so a 36" roll you would snap a line at 34" up the sheathing.
2nd: You now install your f5 or f8 drip edge.
3rd: Install roof sorry not going to go into detail on how to do that.
4th:You do not need drip edge or rake edge on the rake end of the roof if you do it as i do.
5th: Rake end, First off you never install just a 2x6 as your rake/gable end, you just don't, you add a 1x3 even with the top edge of your 2x6 adding 3 more bends to your aluminum rake piece. When bending your rake piece out of aluminum you start at the bottom with an L shape bend covering your soffit, you come up the 2x6 until you meet the 1x3 causing you to bend out 3/4" follow the 1x3, follow the 1x3 until you reach the top and bend back in 3x4" under the roofing. Rake piece now complete.
The extra bends is what helps your rake ends from getting waves. Along with you do not nail any 2 connecting piece together, if you do a 1 1/2" overlap you nail in 2". By the way you do not face nail your rake pieces you lift the roofing and nail down from the top and the same thing at the bottom. You nail on the bottom L shape, nail thru your soffit into the edge of your 2x6. 6-8 nails for a 10' piece is all you need, 3-4 on top and 3-4 along the bottom.

Fascia time:
1st: you bend an L shape for your fascia
2nd: You install your fascia sliding it under the overhanging water and ice membrane.
Yes you will see the water and ice for now.
3rd: you install the the gutter sliding it under your drip edge and over the water and ice that is overhanging.
Now you have a 100% water tight seal and no ice **** has a way of getting back up under the roofing or drip edge.
Note when making your L shape for the fasic you should be double bending your top edge to minimize the waves.

Yes People you can take this to the bank this is how it is done !!!!!!!!!!!!
 
   / Building a stick frame house in the woods in 90 days #820  
Ok guys time for me to chime in on the rake and fascia issue. First off the last pic posted showing the 2 rakes ends is poorly done and i would never do it that way. I will start with installing water and ice.
1st: When installing water and ice you should let it over hang the drip line by about 2 inches, so a 36" roll you would snap a line at 34" up the sheathing.
2nd: You now install your f5 or f8 drip edge.
3rd: Install roof sorry not going to go into detail on how to do that.
4th:You do not need drip edge or rake edge on the rake end of the roof if you do it as i do.
5th: Rake end, First off you never install just a 2x6 as your rake/gable end, you just don't, you add a 1x3 even with the top edge of your 2x6 adding 3 more bends to your aluminum rake piece. When bending your rake piece out of aluminum you start at the bottom with an L shape bend covering your soffit, you come up the 2x6 until you meet the 1x3 causing you to bend out 3/4" follow the 1x3, follow the 1x3 until you reach the top and bend back in 3x4" under the roofing. Rake piece now complete.
The extra bends is what helps your rake ends from getting waves. Along with you do not nail any 2 connecting piece together, if you do a 1 1/2" overlap you nail in 2". By the way you do not face nail your rake pieces you lift the roofing and nail down from the top and the same thing at the bottom. You nail on the bottom L shape, nail thru your soffit into the edge of your 2x6. 6-8 nails for a 10' piece is all you need, 3-4 on top and 3-4 along the bottom.

Fascia time:
1st: you bend an L shape for your fascia
2nd: You install your fascia sliding it under the overhanging water and ice membrane.
Yes you will see the water and ice for now.
3rd: you install the the gutter sliding it under your drip edge and over the water and ice that is overhanging.
Now you have a 100% water tight seal and no ice **** has a way of getting back up under the roofing or drip edge.
Note when making your L shape for the fasic you should be double bending your top edge to minimize the waves.

Yes People you can take this to the bank this is how it is done !!!!!!!!!!!!
 

Tractor & Equipment Auctions

2021 ALLMAND BROS, INC. NIGHT LITE TOWER (A50854)
2021 ALLMAND BROS...
2018 GMC Sierra 1500 Crew Cab Pickup Truck (A50323)
2018 GMC Sierra...
2018 HINO 268 26FT BOX TRUCK (A51222)
2018 HINO 268 26FT...
80in HD Tooth Bucket with Side Cutters ONE PER LOT (A51039)
80in HD Tooth...
2004 Dodge Dakota Ext. Cab Pickup Truck (A50323)
2004 Dodge Dakota...
2019 Bobcat E32i Mini Excavator (A50322)
2019 Bobcat E32i...
 
Top