skylarkguy
Platinum Member
That's pretty neat.
I' am so surprised how well it collapses.:cool2:
Tomorrow after cutting the pins, he wants to play with some welding machines.
I'll ask him tomorrow when he comes back.Did he do the design with a 3D CAD package on a computer?
He is hooked on aluminum Tig welding:laughing:. With less than 2-hours under his belt, it's hard to tell my Tig welds from his:shocked:. Kid is a natural at Tig welding aluminum!
I'm no teacher, by any stretch of the imaginationNot to mention having one-on-one quality time with a great teacher. I'm jealous! :laughing:
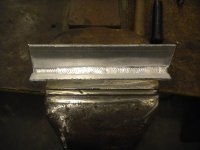
, But nothing beats one on one instruction! This kid is sharp as a tack.Tell me this kid isn't a natural! This is with about 2-hours of hood time:shocked::shocked:. His only problem, he forgets to back off the pedal at the end of the weld, (far left side). Color me impressed!:cool2::cool2:
I had very little to do with it. I really believe the Miller Dynasty 300 makes it so easy to weld aluminum. I surely don't want to take anything away from this kid. First thing this morning we fired up the Mig welder. I had him run some .045" Metal Core, and some .035" Mig wire. He did excellent with both.Okay. I'm sold. Sign me up, let me know when classes start and where to send my money!
Terry
I showed him how to do it with a hole saw. He about fell over! :laughing:
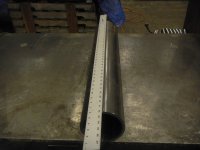
To keep the copes oriented the same way I'd tack a chunk of 1.875" on the back one and let gravity keep things lined up, or have a helper hold it with a level while I secured it, if it was being particularly difficult.
Do you have a center head? Mark center of pipe at each end, take a straight edge, or chalk line and make a mark from one end of the pipe to the other end. Transfer this mark to the opposite side of the pipe. You can even quarter the pipe if you want to.
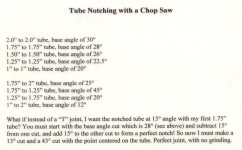
I have a job coming up where I need to cut 45° miters on each end of a 2' piece of tube, and I'm scratching my head how I'm gonna keep the miters aligned. The ends of the tube will be fit into a corner, so they need to align along a right angle. The tables on the bandsaw and mill aren't much help because they're either too small or oriented wrong to let me use a miter gauge. Your idea of tacking a length of something to the first miter just might work, but I'm open to suggestions... :confused3: