John Deere 4300 complete rebuild

   / John Deere 4300 complete rebuild #571  
I just found this! It took me a while to read but well worth it. I just bought a 4300 a couple of months ago and this is GOLD! I bookmarked this thread. Its like having the technical manual online. You a little more skilled than I and but I like to do repairs myself when I can. Thanks again for doing this. What has happened to the tractor since you last posted?
 
   / John Deere 4300 complete rebuild
  • Thread Starter
#572  
What has happened to the tractor since you last posted?

I had 2 of these units, which I sold locally. One of them is owned by a friend in an adjacent county, and it is still
working. The other has been resold at least once, and I have lost track of where it is. I offer to help anyone
who gets a tractor from me. Both have backhoes mounted on my custom subframes, of 2 different designs.

I like these tractors, despite problems with plastics, interlocks, and some weak aluminum structural components.

I am glad that posting my efforts can help others....good luck with your project.
 
   / John Deere 4300 complete rebuild #573  
I just found this thread as well. I have to split my 4300HST due to a broken forward control linkage rod. It snapped right at the ball joint on the rocker linkage up inside the bellhousing tube. I have the new rod in hand, and am fabbing a set of splitting jacks since I anticipate splitting it again this winter. No time to fix several things I know are bad, like the MFWD lever that pops out of 4WD. I plan that for this winter. Thanks again for a fabulous job of documenting your work.

Jon
 
   / John Deere 4300 complete rebuild #574  
More on taking apart and analyzing my engine:

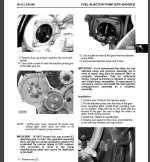
My first photo is the insides of the front gear case. If you look closely, you
can see white hash marks highlighting the index marks on the gears. These
must be lined up for proper valve and FI timing. The crank has to be rotated
many times before these marks line up since some of the gears have an odd
number of teeth. Correctly assembled, you don't have to adjust the FI timing.

Next are the pistons. This engine is a 1.5-liter direct-injection engine, so
the pistons will look a little different than some other port-injected Diesels.
There are four steel inserts (arrows) in the 4300 pistons, but none in the
earlier 955 piston. The latter engine had a shorter stroke, for a displacement of only about 1.4-liter. The skirts have some funky cutouts in them, too. A
lot of thought must have gone into these piston designs!

With everything apart (photo 4), it only looks like a mess. Believe-it-or-not,
all the parts are carefully set out to be assembled exactly where they came
from.

Can you verify the timing marks are like they were when you tore the engine down with the crank and idler gear marks matching the groove/tooth? The deere manual shows the marks lining up when viewed from the front which would but them a tooth of of where that picture shows, but I believe my engine was like yours when I tore it down and that's how I assembled it.
 
   / John Deere 4300 complete rebuild
  • Thread Starter
#575  
Can you verify the timing marks are like they were when you tore the engine down with the crank and idler gear marks matching the groove/tooth? The deere manual shows the marks lining up when viewed from the front which would but them a tooth of of where that picture shows, but I believe my engine was like yours when I tore it down and that's how I assembled it.

There is really no ambiguity to the alignment of the marks. Both the manual photo and mine
show one set of marks that look off only because the gears are beveled and the shaft is
not fully inserted. I checked my photo archive and I do not have better closeups.

Here are pages from the manual:
 

Attachments

  • timing_gears.JPG
    timing_gears.JPG
    78.4 KB · Views: 221
  • FI_timing.JPG
    FI_timing.JPG
    151.8 KB · Views: 223
   / John Deere 4300 complete rebuild #576  
There is really no ambiguity to the alignment of the marks. Both the manual photo and mine
show one set of marks that look off only because the gears are beveled and the shaft is
not fully inserted. I checked my photo archive and I do not have better closeups.

Here are pages from the manual:

I agree that your photo and the one from the manual look to be the same, but I don't agree that any shaft is not fully inserted in those pictures. Both the manual and your picture look like an installed, running, timing set and look like what I remember mine looking like when taking it apart. The crank gear is just longer than the rest so it turns as it slides down on the idler during installation, making the mark not look like the diagram from page 3-52 once installed.
The ambiguity comes from looking at yours, mine, or the pictures timing set straight on, versus the diagram. If the idler gear were advanced 1-tooth from the crank gear, the marks look just like the diagram on page 3-52 and contradict the pictures, including the picture on page 3-65. That is how I started to assemble it before I checked my notes.
I think the diagram in the manual on page 3-52 is wrong, which wouldn't be the first error I've found in the manual. I'm just glad I didn't put it together like the diagram shows to.
 
   / John Deere 4300 complete rebuild
  • Thread Starter
#577  
I agree that your photo and the one from the manual look to be the same, but I don't agree that any shaft is not fully inserted in those pictures. Both the manual and your picture look like an installed, running, timing set and look like what I remember mine looking like when taking it apart. The crank gear is just longer than the rest so it turns as it slides down on the idler during installation, making the mark not look like the diagram from page 3-52 once installed.

You may be right. In editing the photo I posted, somehow I lost the original to do a different
crop and blow-up to show it better.

Regardless, anyone doing this repair should align the marks and photograph them before
any disassembly of the gears. "Film" is cheap.

I am a big fan of manuals, too, tho errors are common. The JD factory manuals are pretty
good, among the competition.
 
   / John Deere 4300 complete rebuild #578  
Tractor splitting novice here. My JD4200 whines in all gears and all ranges. I'm thinking bad bearing. A guy told me that I could isolate which shaft by putting the ABC range shifter in neutral and the 123R stick in gear. Let off clutch. If whines, then it's the 123R shaft bearing. Or put the 123R in neutral and the range shifter in gear. Listen for whine. I did so and got whine with only 123R in gear, but no whine with only range ABC shifter in gear.

I've read a good bit of this thread. I got a copy of the service manual and planned to split at the rear, but it looks like then I have to also take off the tunnel to get to the 123R shaft bearing? Is that correct? Or can I just split at the front? Or just at the rear?

Also, when I changed the hydraulic fluid earlier this year, I had to destroy the suction screen to remove because it was wedged in place with lots of bits of metal. What could this be? I've also recovered two ball bearings about 1/4 diameter from the sump last year. Perhaps these are detente balls that have become dislodged? Maybe that's the whole problem?
 
   / John Deere 4300 complete rebuild
  • Thread Starter
#579  
I've also recovered two ball bearings about 1/4 diameter from the sump last year. Perhaps these are detente balls that have become dislodged? Maybe that's the whole problem?

My bet is that those loose balls are from a bearing which has suffered failure of its cage. Yes, that will cause your bearing noise problem. Detent balls are less likely to get free, IMO.

Inlet screens will get full of debris, and most of that seems to be pieces of the PTO clutch and brake, as well as wheel brake friction particles and failed bearing pieces. "Swarf" from manufacturing is also in there. Cleaning the sump is very revealing.
 
   / John Deere 4300 complete rebuild #580  
@dfkrug or anyone familiar with the JD 4200/4300 series.

Removed bolts, and nothing! The tractor won't come apart. Any ideas for places to pry?

(Please excuse my newbie-ness!)
 

Tractor & Equipment Auctions

2004 MACK GRANITE CV713 DUMP TRUCK (A51406)
2004 MACK GRANITE...
2011 L3 GENERATOR SET (A51222)
2011 L3 GENERATOR...
2018 KUBOTA SVL95-2S SKID STEER (A51242)
2018 KUBOTA...
2014 INTERNATIONAL MA025 26FT NON CDL BOX TRUCK (A51222)
2014 INTERNATIONAL...
2011 International WorkStar 7400 Chassis Truck, VIN # 1HTWGAAR1BJ325796 (A51572)
2011 International...
1993 Harsh Feed Mixer (A51039)
1993 Harsh Feed...
 
Top