Yet another woodworking question.

   / Yet another woodworking question. #11  
You forgot carbide. I don't think anything but a carbide toothed blade is worth taking from the store.

Another thing to be wary of, those very fine toothed specialty plywood blades are typically, non carbide and about as slow cutting as molasses at Christmas so tend to burn. However they are cheap. Smarter money is investing in a good quality thin kerf, carbide cross cut blade and double cut if you have to. You'll get much more use out of it.
If you intend to make a single pass cut, keep the finish side down with a circular saw and finish side up on a table saw. When the tooth exits the cut where the unsupported face laminate is, that's where chipping and tearout occur. Sharp blades also chip and tearout less than dull blades.

Haven't used a non carbide blade for almost fourty years!
Lot's of other things I didn't mention.

[video]http://justsawblades.com/ten/choosing_the_right_blade.html[/video]d

This fellow may also have not mentioned a few of the design properties.
 
Last edited:
   / Yet another woodworking question.
  • Thread Starter
#12  
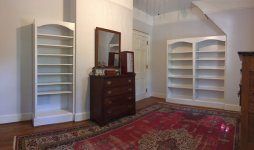
Here's an update. We decided to do the shelves ourselves. We used 3/4" "cabinet grade" plywood from one of the big box stores. I used pine trim of decent quality. My wife insisted on adjustable shelves so we used metal rail shelf standards the same color as the paint. Her father had a bunch of old pine boards (not antique) that had served as shelving in her mother's shoe store years ago. I did not like them because they had knots and some rough edges but my wife wanted to use them. We sanded, puttied defects, primed and painted them and they look okay.

I ripped the plywood sides using saw guide on Makita circular saw. It worked very well. Used a 60 tooth Frued blade and there was very little splintering etc.

The hardest part was the fact that nothing in the house was square, flat or flush. We also had to deal with doors, vents and electrical outlets. We took the molding off the bottom of the wall and ran it around the base of the shelves so they look built in, which they are. We painted them the same color as the room trim (white). Just the measuring, figuring, fitting and refitting took forever.

I think they turned out okay. My wife is very happy with them so that is what counts. There are lots of little flaws that I see when I'm looking for them but they are not particularly noticeable if you're not looking. We spent about $350 dollars on materials and paint. Our best professional estimate was $2000 and that guy never showed up. The next lowest was $3000. (There would have been drawers at the bottom of the double unit at that price. I was not ready to tackle drawers.) It took us a solid two and a half days of work but we went real slow. My shop is also in the basement and this room is on the second floor. We spent a lot of time running stairs.

Here is a picture. It is a panorama shot so things are a little distorted. The shelves are actually the same height. The unit on the left will be for shoes.

IMG_0354.JPG
 
   / Yet another woodworking question. #13  
Here's an update. We decided to do the shelves ourselves. We used 3/4" "cabinet grade" plywood from one of the big box stores. I used pine trim of decent quality. My wife insisted on adjustable shelves so we used metal rail shelf standards the same color as the paint. Her father had a bunch of old pine boards (not antique) that had served as shelving in her mother's shoe store years ago. I did not like them because they had knots and some rough edges but my wife wanted to use them. We sanded, puttied defects, primed and painted them and they look okay.

I ripped the plywood sides using saw guide on Makita circular saw. It worked very well. Used a 60 tooth Frued blade and there was very little splintering etc.

The hardest part was the fact that nothing in the house was square, flat or flush. We also had to deal with doors, vents and electrical outlets. We took the molding off the bottom of the wall and ran it around the base of the shelves so they look built in, which they are. We painted them the same color as the room trim (white). Just the measuring, figuring, fitting and refitting took forever.

I think they turned out okay. My wife is very happy with them so that is what counts. There are lots of little flaws that I see when I'm looking for them but they are not particularly noticeable if you're not looking. We spent about $350 dollars on materials and paint. Our best professional estimate was $2000 and that guy never showed up. The next lowest was $3000. (There would have been drawers at the bottom of the double unit at that price. I was not ready to tackle drawers.) It took us a solid two and a half days of work but we went real slow. My shop is also in the basement and this room is on the second floor. We spent a lot of time running stairs.

Here is a picture. It is a panorama shot so things are a little distorted. The shelves are actually the same height. The unit on the left will be for shoes.

View attachment 474662
Looks like it turned out very well, nice job!
 
   / Yet another woodworking question. #14  
Nice job, the depth of the shelves would not make for a lot of usable space if you had built drawers. If you want the look of drawers on the bottom, make doors designed to look like drawer faces.
 
   / Yet another woodworking question. #15  
Looking good. Don't think drawers would be very difficult for you.

one question; anything to keep the shelves from tipping forward?
 
   / Yet another woodworking question. #16  
You did a really nice job. Those quotes were pretty much telling me that they didn't want to fool with the job. We have a finish carpenter/cabinet builder that attends our church. He is really good and charges prices like you was quoted. He tells me he can get it because very little competition in the field. A lot cabinet and finish carpenters don't want to fool with custom work for existing homes. You saved a ton of money.

Just curious, what method of construction did you use. Kreg jig?

Thanks for the pictures. You did a great job.
 
   / Yet another woodworking question.
  • Thread Starter
#17  
Egon, the double shelves have a plywood back which is screwed to the wall. The single unit on the left has a board, in the back that is screwed into the wall.

Turbys, construction was just with a nail gun and screws. All surface nail holes were puttied over and sanded. Shelves are adjustable on metal standards. The plywood back on the double unit provides most of it rigidity and both are supported by being attached to studs in the wall.

I feel good about the job and the money we saved. My wife is very happy with them. The little mistakes and cosmetic errors bother me and would not have been there if a pro hand done the work.

Again, the hardest part is working around the existing molding, air vents, outlets and irregularities you see in any old home. The double unit took me an entire day's work just to get it roughed in. Building a free standing shelf unit would have take a couple of hours at best. However, I think these look a lot better as built ins.

Thanks for all the replies and assistance guys.
 
   / Yet another woodworking question. #18  
I agree with every one so far, they look very nice. The important thing is your wife likes them!
 
   / Yet another woodworking question.
  • Thread Starter
#19  
Thanks guys. Another project complete thanks to the experience and wisdom of the folks here at TBN.
 
   / Yet another woodworking question. #20  
Congratulations on a job well done.

As to your earlier question about splitting the plywood when cutting, I've found that any decent name brand blade works just fine. What you are paying for is how long it will last. Cheap saw blades go dull quickly, quality ones last a very long time. To get the cleanest cut possible, you need the blade to be as shallow as possible. For 3/4 inch plywood, the blade should only stick out an inch at the most. That shallow angle of the blade allows for more of the blade to cut the wood, giving it a cleaner finish. Adding blue tape to the wood also helps, but really not enough to be worth the effort. If I'm cutting wood that will be stained, I make sure that the top/finish side is on the top when cutting with my table saw, or the bottom when cutting with a circular saw.
 

Tractor & Equipment Auctions

2014 Dodge Charger Sedan (A50324)
2014 Dodge Charger...
UNUSED CFG Industrial QK18R Mini Excavator (A47384)
UNUSED CFG...
2019 Cat D6N LGP Dozer (RIDE AND DRIVE) (A50774)
2019 Cat D6N LGP...
Agco 4227 4 Star Tedder (A50774)
Agco 4227 4 Star...
2019 Ford F-350 XL (A50120)
2019 Ford F-350 XL...
2016 FORD F550 CREW CAB SERVICE TRUCK (A52141)
2016 FORD F550...
 
Top