Flail Mower Grass getting sucked through the bearings on Mott F5

   / Grass getting sucked through the bearings on Mott F5 #11  
I can't find a decent pic of the cutter shaft of a 390. Is the mechanism that you are talking about sort of like a shroud that covers the collar of the bearing housing, or is it something sharp that spins and cuts the grass before it can wrap? Thanks again.
I'll try to get a pic of the end of my 390 rotor. the 390 is attached to my AGCO Allis 5670 that is currently down with a hydraulic steering issue. I can't start the tractor to lift the 3 pt until i reinstall a cylinder.

Let me describe The 390. The end of the rotor is recessed into a collar on the bearing housing. The rotor has a piece of rod attached that overlaps the od of this collar. As the rotor rotates the rod throws off grass to prevent from wrapping.

My 25A does not have this feature. I will add similar feature to the 25A this winter.
 
   / Grass getting sucked through the bearings on Mott F5 #12  
Goaychay, if i understand you correctly, the washer stayed on the shaft when you removed the bearing. That would indicate that it is not secured to the bearing housing. Perhaps the grass entered at the OD of this washer. Is there a retainer clip to secure the washer to the housing?
 
   / Grass getting sucked through the bearings on Mott F5 #13  
I reviewed your pics again and understand that the spacer washer is sandwiched between the end of the rotor and the bearing, and spins with the shaft. This feature provides a similar rotor recess like my 390. I would think that you could weld a short piece of key stock to the rotor that overlaps the bearing housing (but clears the bolt heads). The radial clearance between the keystock and the bearing housing should be 0.02-0.03". Keep a 1/8" axial clearance to the bolt heads.

Regarding your larger knives. Are the holes in the blade for clevis pins the same size? My only concern is the increased mass of the larger blade and the subsequent increased loads on the clevis pins and mounting structure that is welded to the rotor shaft.

Regarding the securing torque. It appears that the Mott has a solid stacked rotor assembly, meaning that the bearings are secured axially to the rotor by bolts compressing the inner race to the rotor. The only way to adjust the bearing location (thus preload) is by applying shims to either the rotor shaft or bearing housing.
 
   / Grass getting sucked through the bearings on Mott F5 #14  
Hello Chris,


Sent you a PM.

Do you live on the Weeks Island, Saint Marys Parish, Franklin Louisiana side of the Five Island Chain?


Please do not hesitate to ask questions about flail mowers and your flail mower we are all here to help you.

======================================================================================================================================================================


Hello Leon,

Thanks for taking the time to respond, I appreciate it. I've read many of your posts here and I realize that you have a vast amount of knowledge and expertise regarding flail mowers.
Thank you for the welcome and I will update my info/ID ASAP.

Just for reference, I think that the grass height is set at the second to highest position (of 4). I will double check that. When on concrete, the distance between the blades and the ground is about 2".

Thanks for the explanation regarding how the Deere cutter shafts are set up. I'll keep brainstorming. One thing that did occur to me... an empty dog food/soup can is a very tight friction fit over the collar of the bearing housing that protrudes into the inside of the mower shell towards the cutter shaft. I was thinking about cutting a can down to about a 1" ring (or as long as I clearances allow) and maybe snipping some slits in it to allow it to be folded inwards towards the center of the shaft to make a cover/shroud of sorts. Stupid idea???


===================================================================================

(hold off on that Chris please it will just make it(the flail mower rotor)a heat sink)

===================================================================================
===================================================================================


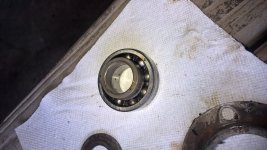
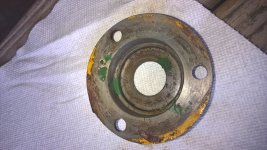
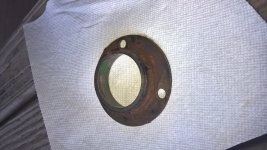
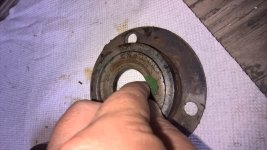
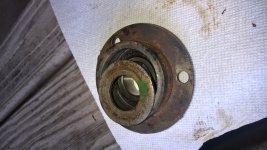
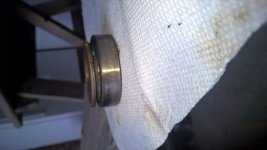
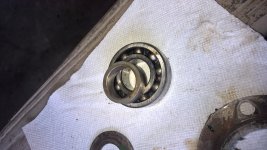
In regards to the seal on the bearing, it came out just as pictured. I have looked at pics of new 206KL bearings for sale on ebay etc and they look the same as mine....the outside is open and you can see the cage/bearings, and the inside face of the bearing that is resting up against the seat/lip of the housing and facing the inside of the mower has what I guess it a type of metal seal (the dark area between the races, that has the printing/lettering on it...or is that just the back side of the cage?) It doesn't seem like a total seal, more like a semi seal or guard because there is daylight on the outer edge of it, near the outer race, and fluid can pass through.

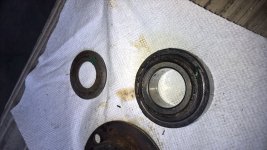
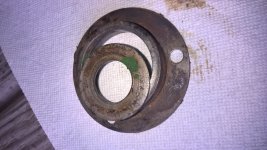
Further inboard of the bearing, a thick and very tightly fitted seal washer sits up against the interior side of the bearing. The washer is the exact OD of the bearing and rests inside of the collar. The cutter shaft butts up against it. i will try to get a good pic of it. It is in the schematic also. It seems like it would do a good job of keeping grass out for sure, if not tiny particles, dust etc. But the grass got through it somehow, through the dark metal shield/seal of the back of the bearing and out through to the pulley.


===================================================================================

Chris, if you can take the old roller bearings to a KAMAN Industrial store if you have one nearby as with your conditions you may end up using a completely sealed bearing-0just be sure to tell them that your operating RPM will be 2200 RPM+- to obtain the right bearing.

===================================================================================
===================================================================================


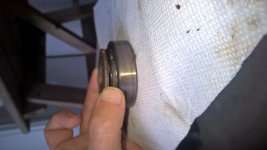
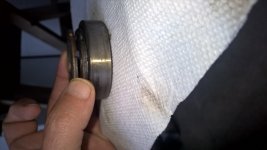
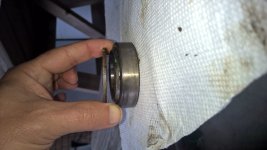
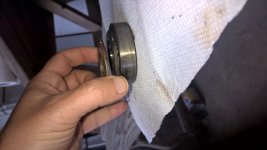
I am not sure if I am answering your question Leon. I can try to take some better pics of the bearings if you'd like. I have them both removed now and pressed out of the housings. I had a very hard time getting the drive side housing out of the mower shell. Once it finally came free, I was able to inspect that bearing more closely and it was a goner. The non drive side was almost like new in terms of feel etc. That side wrapped a ton of grass also, but it did not seem to make it's way completely through the bearing.

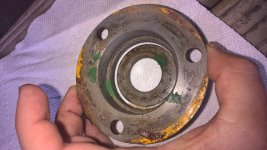
While I am at it, I might as well replace the outboard bearing for the drive pulley/extension shaft. But according to the schematic, it looks like a casting/assembly rather than a pressed in bearing (item number 21, part number 3-61)


===================================================================================

Chris, The open flange bearing is designed to carry the cross shaft and drive pulley and the weight and force created by the V-belt belt tension and it will be a good idea to change it as a matter of good maintenance. Just be very sure to take pictures as you disassemble the cross shaft and open flange bearing to make sure the parts are not lost or misplaced.

There should be at least one or possibly two locking collars holding the cross shaft in place through the open bearing to the drive pulley.

The magnetic parts catcher from NAPA that looks like a metal ash tray are great for the small parts by the way.

You can purchase the open flange bearing from KAMAN Industrial as well.

===================================================================================
===================================================================================


I was also curious about how to preload the bearings or the torque spec on the two bolts at each end of the cutter shaft. One goes through the pulley. The other, non drive side just butts up against the bearing with a locknut and washer. As far as I can tell, the only thing that really ties the shaft and bearing together is the force of the preload/cinching up on those two bolts on the outside of the shaft. There are no set screws etc.


===================================================================================

NOPE, NOPE, NOPE, NOPE, Chris there is no preload on these ball bearings they are as slip fit with locking methods like shaft collars and set screws to hold the inner race of each bearing immobile.

===================================================================================
===================================================================================


I definitely planned on replacing all of the knives Leon, I have read in your previous posts about the dangers of an imbalanced shaft. I just placed one on the shaft for reference to show the difference in width of the two. I also purchased new clevises and cotter pins.

So it is OK to replace the 3/4" inch knives with the 1 1/4" ones? I asked Flailmaster and I'm waiting on a response from them.


===================================================================================

Yes, just be aware that they are heavier and will need you to be more diligent about starting up as you may have more noise from the knives clattering a bit more is all.


======================================================================================================================================================================


I also thought about removing the cutter shaft from the mower to make it easier to replace the knives on a table top etc.. I was going to leave a few stations blank so that there would be room for my hands to grab it to carry it etc. Does anyone see a problem with this idea? Or Should I just mount everything back up with the new bearings and then change the knives at that point as a last step?


===================================================================================

NOPE, neither I or Mr. Mott would not want you to fight with it like this, that is why the knife pairs are pinned and believe me you do not want to man handle a fully loaded flail mower rotor with all the knife sets UNLESS you have a jib crane to lift the fully loaded flail mower rotor into a high speed rotor balancer.


======================================================================================================================================================================


Thank you again for the heads up on the wet grinder Leon. I have seen you mention wet grinding in several other posts and was looking around for one. Thanks a ton for the specific recommendation, as well as for the tool rests! That should make sharpening much more consistent.

How can I tell if the knives are hardened/heat treated, other than by asking Flailmaster, which is where I bought them? They have 803N stamped on them. My receipt just says MH 386 knives and they were .71 cents each. I did not specify heat treated.

I am going to try and keep brainstorming about my soup can idea lol!

===================================================================================

NOPE, soup can = heat sink.

Wait until you have the new bearings and new washers in place.


Until you start mowing again you may just have to be more diligent about the Bahia grass build up in the flail mower until you have a short carpet of Bahia grass to mow which will not build up as much on the flail mower rotor.


======================================================================================================================================================================


Leon, in a previous post, I saw you mention the Franklin La area and Cote Blanche. I am in that area, are you familiar with it?

Thanks again everyone and have a great weekend.
 
   / Grass getting sucked through the bearings on Mott F5 #15  
FWIW, I read through the entire thread and did not see any mention of your having done any gearbox service on your mower. I mention this because your last pic in post #1 shows a square plug poking up toward the PTO shaft from the gearbox area.
I'd hate to see you go to all the trouble to refurb everything and accidentally forget to service the gearbox.
I'll leave it to the 'membership' to give advice on the fluid to use and the procedure(s) involved.
BTW, good pics and details of your work.
Here's an idea for a bearing cover to kick around. You can buy the magnetic metal 'dish' at most any auto parts store to hold small parts, screws, etc. Could you adapt one of those or similar preformed metal items to allow sliding it over the 'knife shaft' possibly, with a collar of some sort with a set screw or two, to hold the dish edge against the 'wall' where the bearing is housed. Maybe the dish could remain pressed against the bearing's 'wall' and just the collar could turn with the knife's shaft?
It's a 'rough' idea of how to possibly seal the bearing from grass access, which should remedy the issue.
 
   / Grass getting sucked through the bearings on Mott F5
  • Thread Starter
#16  
Thanks Thibodeau, I appreciate the additional info and explanation. That is sort of what I was picturing in my mind, but that definitely clears it up. Sorry that you are having issues with your Allis, hope you can get them resolved easily.
 
   / Grass getting sucked through the bearings on Mott F5
  • Thread Starter
#17  
Yes, that's correct, the washer stayed on the shaft, largely due to being held there by the grass entganglement I guess. It is definitely just a loose washer on both sides, as indicated in the parts diagram (number 12, they call it a "bearing shield washer"). It is however, a very tight fit into the inside of the collar on the bearing housing and I would think would provide a good seal/shield against large debris. It sits fairly flush with the end of the housing collar, maybe recessed inside a little bit. Yes, I agree, the grass entered at the OD and I think ID also of the washer and then made it into the bearing and then on through to the exterior and up to the pulley.

No, there is no clip to retain the washer, it just sits on the cutter shaft, inside of the bearing housing collar. I will post some better pics now that all of the pieces are disassembled. It may be easier to understand how it is set up.
 
   / Grass getting sucked through the bearings on Mott F5
  • Thread Starter
#18  
Thibodeau, thank you so much for the input/ideas/help. I really do appreciate it. I had initially thought of trying to attach something to the collar itself vs the shaft. But I see that your idea of welding the key stock would probably be much more effective. My only concern is if it would potentially throw off the balance of the shaft?

Some of the factory weights that were added were pretty small, although they are corroded now. I didn't know if even something as small as the piece of key stock could through things off? It seemed to be pretty well balanced and smooth on the test cut that I made, no vibrations at all.

Regarding the knives, yes the holes for the clevis pins are the same size, 3/8" I believe. I was concerned about the increased load also, as well as clearances. The old clevis pins are worn in half on some that I have looked at, so I am glad that I ordered the new ones. The old ones look fine from the outside, but once removed, the middle section of them is worn down substantially.

Yes, it does appear that the bearings would be secured axially to the rotor by bolts that compress the inner races to the rotor. The rear side of the bearing facing the shaft, has the inner race protrude outward toward the cutter shaft, although it contacts the shield washer first. So the shield washer is only in contact with the inner race and not both inner and outer.

There were no shims installed. On the non drive side, just a smaller washer, about the diameter of the inner race, a lock washer, then the bolt.

On the drive side, there is a pulley spacer (number 8 in the schematic) that is the same size at the inner race, then the pulley, which is keyed, rides against that spacer, then an identical washer, locknut, bolt set up as the other side, only additionally securing the pulley in this case. Neither of these bolts were torqued tightly at all upon disassembly. If I had to guess, maybe in the 30-40 lb.-ft. range? Probably less. So should I just basically snug those up when I re assemble? I don't want the shield washers or pulley spacer spinning, I'm assuming?
 
   / Grass getting sucked through the bearings on Mott F5
  • Thread Starter
#19  
Hi Leon, yes I am very much in that area! Wow, not many people know about this neck of the woods lol! There is a festival this weekend called the Delcambre Shrimp Festival which is right near Lake Peigneur, which was the site of the salt mine disaster in 1980. "The swirling vortex of doom" as the videos call it.

Thanks for the offer and willingness of everyone on here to help! It is greatly appreciated and I will always try to do the same when I am in a position to help someone else.

Regarding your PM Leon ,when I first logged on, I had a pop up advising me of a message, but when I clicked to open it, it said that my redirect blocker or something prevented it from opening. I tried to then find it manually but I couldn't. I found a link to send a PM, but not a mailbox etc. I will look again. I am sorry that I missed it, hopefully I can retrieve it.

OK, I will hold off on the soup can idea lol. I know it sounded stupid, but I have done stupider things that worked lol. Would it be a heat sink for the shaft if it is attached to the bearing housing collar and not touching the shaft itself?

I did double check the height. I have four square adjustment holes and I am on the second to highest one, which means that I can lower the roller towards the ground one more notch, which I will do.

Regarding the Kaman bearing, I will see if I have someone nearby. There are a few bearing supply houses, Motion Industries is prevalent here. Thank you for the suggestion and the reminder to point out the RPM. So do you think that a sealed bearing would help eliminate or reduce the grass getting sucked into the bearing?


Thanks so much for the info on the outboard bearing and how it is assembled, collars, etc. I have not even really looked at that part of the mower yet and it's covered in grease so I can't really see how things are assembled there anyway until I clean it up some. Yes, I recently got one of the ashtray magnetic holders, don't know how I went all these years without one lol!

I should have replied to this with your quote. I am trying to go down the list and address your concerns and advice, sorry if it is difficult to read this way.


Hmmm, that was exactly why I was curious about securing the shaft/preload etc. There are no set screws or locking collars of any kind on this set up. Just the two bolts at each end of the cutter shaft?? I'm not sure what exactly holds each inner race to the shaft and keeps it immobile? The bearings are slip fit. There is a slight raised/machined area of the shaft where the bearing rides on the drive side. It steps down from there for the pulley spacer and pulley. But it is very slight. You have to feel for it with your finger nail. And the non drive side is short so doesn't have the minimal step down.

But regardless, the bearings slip on and off with ease, even after sitting all these many years. They are not like a strong press fit onto the shaft. So I assumed that the horizontal force of tightening the bolts at the ends of the shaft is what sort of locked everything up and secured the shaft to the inner race of the bearing??? I'm confused.

Ok, good to know that the knives should be compatible, I have a feeling that finding the C5 narrow knives would be a task.


Advise taken regarding removing the rotor to install the knives. I am working solo and definitely don't want to injure myself or damage the rotor. I was thinking of using a floor jack to roll it around etc. But I will take your advice and just leave it in the mower and install the knives that way. Thanks for pointing out how much of a bear the rotor is.

Hmm, I didn't order new washers from Flailmaster. I will see if I can source them locally with the bearings. Is it necessary that they be replaced with the bearings?

I will give up on the soup can idea then I guess lol.

I just hope that I can get through one complete mow after I get this mower back in running condition. The grass wrap/belt smoke happened so relatively quickly into the test mow. I don't mind going at a snail's pace. I just don't have any other options since the fellow that usually bales it is having equipment issues. Now that I have the flail mower, I would mow it weekly or so to keep it down and never have to rely on someone else baling it again. I just hope that I can make it through one entire mow without continually smoking belts, changing bearings, and having to disassemble to get the grass out. This mower would be the answer to my prayers in terms of property maintenance if I can just get this one mow completed.

Thanks again to everyone that is trying to help me with this, I really do appreciate it. I will try to post a few more pics and see if that helps ID things better. Hope everyone has a great weekend!

The pulley spacer in the pic can be seen on the shaft in the first set of pics with the grass in the bearing.

Leon, I will try to retreive your PM. Thank you!

Chris
 

Attachments

  • WP_20180818_16_46_06_Raw - Copy.jpg
    WP_20180818_16_46_06_Raw - Copy.jpg
    1.7 MB · Views: 65
  • WP_20180818_16_41_30_Raw - Copy.jpg
    WP_20180818_16_41_30_Raw - Copy.jpg
    1.6 MB · Views: 59
  • WP_20180818_16_40_36_Raw - Copy.jpg
    WP_20180818_16_40_36_Raw - Copy.jpg
    1.6 MB · Views: 52
  • WP_20180818_16_40_27_Raw - Copy.jpg
    WP_20180818_16_40_27_Raw - Copy.jpg
    1.7 MB · Views: 63
  • WP_20180818_16_40_21_Raw - Copy (2).jpg
    WP_20180818_16_40_21_Raw - Copy (2).jpg
    1.9 MB · Views: 70
  • WP_20180818_16_40_05_Raw - Copy (2).jpg
    WP_20180818_16_40_05_Raw - Copy (2).jpg
    1.7 MB · Views: 58
  • WP_20180818_16_42_37_Raw - Copy.jpg
    WP_20180818_16_42_37_Raw - Copy.jpg
    1.2 MB · Views: 52
  • WP_20180818_16_42_15_Raw - Copy.jpg
    WP_20180818_16_42_15_Raw - Copy.jpg
    1.2 MB · Views: 54
  • WP_20180818_16_46_12_Raw - Copy.jpg
    WP_20180818_16_46_12_Raw - Copy.jpg
    1.7 MB · Views: 60
   / Grass getting sucked through the bearings on Mott F5
  • Thread Starter
#20  
more pics
 

Attachments

  • WP_20180818_16_46_06_Raw - Copy.jpg
    WP_20180818_16_46_06_Raw - Copy.jpg
    1.7 MB · Views: 56
  • WP_20180818_16_45_15_Raw - Copy.jpg
    WP_20180818_16_45_15_Raw - Copy.jpg
    1.6 MB · Views: 52
  • WP_20180818_16_44_43_Raw - Copy.jpg
    WP_20180818_16_44_43_Raw - Copy.jpg
    1.5 MB · Views: 57
  • WP_20180818_16_44_26_Raw - Copy.jpg
    WP_20180818_16_44_26_Raw - Copy.jpg
    1.3 MB · Views: 58
  • WP_20180818_16_43_14_Raw - Copy.jpg
    WP_20180818_16_43_14_Raw - Copy.jpg
    1.2 MB · Views: 53
  • WP_20180818_16_42_41_Raw - Copy.jpg
    WP_20180818_16_42_41_Raw - Copy.jpg
    1.1 MB · Views: 57
  • WP_20180818_16_46_12_Raw - Copy.jpg
    WP_20180818_16_46_12_Raw - Copy.jpg
    1.7 MB · Views: 56
 

Tractor & Equipment Auctions

ALL TITLED ITEMS HAVE A $35 TITLE FEE!!! (A50774)
ALL TITLED ITEMS...
2008 Ford F-350 4x4 Crew Cab Pickup Truck (A50323)
2008 Ford F-350...
2016 KUBOTA RTV-X900 UTV (A51242)
2016 KUBOTA...
2021 CATERPILLAR D3 LGP CRAWLER DOZER (A51242)
2021 CATERPILLAR...
2020 Massey Ferguson 1840 Small Square Baler - High-Performance Hay Baler (A52128)
2020 Massey...
SELLICK S80J4E-2PS ROUGH TERRAIN FORKLIFT (A51242)
SELLICK S80J4E-2PS...
 
Top