40x60x14 Shop

   / 40x60x14 Shop #41  

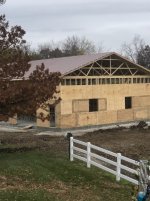
Your crew was doing so well with everything, it's kind of shocking to see what they did with your sheeting. The sheeting is what keeps the walls for racking, and gives your studs the ability to stand up and remain straight. Once it's installed, then you can remove your bracing because the sheeting holds the building together. To get the most strength, you want to have full sheets in the corners, top and bottom. And most importantly, you want your sheets to tie all your headers together with your walls. You NEVER want to cut your sheeting into squares to fit around the doors and windows. You cut the sheeting into an L shape so that it holds the wall studs together with the headers to lock that weak spot in your wall together. With your large door openings, this is really important.

If this was my building, I would have them remove that top little square of plywood that looks like a filler piece and have them install a full sheet in the top corner. Then cut out the opening for the door. I personally attach my sheeting first, then use a sawzall to cut out the windows and doors from the inside so I have a perfect fit. In the area between the garage doors, I would want the sheeting too look like the letter T when it's installed.

What type of nails are they using to install the sheeting? How long? Once I see something odd, I question everything. Is somebody different then your framing crew installing your sheeting?
 
   / 40x60x14 Shop
  • Thread Starter
#42  
Your crew was doing so well with everything, it's kind of shocking to see what they did with your sheeting. The sheeting is what keeps the walls for racking, and gives your studs the ability to stand up and remain straight. Once it's installed, then you can remove your bracing because the sheeting holds the building together. To get the most strength, you want to have full sheets in the corners, top and bottom. And most importantly, you want your sheets to tie all your headers together with your walls. You NEVER want to cut your sheeting into squares to fit around the doors and windows. You cut the sheeting into an L shape so that it holds the wall studs together with the headers to lock that weak spot in your wall together. With your large door openings, this is really important.

If this was my building, I would have them remove that top little square of plywood that looks like a filler piece and have them install a full sheet in the top corner. Then cut out the opening for the door. I personally attach my sheeting first, then use a sawzall to cut out the windows and doors from the inside so I have a perfect fit. In the area between the garage doors, I would want the sheeting too look like the letter T when it's installed.

What type of nails are they using to install the sheeting? How long? Once I see something odd, I question everything. Is somebody different then your framing crew installing your sheeting?

Thanks for your input Eddie! I am not a builder, nor do I know anything about building, so I wouldn't know to question any of the processes as they build. It all looks like progress to me. Same crew doing all the work on the building. As far as the size of the nail, and length I'm at a loss as well. I would say it was 2-3" long, but I have no idea the size just because I'm not familiar with it. If Richard sees this thread he may be able to comment better than I can. He was over Sunday evening and pointed out a couple that they had missed on when nailing the sheeting.
 
   / 40x60x14 Shop #43  
As to the nail size, my main concern was if they where using framing nails or roofing nails. Framing nails two inches long are fine. Roofing nails should never be used, but seem to be used all the time for sheeting. Another thing about nailing, on a 4x8 full sheet, you nail ever six inches on the edge and every foot on the interior.
 
   / 40x60x14 Shop #44  
They used nail guns. I'm guessing 2 1/2" x .131". They missed more often than I liked.

The way they cut the sheeting surprised me too. Ed is considered a quality builder. I've saw several of his finished builds. This is the first time I've been able to follow him step by step.

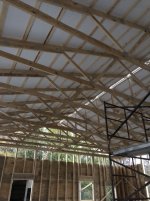
They did all the truss work by hand. Fabricated a scaffold system with walkway the length of the building and stacked the trusses in four stacks laying across this scaffolding. Then put them in place by hand and added purlins. Took them two days. I was surprised they didn't use a Skytrak or se equivalent.

I took some more Drone pics this morning. Visited with Ed briefly. I don't know him well enough to ask questions. Afraid he'd think I was being critical. When actually I'd be trying to educate myself. Every time my builders took a break or stopped for lunch I asked about the things I didn't understand. I learned a LOT about professional building conctruction.

My guys over delivered all the dimensional lumber. Critically inspected each piece and sent back the rejects. They rejected 54 2x6x14 studs. Ordered a brick of 2x4x16 purlins. Sent half back.

I don't know Ed's method of purchase or where the materials are coming from. He might not have that luxury. I don't see a stack of rejects onsite. I saw several studs in place that could have been rejected.

As Eddie pointed out, these things will impact the structural strength of the building to a certain degree. Whether that impact will ever be noticed is beyond my pay grade to determine.

I'm certainly not condemning what I see. I think it will be a very nice shop. I'm just curious about things I see.
 
   / 40x60x14 Shop #45  
They are framing nails Eddie. I didn't check frequency.
 
   / 40x60x14 Shop
  • Thread Starter
#46  
Had to make a parts delivery so a ran by the house to check progress. Definitely framing nails, and looks like they put them every six inches around the perimeter of the sheet, and every foot on the interior. I didn’t get s good visual on it, but they have tin on the north side of the roof! Maybe if the rain holds off this afternoon they’ll get the south side done.
 
   / 40x60x14 Shop #47  
They were drillin tin when I was there. It's misting up here now. My guys are scurrying layin pex and steel so my house pad is ready for pour tomorrow.
 
   / 40x60x14 Shop
  • Thread Starter
#48  
Got a roof on just in time for it to start raining a bit this eve.

IMG_2055.JPG
IMG_2056.JPG
 
Last edited:
   / 40x60x14 Shop #49  
Congrats on the build! Always exciting to see new barns go up.

I was interested to hear the requirement for nails every 6" on the edges and 12" on the interior (of sheathing...). I've never heard that before but I guess there's rules for everything!

My dream is to build a 60x100 barn, though I don't have the money or, truly, the "need" at this point. Maybe when I win the lotto and/or retire...

Always nice to have a trusted friend around like Richard who can assist!
 
   / 40x60x14 Shop
  • Thread Starter
#50  
Congrats on the build! Always exciting to see new barns go up.

I was interested to hear the requirement for nails every 6" on the edges and 12" on the interior (of sheathing...). I've never heard that before but I guess there's rules for everything!

My dream is to build a 60x100 barn, though I don't have the money or, truly, the "need" at this point. Maybe when I win the lotto and/or retire...

Always nice to have a trusted friend around like Richard who can assist!

Thanks! I'm so excited to finally have one being built.
 

Tractor & Equipment Auctions

(1) 12ft Tarter Gate (A51573)
(1) 12ft Tarter...
2016 INTERNATIONAL 4300 24FT BOX TRUCK (A52577)
2016 INTERNATIONAL...
(4) 3 PLUG VALVES (A52472)
(4) 3 PLUG VALVES...
2016 Hino 195h Truck, VIN # JHHSPM2H9GK001609 (A51572)
2016 Hino 195h...
2007 International 4300 Box Truck, VIN # 1HTMMAAL27H513415 (A51572)
2007 International...
2015 Dodge 5500 4X4 Bucket Truck (A52748)
2015 Dodge 5500...
 
Top